Classic replica air pistol review: The Hy-Score Air Pistol

When automotive engineer Andrew Lawrence was commissioned in 1940 to design an air pistol that would be powerful, accurate, inexpensive to manufacture and would replicate the balance and handling of a firearm, he came up with an innovative design that resembled both the Colt Woodsman and the Luger. However, wartime shortages meant that the result of his work, the Hy-Score air pistol, didn’t finally appear for sale until 1946. These spring powered air pistols proved to be reliable and well made and they became enormously popular and many hundreds of thousands were produced until new safety rules in the US led to the end of production in 1968.

Relatively recently, people have started to appreciate just how innovative and well-made the Hy-Score was and these pistols are starting to become sought-after collector’s items. But, what’s the story behind the Hy-Score and would you really want to add one of these to your replica collection?

Development

Entrepreneur Steven E. Lazlo started the S.E. Laszlo House of Imports of Brooklyn, NY in 1933. His plan was to create an American company through which he could import and market some of the best products from Europe. He was very successful in this and quickly began to import large numbers of airguns, telescopes, binoculars, lenses and other items. The market for European airguns in pre-war America was particularly strong with the imported products (especially those from Germany and the UK) being regarded as being of higher quality than home-grown American airguns. It didn’t take Lazlo long to realise that there would be a ready market for an American manufactured airgun which was made to the same quality standard as the guns he was importing.

In 1940 he approached his brother, Andrew Lawrence (Andrew had anglicised his surname to the more American sounding Lawrence in 1939) with a design brief for a spring powered air pistol which included seven main requirements:

  1. Ease of cocking.
  2. Minimum muzzle velocity of 300fps (for .22” version) and 400 fps (for .177” version).
  3. Elimination of parts needing frequent replacements such as leather seals, etc.
  4. Trigger pull not to exceed 3½ pounds and to be short and crisp.
  5. Barrel to be rifled for accuracy.
  6. Appearance and balance to approximate as closely as possible that of a standard firearm.
  7. Low manufacturing cost by use of stampings, automatic screw machine parts and plastics.

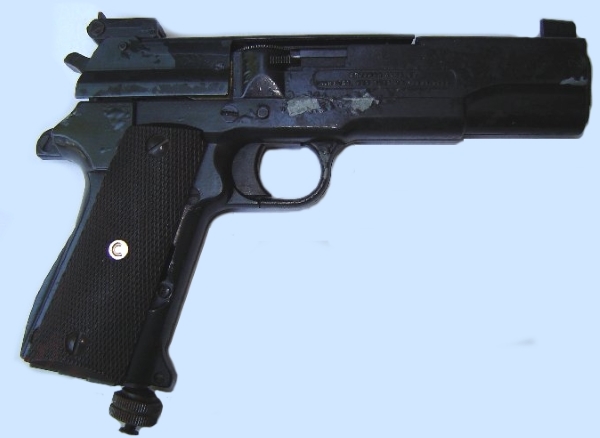
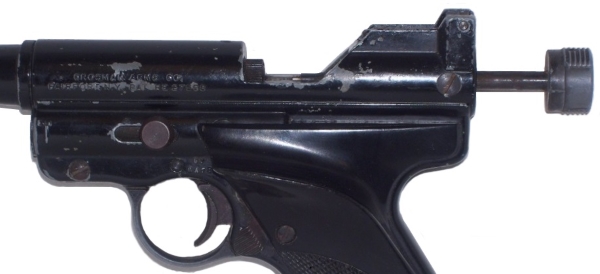
Andrew, a talented automotive design engineer, began his design study by looking at some of the imported air pistols that Steven Lazlo was selling in order to assess their designs. He examined two German Air pistols, a Haenel and a Diana, as well as a Swedish Zenit and a British Webley. All were spring powered designs with various methods of cocking. However, after considering the relative merits of each, Andrew produced a design for something very different, a concentric piston design where the air piston fits round the outside of the barrel. This allows the main spring and barrel to be long (increasing power) but because these are concentric, it also keeps the overall length of the pistol short. This wasn’t the first time that this design had been used for an air pistol – the British Westley Richards and Abas-Major air pistols for example had used a similar overall design. However, this was the first time that an attempt had been made to combine this design with modern production methods to produce an air pistol constructed using pressed steel to ensure that it looked and handled like a firearm.

The unusual design of the Hy-Score was mentioned a lot in early advertising.

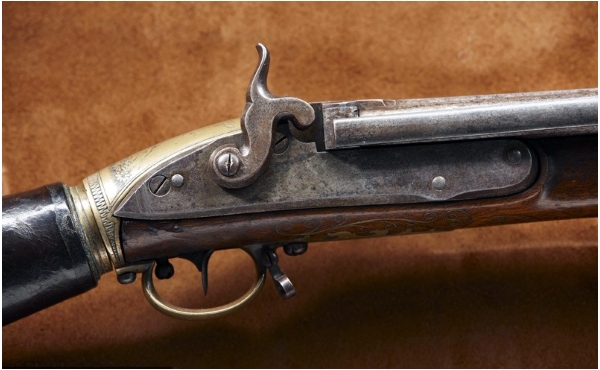
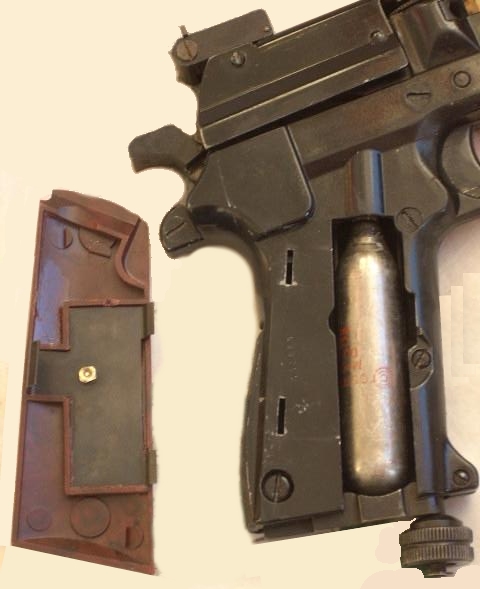
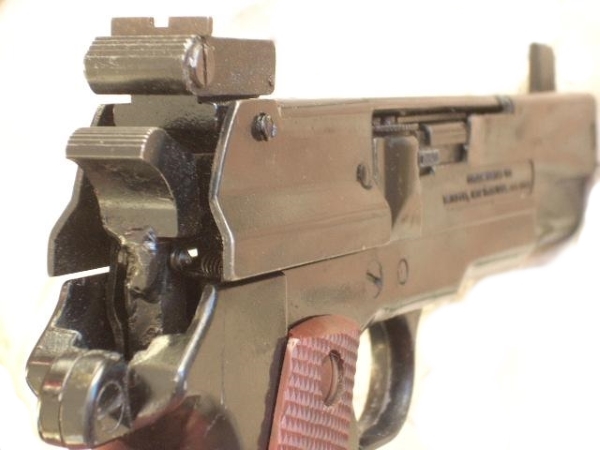
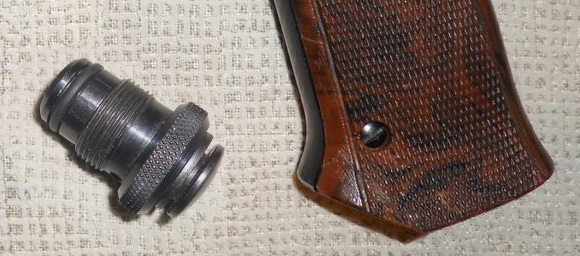
Lawrence also included other innovative ideas in his design. For example, most contemporary air pistols used leather for seals, but this tended to dry out and required frequent lubrication to keep it working efficiently. Instead, steel piston seals were to be used on the new design (though, in the event, these proved to be too brittle to withstand the forces in an airgun compression chamber and these were fairly quickly replaced with neoprene O rings). The grips were to be made of Tenite, a new plastic material developed by the General Electric Company which was hoped to be both strong and durable. The grip design incorporated the insertion of two large steel slugs to ensure that the completed pistol had good balance. The trigger design was also novel – to avoid the full weight of the mainspring bearing on the sear (which would have increased pull weight), Lawrence designed what he called a “servo mechanism” which knocked the sear free as the trigger was pulled, giving a much lighter trigger action. There was also a “dry fire/practice” facility which allowed the trigger to operate without the pistol being fully cocked, so that shooters could get used to the trigger pull. Even the loading gate used a unique and clever “camera shutter” mechanism that ensured effective sealing while being reliable and simple in use. Cocking was achieved by lifting the compression cylinder, breech and barrel from the rear and rotating this assembly round a pivot pin in front of the trigger guard.

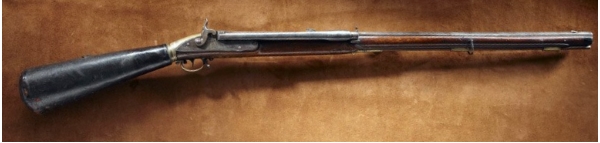
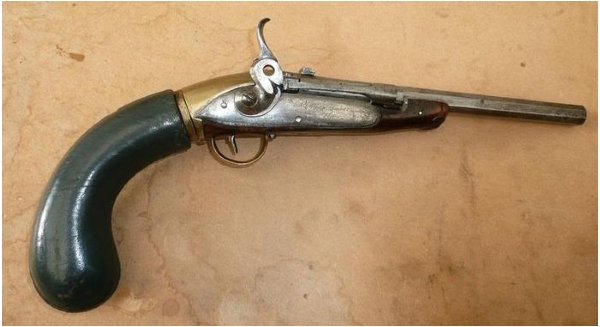
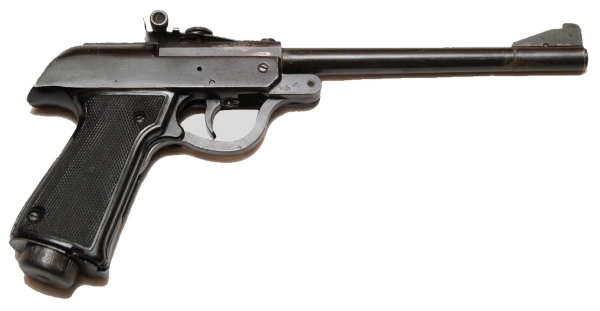
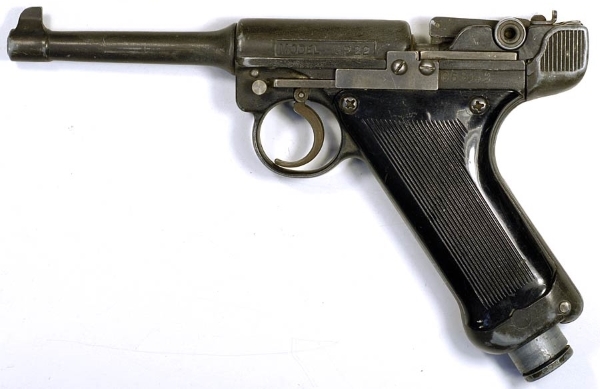
The completed air pistol certainly looked like nothing else on the market. In contrast to most other contemporary air pistols, with its blued finish and chunky looks, it did look and handle like a firearm, most notably like the iconic German Luger even if it wasn’t intended to be a direct replica of that pistol (though later Hy-Score advertising proudly claimed “the accuracy of an air rifle with the looks and handling of a Luger”). By around 1942, the design was ready to go into production, but by that time America was involved in World War Two and the US War Production Board cut off the supply of raw material to all production that was not considered essential for the war effort, including the manufacturing of air pistols.

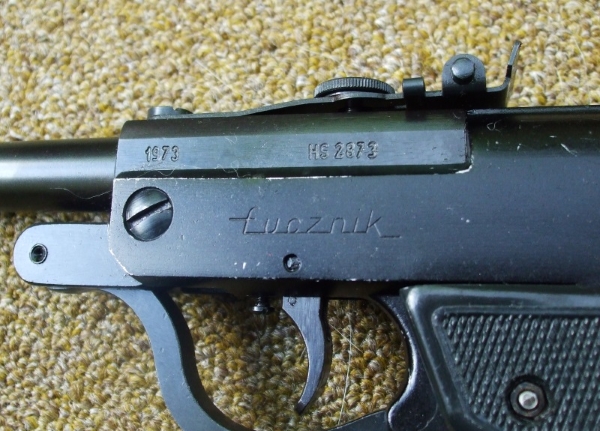
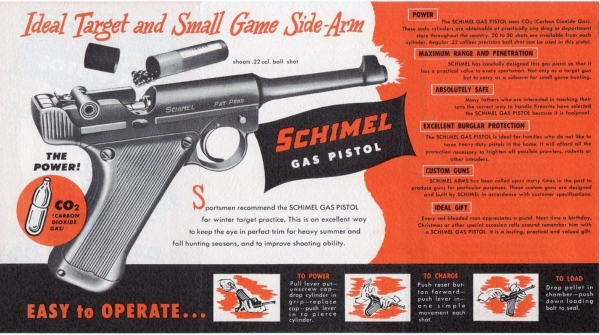
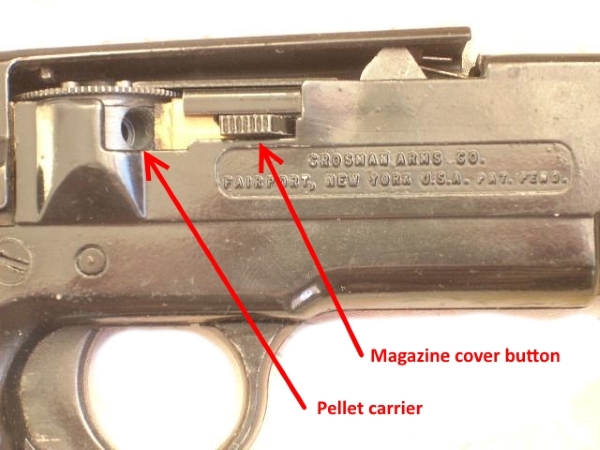
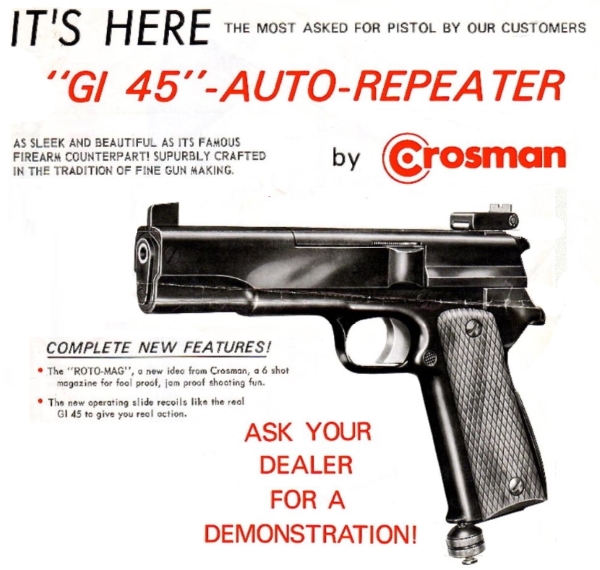
For this reason, it wasn’t until 1946 that Steven Lazlo was finally able to begin advertising what had been named the Hy-Score Target Model Air Pistol through the newly created Hy-Score Arms Corporation. The first models (no model numbers were initially assigned) were single shot only and offered in both .177’ and .22” calibre, but it wasn’t long before Andrew Lawrence began refining the design to produce a multi-shot version. This used a magazine on the end of the pistol which incorporated six pellet chambers. When the user turned the breech cap, one of the chambers would line up with the breech, dropping a pellet into position.

Production

1949 advertising for the Hy-Score from Popular Mechanics Magazine. “Looks and feels like a Luger. Revolutionary mechanism blasts pellets at close-to-firearm speed!”

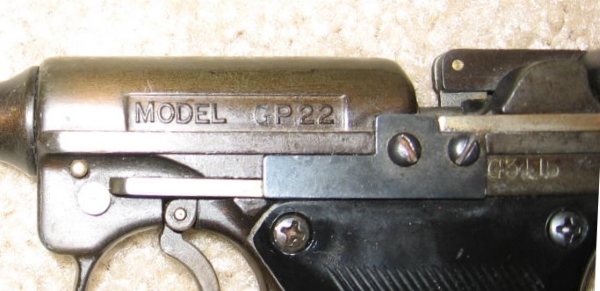
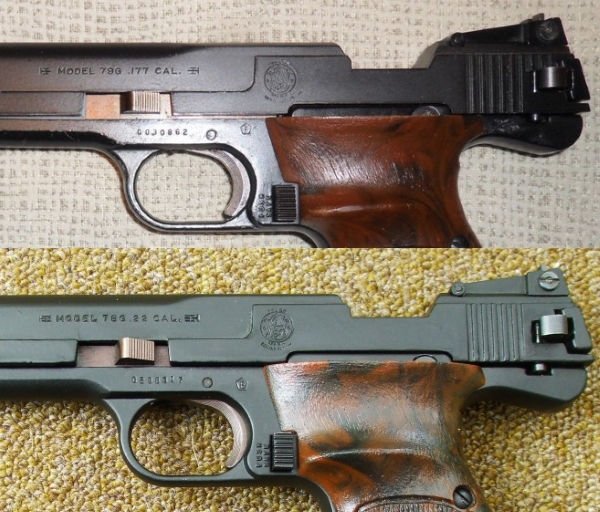
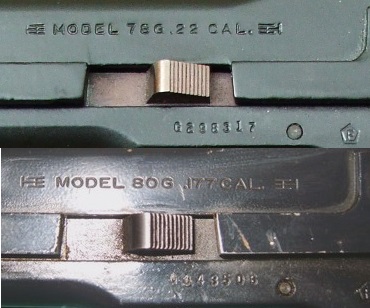
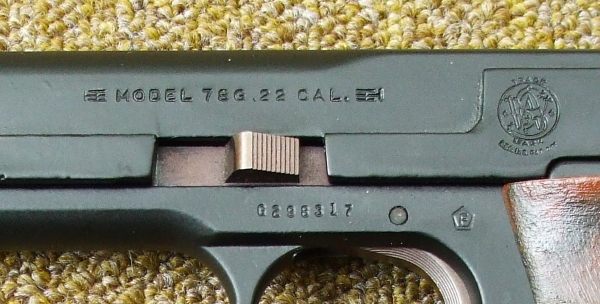
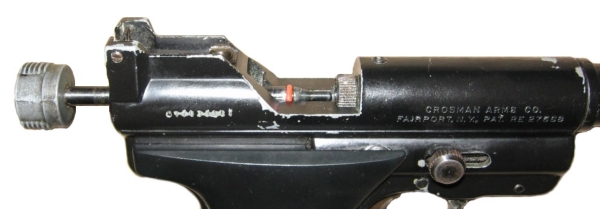
Production of the first Hy-Score Target Model began in 1946 and this air pistol immediately proved to be powerful and reliable and became popular with air pistol enthusiasts across America. From 1948 onwards, single shot Hy-Score pistols were provided with a longer barrel and a revised rear sight and were designated as the Model 800 (the earlier models were then referred to as the Model 700). The Model 800s also used revised production methods so that they required less final machining, though some people feel that the extremely high quality of the first models was reduced with the Model 800. When the repeating version was introduced, this was designated the Model 802. And if you’re wondering, the Model Number 801 was given to a Hy-Score, break-barrel air rifle.

Advertising for the Model 802 repeater, also from 1949

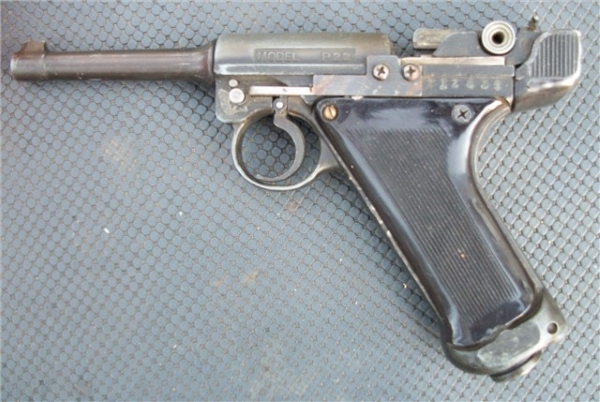
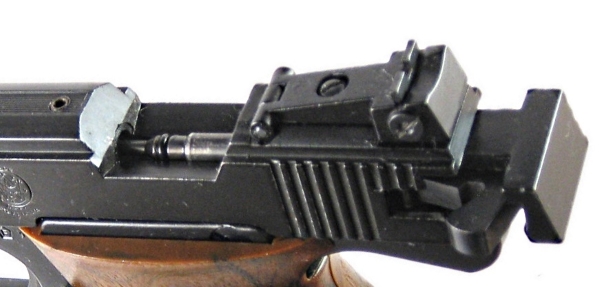
The original Model 700 had incorporated a relatively short barrel with an extended outer barrel shroud. In 1952, the Hy-Score company began to produce the “Sportster” and “Shorty” Models 803 and 804 (the 803 Sportster was a single shot version, the 804 Shorty was a repeater). These used the short barrel of the original Model 700 with a shorter outer barrel. These models were often sold with interchangeable .177” and .22” rifled barrels and a smoothbore barrel for BB shooting. However, these short-barrelled versions were less powerful and less accurate than the longer barrelled 800 and 802, and proved to be less popular. Confusingly, there was also a Hy-Score 805 Pocket Model (despite the fact that Hy-Score already had a Model 805 in their range – a licensed version of a break-barrel Diana air rifle). It appears that the Model 805 is basically a .177” calibre Model 803 with a fixed, non-interchangeable barrel though these appear to be very rare. By the end of 1954, production of all short barrelled versions had ended and only the Model 800 and 802 remained in production.

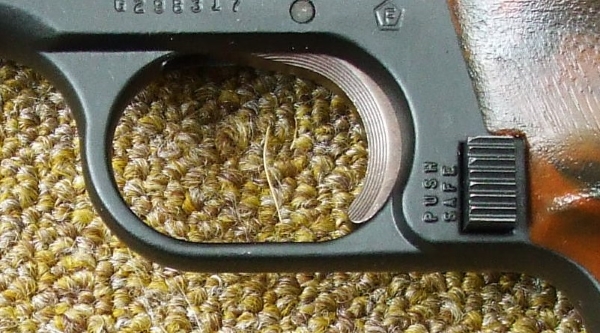
Many hundreds of thousands of Hy-Score pistols were produced in America between 1946 and 1968, when all production ended. Most were Model 800 or 802. Production ended mainly because the Hy-Score was not provided with any form of manual safety and Andrew Lawrence believed that the trigger design of the Hy-Score would make it difficult to incorporate such a device without a major re-design. Increasingly strict safety laws in the 1960s in America meant that there was a limited future for any air pistol which didn’t have a manual safety and so the decision was made to end production. The Model 802 ceased production first and for a time, only the Model 800 continued. Then this too ended in 1968 and Steven Lazlo went back to selling imported air guns (though Hy-Score continued to sell accumulated stocks of the Model 800 up to 1970).

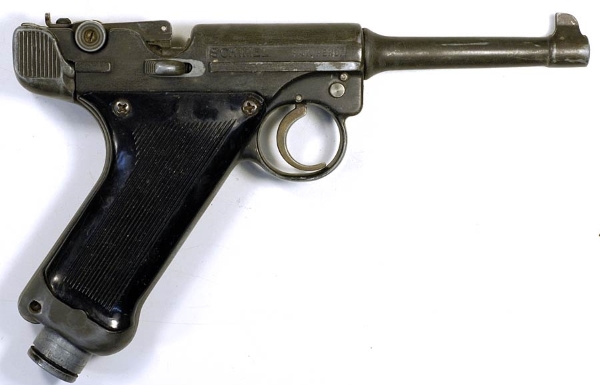
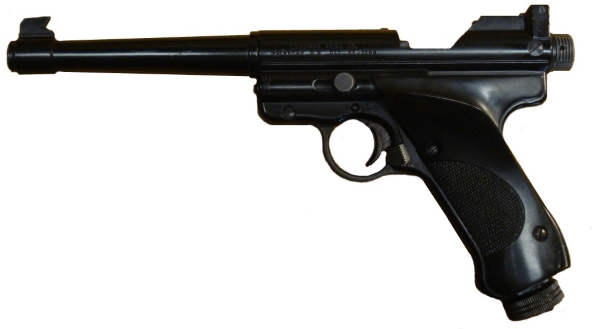
The Hy-Score company went into liquidation in 1981 following the death of Steven Lazio in 1980, but that wasn’t quite the end of Hy-Score production. In 1989 a British businessman, Richard Marriot-Smith, bought not only the rights to manufacture the Hy-Score but many of the machine tools and jigs required. These were shipped to Kent in England and the Phoenix Arms Corporation was set up to manufacture and sell a slightly revised version of the Model 800. This incorporated an improved rear sight which was adjustable for elevation, a thicker, heavier machined front end and a barrel that was approximately 8” long and recessed about ½ from the muzzle for a threaded section which was used to mount a silencer. The Phoenix Hy-Score also had a revised body which incorporated milled grooves to allow the fitment of a telescopic or laser sight. Sold as the Hy-Score Sporter, these air pistols were supplied with interchangeable .177” and .22” barrels and an optional silencer. Initially, only a single shot version was produced but, in September 1990, a repeater version was introduced which was based on the Model 802. At around the same time, a new, fully adjustable plastic rear sight was added and versions with this feature are generally referred to as “Mark II” models, though otherwise they are identical to the first models. Sporters were supplied either in blued finish with brown plastic grips or in chrome finish with white or grey grips. However, the Hy-Score Sporter still lacked a manual safety which meant that it couldn’t be sold in many markets. Limited opportunities for sales meant that by 1991, all production of the Phoenix Hy-Score pistol had ended.

The American Hy-Score was confidently advertised in the 1940s as “the world’s most powerful air pistol.” By the time that the Phoenix Hy-Score Sporter was advertised in 1989, it had been downgraded to “one of the world’s most powerful air pistols’”

Design

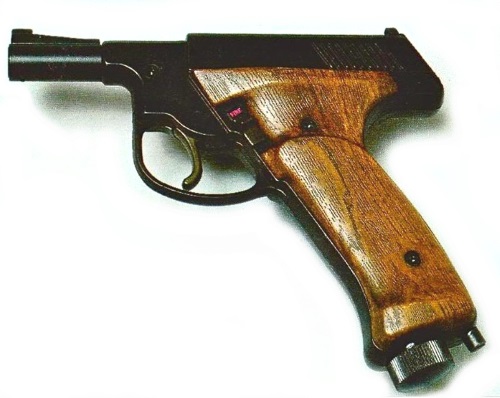
The basic design of the Hy-Score didn’t really change much from the first version produced in 1946. On the very first versions, the rifled barrel was actually only 7¾” long, but this was hidden by using a longer, drawn steel outer shroud. From 1948 onwards, Model 800 and 802 Hy–Scores had a longer, 10¼” rifled barrel which was virtually as long as the outer shroud. From the time that these models were introduced until production ended twenty years later, their design remained almost unchanged. The Sportster and Shorty and Pocket Model versions (Models 803, 804 and 805) introduced in 1952 used the 7¾” barrel from the original models with a shorter outer barrel.
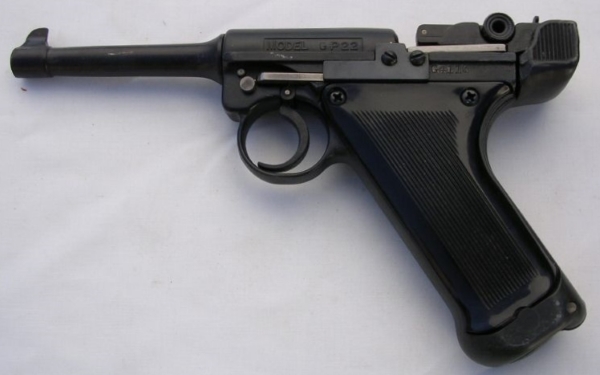
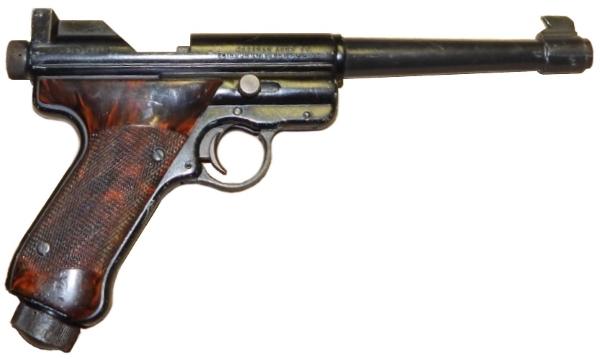
Model 803 Sportster

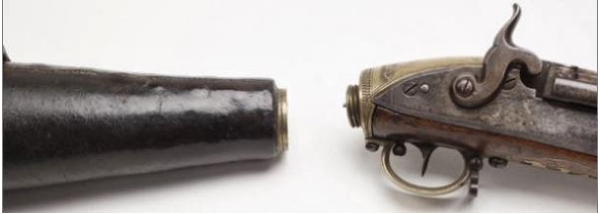
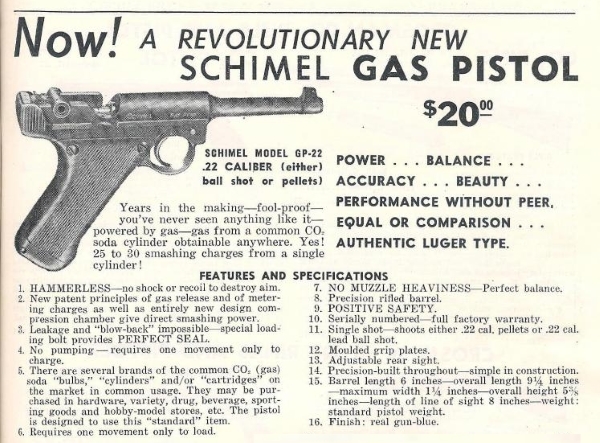
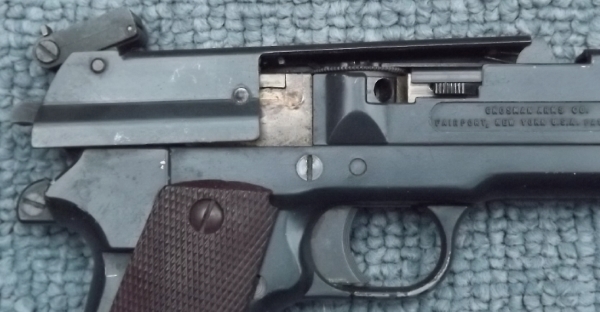
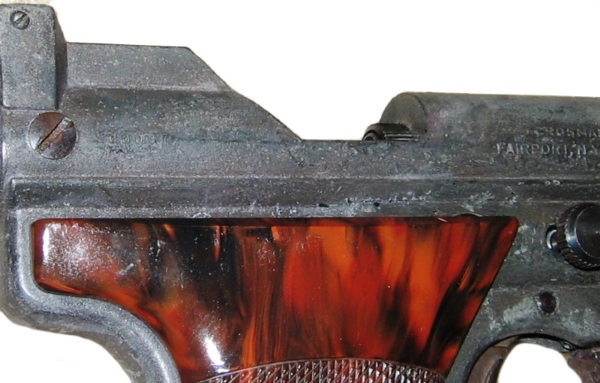
The frames on all versions of the Hy-Score are made from pressed steel which means that they can be blued, unlike more modern replicas which are made from zinc alloy. Likewise the body tube which is made from drawn steel. And that, in most cases, is what you get on the Hy-Score – a durable, hard wearing, glossy blue/black finish that lasts approximately forever. The newest Hy-Scores (other than the Phoenix versions) were made almost fifty years ago, but most seem to have retained their finish well. The same goes for the Tenite plastic used for the grips. Unlike the material used, for example, on the grips for the Schimel which was produced around the same time, the grips on the Hy-Score seem to resist cracking and shrinkage very well. Some Hy-Scores were also produced with a rather nice chromed finish and white plastic grips, and this too lasts well.

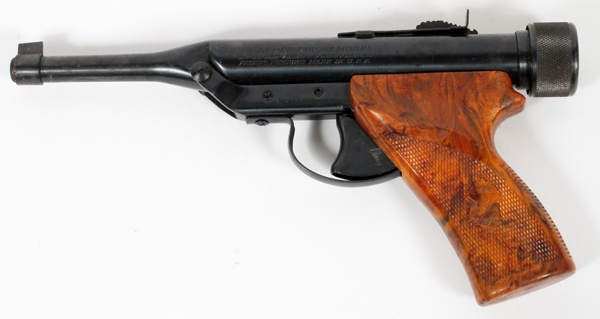
When the Phoenix Arms Company re-launched the Hy-Score in 1989, there were a number of differences. The rear sight was improved and in the Mark II version replaced with a more robust and fully adjustable plastic “field sight”. The inner rifled barrel was shortened (compared to the Model 800 and 802) and the barrel shroud was threaded for an optional silencer which was claimed both to reduce noise and to act as a cocking aid. The barrel shroud itself and the front of the frame were redesigned and machined rather than pressed to give a much more chunky look. However, in terms of mechanical function and operation, the Phoenix Hy-Scores are identical to the US models.

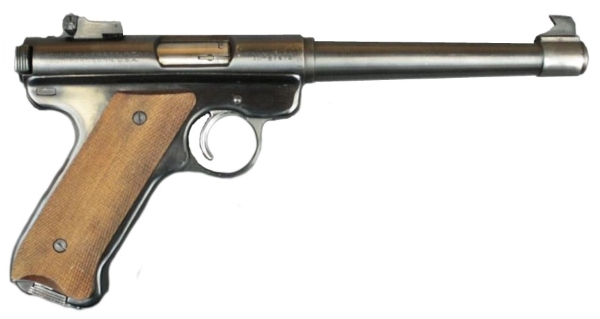
Phoenix Hy-Score Sporter Mark II

Shooting the Hy-Score

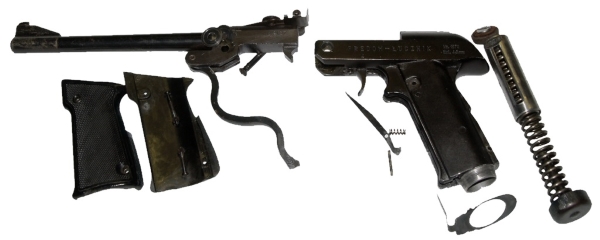
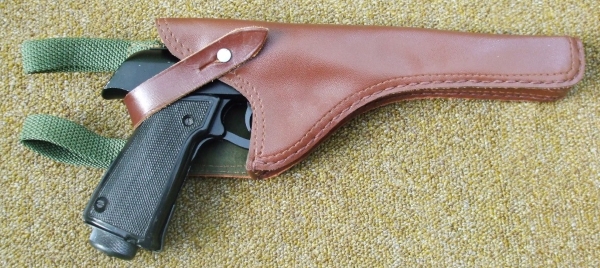
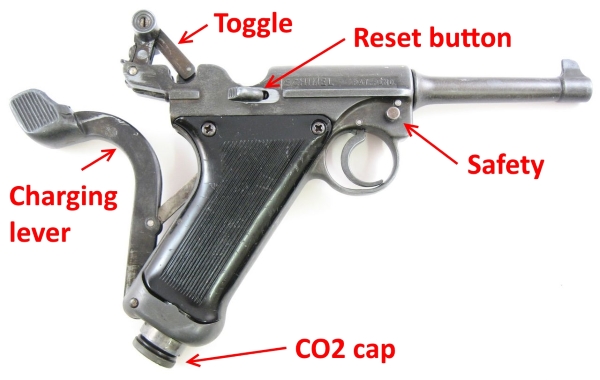
To prepare any Hy-Score for shooting, you must first cock the gun and compress the mainspring. To do this, the latch on the right side of the frame, above the trigger guard, must be pushed forward to release the upper part of the pistol. Then, the whole upper body is pivoted forward around a pin in front of the trigger guard. A link in the frame drags the piston forward and compresses the mainspring until it catches on the sear with an audible “click.” The upper body is then pivoted back until it latches closed. With the pistol cocked, you do have to very careful about avoiding accidental discharge given the lack of any form of manual safety. It’s also said that striking any Hy-Score model at the rear of the receiver even fairly gently or dropping it will cause the pistol to fire so some caution is required when handling a cocked Hy-Score.

To load a pellet (in the single shot version) the pistol must be pointed down and then the knurled breech cap is turned anti-clockwise to open the central breech shutter. A pellet is then dropped into the opening in the end cap, point down. The end cap is then turned clockwise to allow the pellet to drop into the breech and tightened to seal the breech. In the repeater, the process is similar, other than that up to six pellets can be loaded into the breech cap which is then rotated, with the pistol pointing down, to load a single pellet into the breech for firing.

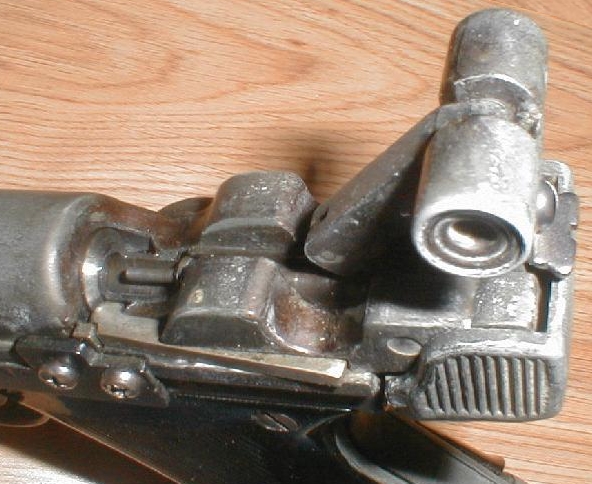
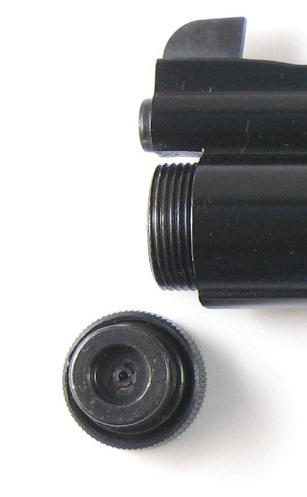
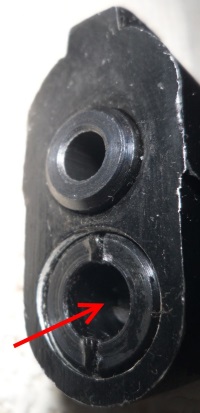
There is just a single opening in the centre of the breech cap on single-shot models

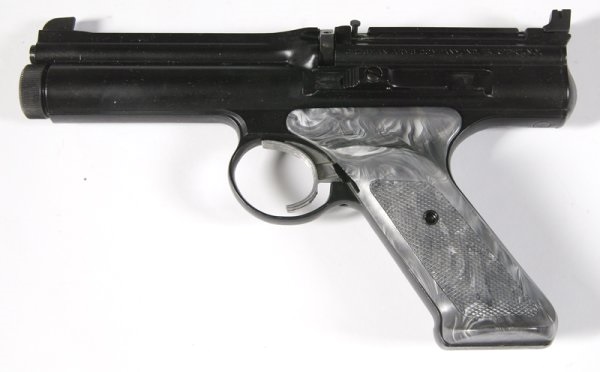
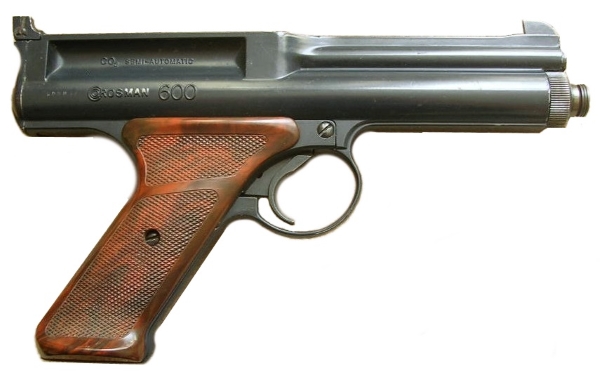
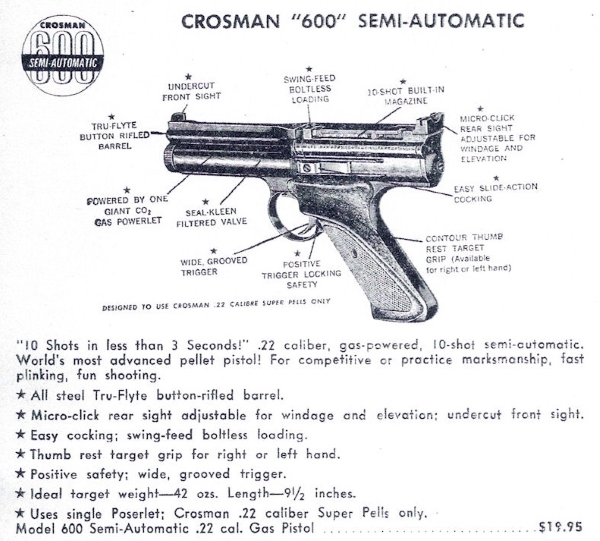
Incidentally, don’t be fooled by the “Repeater” tag – the Hy-Score Models 802 and 804 aren’t like, for example, the Crosman Model 600 which will fling a stream of pellets downrange as quickly as you can pull the trigger. The loading process on the repeaters is finicky, they seem choosy about pellet type and of course they must still be cocked for each shot. In fact, many people seem to prefer the simplicity of the single shot models which, they claim, can be shot just as quickly as the repeaters.

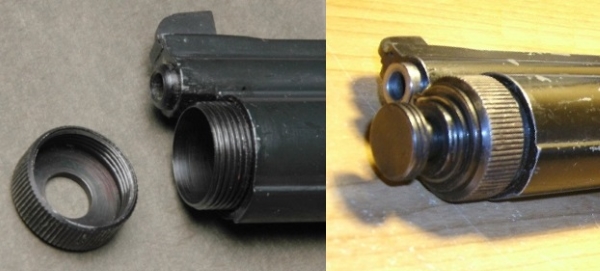
The breech cap on the repeater is a much more complex design

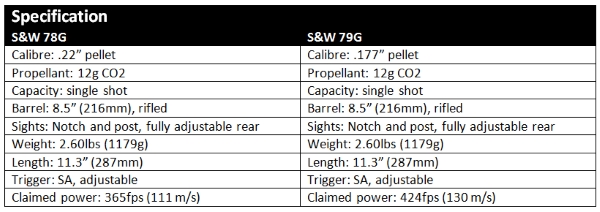
With the Hy-Score cocked and with a pellet loaded, you’re ready to fire. And it seems that there is a great deal of disagreement about this part of the Hy-Score experience. Andrew Laurence claimed that the Hy-Score was designed and tested to give groups of 1” or less at a range of 30ft using standard pellets, but that improved accuracy could be obtained by using competition grade pellets. Some owners agree, claiming that the Hy-Score is very accurate. Others claim that groups of 2½” or more at 30 feet are much more likely. Lawrence also claimed around 300fps for the .22” version and 400fps for the .177” version and most tests of longer barrelled versions do seem to agree with these power figures. In general, the Model 800 and 802 with their longer barrels are more powerful and accurate than the Models 803, 804 and 805. Most reports suggest that the Phoenix Hy-Scores are just as powerful and accurate as the 800 and 802 and some accounts even suggest that it was necessary to reduce power on these versions to meet UK power limits.

There seem to be two issues affecting accuracy with the Hy-Score (assuming that the pistol and barrel are in good condition). First is the trigger action – it’s long and creepy with a vague release point. Presumably this is a result of the servo mechanism, but it’s certainly much less crisp and light than many other contemporary classic air pistols. The second issue is the action of the air piston. This slams to the rear when the trigger is pulled and results in a forward reaction in the spring housing, causing the muzzle to dip down just as the pellet is being fired. The sights are designed to compensate for this (the barrel actually points well above the point of aim), but the amount of dip depends on your grip and stance – some people find that it works well, others that the point of impact is well above or well below the point of aim.

The Hy-Score is a fairly hefty air pistol, weighing around 2.2 pounds (1000g), but it is nicely balanced and the grips suit right and left handers. It’s pleasant to shoot, but, if you’re thinking about buying one of these, you may want to try it first. Some people report very good accuracy, some people report average accuracy at best. There are certainly bound to be variations between individual examples of any elderly air pistol, but this one seems also to depend on shooting technique. If possible, try before you buy.

Buying a Hy-Score

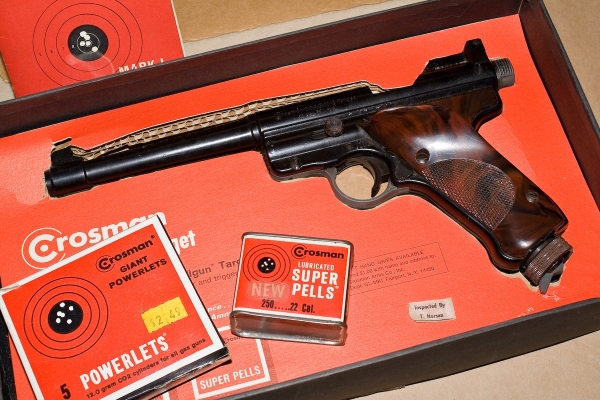
If you decide that you do want to buy a Hy-Score, the good news is that there are lots about and this generally seems to be a well made, well finished and reliable air pistol. If you compare it to, for example, the Schimel, another Luger lookalike launched at about the same time, the materials used on the Hy-Score appear to be of much better quality and it’s relatively easy to find a Hy-Score in good condition. The bad news is that this pistol is now becoming recognised as a classic and prices for good examples have risen dramatically in recent years. Highest prices seem to be for the very first Model 700s, especially those which come in their original boxes. The Shorty, Sportster and Pocket Models also command high prices because of their relative scarcity with the chromed versions being most sought-after. Cheapest currently seem to be the Model 800 and 802, but then these are probably the most powerful and accurate of the US Hy-Scores so they’re ideal if you want a replica you can shoot as well as admire.

In reliability terms, the only real problem is the relatively fragile rear sight fitted to all US Hy-Scores. On many examples this breaks off and finding a replacement may not be easy. Other than this, and the need to replace the neoprene O ring piston seal now and again, there is very little that seems to go wrong with Hy-Scores. Finish seems to last very well indeed, the Tenite grips don’t seem prone to shrinking or cracking and there don’t appear to be any inherent mechanical weaknesses.

The Phoenix Hy-Score Sporter was often sold as a kit which included two barrels (in .177” and .22” calibres) and a silencer in a foam lined hard case

The British-made Phoenix Hy-Scores seem to be, if anything, even better made than the US versions. The rear sight is certainly much more robust on the Sporter Mark II and the quality of pressing and machining is very good indeed. The main problem is that relatively few Phoenix Hy-Scores were made in a period of not much over one year of production, so finding one of these won’t be easy and will likely cost you as much if not more than a US made Hy-Score.

Conclusion

The Hy-Score represents innovative design coupled with very high standards of production and finish from the Golden Era of American air pistols. It may not be capable of the sort of pinpoint accuracy that some other contemporary replicas provide, but it’s a robust and reliable air pistol that just seems to go on shooting without problems for year after year. If you want a classic replica which you can shoot without worrying about whether it’s going to break (I’m looking at you, Crosman 451!), you are probably going to want one of these in your collection. Just don’t wait too long – the way that interest in the Hy-Score is increasing, it’s going to get harder and harder to find a pristine example for reasonable money.

Related Pages

Crosman Mark I/II

Crosman Model 600

Crosman 451

The Schimel

Classic Replica Reviews

Home

Links

Short article from 2006 about the Hy-Score on the Pyramyd Air Blog site

The Hy-Score on Trev’s Airgun Scrapbook

Hy-Score disassembly guide

Classic Air Guns: The Girandoni repeating air rifle

gir11

In the late 1700s, all the major armies of the world armed their infantry with inaccurate, muzzle-loading muskets. Just like modern BB shooters, the lead balls fired by muskets didn’t fit tightly within the smoothbore barrel (for example, the British Brown Bess musket fired a .67” ball through a .75” bore). Just as in a BB shooter, the musket ball could bounce erratically as it travelled down the bore (and, unlike BBs, musket balls weren’t always perfectly round). Contemporary tests showed that, in ideal conditions, a soldier shooting a musket from a range of 80 yards could be expected to hit a target 10 feet long and six feet high just 50% of the time. In combat, this hit rate might reduce to around 10%. During the Peninsular War (1807 – 1814), British troops were estimated to have fired more than 450 musket balls for each French soldier killed in combat.

Most of the muskets used in the Eighteenth Century were so inaccurate that they didn’t even have sights. Not that sights would have helped anyway because after a couple of shots, the black powder used in muskets produced clouds of choking smoke which obscured the target. The rate of fire wasn’t great either as a trained soldier could reload and fire a musket just two or three times each minute and depending on the weather, anywhere from 10 -30% of shots were likely to result in a misfire. In general, muskets were grossly inefficient weapons which were only effective when they were fired en-masse at large bodies of opposing troops. The pistols of this period were of even less practical use as they were universally muzzle loading, single shot weapons which were unreliable and inaccurate.

Re-enactors and actors are engulfed in smoke after firing blank shots from their muskets during the filming of "Making of an American Army." (DOD photo by Sgt. 1st Class Raymond Piper)

These re-enactors are using modern replicas of 18th Century muskets. You can see what I mean about the smoke…

Now, let’s suppose for a moment that an army in the late 1700s was somehow able to arm its troops with assault rifles instead of muskets. Imagine powerful weapons, accurate to over 150 yards which produce no blinding smoke, hold up to 22 rounds in a magazine and are capable of firing of all 22 shots almost as quickly as the shooter can pull the trigger. It all sounds a little like science fiction, doesn’t it? And yet this just what did happen around 1790 when the Austrian army equipped some of its troops with a super-secret new repeating rifle. And even more surprising, the weapons involved were PCP air rifles. OK, hands up, this article isn’t about a replica at all, but the development and use of Girandoni guns is such a fascinating piece of air gun history that I think it’s worth talking about.

Development

Relatively little is known about the early life of Bartholomäus Girandoni (his surname is also sometimes given as Girandony or Girardoni) other than that he was born in Cortina dAmpezzo in what is now the Veneto region of Northern Italy. In the 1700s this area was under the control of Austria (it didn’t become part of Italy until 1919) and by the 1770s, Girandoni was living in Vienna. He was an inventor and gunsmith who first attempted to design a repeating musket for military use. When this proved to be as potentially lethal to the shooter as to the target, he switched instead to the design of a repeating air rifle for military use.

gir1

18th Century German hunting air rifle

Air rifles were very popular as hunting weapons in Europe at this time (generally referred to as Windbüchsen in German). Many were extremely powerful and, compared to contemporary black powder weapons, accurate, relatively quiet and unobtrusive. However, few were used as military weapons. The main problem was that, in order to shoot an air rifle in the 1700s, a bulky air reservoir had first to be pumped by hand to achieve sufficient pressure to fire. This was a fairly slow and tiring process. Which was fine if you had a servant or team of servants pumping reservoirs ready for you to take shots at game but not particularly suited for use by a soldier who would have to spend long periods pumping between shots. What was required to make the air rifle a viable military weapon was a system whereby multiple shots could be fired from a single charge of air, and this is what Girandoni began working on sometime around 1779 or 1780.

Early prototypes presumably showed some promise because the Austrian army began a secret project for the procurement of these weapons with which to equip its troops. The fact that it was secret makes it very difficult to be sure when these rifles were first used by Austrian troops, but it would appear that by around 1790 as many as 1,500 Girandoni repeating Windbüchsen may have been in use by Austrian forces.

Design and Operation

gir2

The pressurized air required to power the Girandoni air rifle was stored in a removable, leather covered iron reservoir which also formed the buttstock. The reservoir could be pressurized to around 800psi by using the hand pump with which this weapon was supplied (though it took around 1,500 strokes of the pump to fully pressurize the reservoir). Once fully charged the reservoir would allow around 30 – 40 shots at useful power, though decreasing pressure meant that shots were progressively less powerful – it has been estimated that while initial shots from a charged reservoir had a useful range of over 150 yards, decreasing pressure could drop this to 75 yards for later shots. The Girandoni rifle was 4 ft (1.2 m) long and weighed around 10 lbs (4.5 kg), roughly the same as a contemporary musket.

gir3

The Girandoni fired .464” (11.75 mm) caliber lead balls at around 800 -900fps (that’s about the same power produced by a Colt 1911 firing .45 ACP!) and it was claimed that this air rifle was capable of shooting completely through a 1” pine board at 100 metres. Up to 22 lead balls were stored in a tubular magazine on the right side of the rifle. In order to re-load after firing, the movable loading bar set in the receiver was moved to the right and the rifle pointed upwards, allowing a ball to roll from the base of magazine into a cavity in the loading block. The loading block was then allowed to spring closed to bring the lead ball in line with the breech and the rifle was cocked using the hammer. When the trigger was pulled, the hammer fell, releasing a measured charge of air to propel the lead ball down the 30” rifled barrel. All this could be done in a couple of seconds by a trained soldier, giving a huge advantage in rate of fire compared to a conventional musket.

gir9

The loading bar, shown here in the closed position. Pushing it to the right against the leaf spring allowed a ball from the tubular magazine to roll down into a cavity in the loading bar. Releasing it moved the bar back to the left and placed the ball in the breech.

The video below shows the loading and shooting of a modern reproduction of the Girandoni repeating air rifle.

Each soldier using the Girandoni rifle was issued with a special knapsack containing tools, two spare air reservoirs and two metal tubes containing lead balls (which were basically used as speed loaders which allowed the tubular magazine to be quickly re-filled). The riveted iron reservoir screwed into the rear of the brass receiver and when air pressure dropped, a fresh pre-charged reservoir could be exchanged for the empty one. A leather washer provided sealing between the reservoir and the receiver.

gir5

The leather washer which provided sealing between the reservoir and receiver worked best when it was wet. If it dried out, it could leak.

All of which sounds very impressive and you may be wondering why more troops weren’t using repeating air rifles in the late 1700s and why the Austrians weren’t able to easily defeat their enemies? There are several answers to this. The first is that the Girandoni repeating air rifle had a few problems. Manufacturing technology in the late 1700s meant that the riveted iron air reservoir was far from perfect. In particular, these could explode, especially if they were pumped to capacity in the cool of the evening and then exposed to higher temperatures the following day. The leather washer that sealed the join between the reservoir and the receiver was also prone to leaks, meaning that it was possible to discover that all pressure had been discharged when a soldier came to fire the rifle. The reservoir was also fairly fragile and dropping the rifle on its butt could damage the reservoir and discharge all air pressure. And pressurizing the three reservoirs supplied to each soldier required 4,500 strokes of the hand pump, not a popular chore after a hard days’ campaigning. To ease the need to hand pump reservoirs, mobile pumps mounted on carts were later introduced to charge Girandoni reservoirs. However, these tied the soldiers using these rifles to the vicinity of the pumps which further limited their usefulness..

However, the greatest disincentive to using the Girandoni was that it simply didn’t fit with the strategy and tactics of the period. In the late 1700s, troops tended to face one another at short range and in line formations which provided the greatest chance of achieving the maximum number of hits from a volley of musket fire. Firing from concealment or cover was considered cowardly and underhand and was rarely used as a tactic by large forces. Using the Girandoni rifle also required specialist training, something that was difficult to achieve in a conscript and largely illiterate army. For all these reasons, the Girandoni rifle was only ever used in very limited numbers by the Austrian army.

gir4

A 9mm repeating air pistol from the early 1800s which used the Girandoni system

A number of repeating air pistols using the same operating principles were also produced in the late 1700s/early 1800s. Like the rifle, the repeating pistol used a tubular magazine and a riveted iron reservoir as a grip. Little is known about these repeating pistols other than that they fired a ball of around 9mm diameter and held up to 13 rounds in the tubular magazine – was this the first 9mm semi-auto pistol?

As was common in the early 1800s, copies of rifles and pistols using the Girandoni system were produced by a number of other manufacturers, especially in Vienna. This included Cantarini, another well-known Italian born gunsmith based in Vienna.

Use

The Girandoni repeating air rifle remained in service with the Hapsburg Army until 1815 after which it was abandoned. It seems likely that there were never more than around 1,500 Girandoni rifles in service at any one time (out of a total army of up to 500,000 men). There is continuing debate as to whether the Girandoni rifle was actually used in combat during Austria’s many battles with France during the Napoleonic wars. There is certainly some evidence for this: a message from Austrian General Josef Alvinczy to Emperor Frances II has been discovered, dated December 1796 and which includes a request for “30 pieces Girandoni airguns”. However, given the very limited numbers of these air guns available to Austrian forces, they can hardly have made a major impact if in fact they were ever used against the French.

gir6

A recreation of the knapsack issued to Austrian soldiers using the Girandoni rifle. It contains spare reservoirs, metal speed loaders containing lead balls and a handpump.

One of the most persistent myths about the Girandoni rifle is that Napoleon was so concerned about this weapon that he issued orders that any Austrian soldier captured with a Girandoni rifle should be executed. There seems to be no truth in this at all. There were so few Girandoni rifles in service that they could not possibly have had a major impact during combat between Austrian and French forces and there is no evidence that Napoleon took any interest in this weapon at all.

Very little is known about the use of Girandoni repeating air pistols. Several examples survive and these range from very plain, functional pistols which look as if they may be military issue to extremely ornate examples featuring gilt and engraving which seem to have been commissioned by wealthy individuals.

gir7

Lewis and Clark

Probably the most well-known use of the Girandoni repeating air rifle was when an example was adopted by Captain Meriwether Lewis on his expedition to explore what is now the western USA with his friend, Second Lieutenant William Clark in 1804. The exploration carried out by Lewis and Clark was massively influential in opening the western US to settlers and traders and it would appear that one of the weapons carried on the expedition was a repeating air rifle which sounds very like the Girandoni rifle. There has been an on-going and lively debate about this amongst historians for some time, but there now seems to be some agreement. One of the pieces of evidence was the publication in 1997 of a travel diary written by Thomas Rodney describing a meeting with Captain Lewis on the Ohio River in September 1803 (all spelling is as per the original):

Visited Captain Lewess barge. He shewed us his air gun which fired 22 times at one charge. … when in perfect order she fires 22 times in a minute. All the balls are put at once into a short side barrel and are then droped into the chamber of the gun one at a time by moving a spring; and when the triger is pulled just so much air escapes out of the air bag which forms the britch of the gun as serves for one ball. It is a curious peice of workmanship not easily discribed and therefore I omit attempting it.”

Another member of the expedition, Private Whitehouse noted the use of the airgun in a demonstration for members of the Sioux tribe on August 30, 1804:

“Captain Lewis took his Air Gun and shot her off, and by the Interpreter told them there was medicine in her, and that she could do very great execution. They all stood amazed at the curiosity; Captain Lewis discharged the Air Gun several times, and the Indians ran hastily to see the holes that the Balls had made which was discharged from it. at finding the balls had entered the Tree, they shouted a loud at the sight and the Execution that was done suprized them exceedingly.”

It now seems very likely that a Girandoni air rifle was used by Lewis and that demonstrating its awesome firepower to the Native Americans the expedition encountered may have been a factor in avoiding attacks. The question of how an Austrian secret weapon found its way to the US has never been satisfactorily answered, but most people accept that the Girandoni air rifle now displayed at the NRA museum is most probably the actual weapon used by the expedition.

The video below is a short presentation by the NRA Museum about the Girandoni repeating air rifle.

Owning a Girandoni

There are a number of surviving examples of Girandoni repeating air rifles and pistols including contemporary copies by people like Cantarini of Vienna. Most are held in museums or private collections but these air guns do occasionally turn up at auction. You can expect to pay somewhere north of €20,000 ($22,000) for a Girandoni repeating air pistol in good condition and considerably more for a rifle. Just don’t expect to be able to fire one of these originals unless you really want to find out what happens when you try to pressurise that 200 year old riveted iron reservoir to 800psi…

Several people have produced modern recreations of the Girandoni rifle (many using much safer turned alloy reservoirs instead of riveted iron) but sadly none appear to be available commercially. As far as I am aware, no-one has produced a modern reproduction of a Girandoni repeating pistol. Which seems a great pity. Wouldn’t you just love a CO2 or green gas powered replica of this pistol? I know I would.

gir8

Replicas (or reproductions…) of this pair of Cantarini repeating air pistols based on the Girandoni design would do very nicely, thank you…

Alternatively, you could consider a modern large calibre air rifle. The Career Dragon Slayer by Shinsung for example, is a Chinese made PCP air rifle that shoots a .50” lead bullet. However, it only gets around 5 shots per charge and it produces 190 foot-pounds (260 Joules!) of muzzle energy which unfortunately means that it is illegally powerful in many parts of the world.

If that sounds a bit underpowered, you could always consider the Texan PCP air rifle by US manufacturer AirForce Guns (“Serious guns for serious shooters”). The Texan has been described as a “modern Girandoni” and flings a .45” projectile downrange at up to 1,000fps, producing over 500 foot-pounds (680 Joules) of muzzle energy.

Conclusion

gir13

The Girandoni repeating air rifle was a stunningly advanced military weapon when it appeared in the late 1700s. There is no doubt that an air rifle can make an effective military weapon – during recent conflicts in the Middle-East, 9mm PCP air rifles have been used as sniper weapons. However, the Girandoni was unreliable simply because the concept was too advanced for the metallurgy and technology available at the time. It was also not widely used because it did not fit with the military tactics then in use. It wouldn’t be until almost 80 years later that the Spencer and Henry repeating rifles would produce a viable military repeater which would change the face of modern warfare forever. But a large calibre air gun got there first. Now, if only someone would give us a modern replica of this historic air gun…

Links

Fascinating article on the Girandoni air rifle by Dr Robert Beeman.

Review of the Career Dragon Slayer air rifle on the Pyramyd Air website

Texan PCP air rifle on the AirForce Guns website

Classic air pistol review: Predom Łucznik Wz.1970

OLYMPUS DIGITAL CAMERA

Sometime in the late 1960s, at the Łucznik arms factory in Radom, Poland, an air pistol was designed, allegedly as a training tool for conscripts in Polish military service.  The design was based on the respected Walther LP53 target air pistol and the Łucznik Wz.70 was introduced in 1970.  Actually, “based on” is an understatement – the Wz.70 is a blatant copy of the earlier Walther design.

The Wz.70 is a break-barrel, single shot, .177″ pellet shooter.  Large numbers were produced and these later found their way on to the private market, and so lot’s of examples of this pistol can still be found for sale, many virtually unused and some still in their original packing grease.  They’re fairly cheap too (certainly if compared to prices for Walther LP53s), but the question is: do you really want a forty year old Eastern European air pistol?

One issue is what to call this pistol.  I have seen it identified as the “VS70”, the “WS70” and the “VS. 1970”.  The only marking on the example I owned (apart from a serial number and date of manufacture) was “Łucznik”.  However, later models carry the identification: Wz.1970.  So, I’m going to go with “Predom Łucznik Wz.1970“.  If anyone knows better, I’d like to hear about it.

Background

In 1925 Fabryka Broni Radom (Radom Weapons Factory) was founded in the city of Radom in central Poland to produce weapons for the Polish Army. Output from the factory included the service sidearm for Polish military forces and what is considered one of the finest handguns ever made, the wz.35 Vis pistol (also known as the Radom Pistol).  Following World War Two, the factory was re-named Zakłady Mechaniczne Łucznik Radom (Radom Archer Mechanical Works) and became part of the Polish Predom conglomerate of state-owned weapons factories.  The company was declared bankrupt in 2000 but was re-formed as Fabryka Broni Łucznik Radom (Radom Archer Weapons Factory) and continues to produce a number of firearms including licensed versions of the Walther PPS and P99 pistols.

ws12

The Radom Archer Mechanical Works in 1975

Little is known about the development of the Wz.1970 air pistol.  A number of sources note that the pistol was produced specifically for use as a training weapon by conscripts in the Polish armed forces, but I have been unable to find any evidence that it was actually used in this way.  It does seem an odd design to use for firearm training – surely something closer in size and feel to a military handgun would have been a better choice?  The Wz.1970 was introduced in 1970 and production continued until approximately 1977.

Design and construction

The Wz.1970 is a break barrel design where two springs inside the grip are compressed as the barrel is rotated through approximately 90°.  The barrel, trigger guard and other parts are steel while the main body is cast alloy. The trigger guard acts as a lever arm which compresses the internal springs.  The barrel on the Wz.1970 is almost nine and a half inches long, but only the first six inches of the bore is rifled.  The last three and a half inches are counterbored to a slightly larger diameter and unrifled.  It looks as though this is intended to allow the use of a cocking aid similar to that supplied with the Walther LP53, but I have never seen a cocking aid for the Wz.1970.

ws701

Walther LP53 (top), Predom Łucznik Wz.1970 (below)

The two concentric springs inside the grip are fitted one inside the other and move vertically through a fairly short stroke (around 2″) and compression is achieved via a 1″ diameter leather piston and buffer.   A fair amount of force is required to cock the Wz.1970: 30 – 35lbs depending on the condition of the springs and piston.  This is made awkward by the prominent front sight which digs into your hand as you push down on the barrel to cock.  Cocking would be much easier if a some form of cocking aid was provided (you’ll find a link at the end of this article to a website showing how one person made a cocking aid for this pistol).

ws703

With the barrel broken, a pellet can be pushed into the breech and the barrel closed.  Latching is positive and precise.  No form of manual safety is fitted, so once the pistol is cocked and a pellet is loaded, the only way to make it safe is to fire.  A slotted screw just in front of the trigger allows the release point to be adjusted.

Other than the grips and some internal parts, the Wz.1970 is of all steel and alloy construction.  This gives the pistol a very hefty and robust feel, essential in a weapon designed for use and abuse by conscripts.  You could probably run over one of these in a T-72 tank and it would go on shooting.

The quality of casting, machining and general fit and finish on the Wz.1970 are fair, but notably inferior to the LP53.  Grips are some form of black plastic, though they are brittle and fairly flimsy.  The rear sight is fully adjustable using knurled fingerwheels for windage and elevation adjustment.

ws705

The construction and function of the Wz.1970 don’t seem to have changed throughout its production run, though there does seem to be variation in markings.  My own 1973 example was marked only with “Łucznik” on the left side of the main body and showed the year of manufacture and a serial number on the left side of the rear of the barrel. Later models (from approximately 1975 on) are marked “Predom-Łucznik”, “Wz.1970” and “Kal. 4.5mm” in addition to the year of manufacture and a serial number on the barrel.

ws707

ws7011

Shooting

With the Wz.1970 cocked and loaded, you’re ready to shoot.  The sight picture is very good and the fully adjustable rear sight means that the point of impact can be precisely adjusted to match the point of aim.  The grip is wide, though not uncomfortably so, and there are no thumb rests on the grips so this pistol can be used in either hand.

ws706

The trigger has two distinct stages.  The first is fairly long and light, though the shorter second stage is heavy.  There is a distinct and consistent release point which can be adjusted by using the slotted screw in front of the trigger (though if you adjust this too far, it can interfere with getting your finger on the trigger).

ws708

Trigger adjustment screw

The Wz.1970 fires with a fairly subdued crack, but the feel is unusual.  The piston and springs move vertically within the grip, causing the pistol to jerk upward as it’s fired.  It’s a distinct, uncushioned and not especially pleasant feeling.  Shooting the Wz.1970 has been compared to having a rat-trap go off in your hand.  It’s not painful or uncomfortable but if you’re used to the relative sophistication of CO2 powered replicas, it does feel a little harsh.  However, I’d guess that the pellet has already left the end of the barrel before the pistol jerks upward because accuracy is consistent and very good.

A Wz.1970 in good condition should be capable of consistent 1″ groupings at 10m.  This pistol seems to happily accept any type of .177″ pellet.  I generally used RWS CO2 target pellets in mine, and these worked without any issues.  My example chronoed at 290 – 300 fps after lubricating the piston and depending on pellet type, though I have seen over 400fps claimed for these pistols.

Quality and reliability

The Wz.1970 is a relatively simple design and is very robustly constructed, so very little goes wrong with these pistols.  The rear sight, for example, is notably stronger than the notoriously fragile sight fitted to some models of the Walther LP53 though I have seen reports of rear sights coming loose on the Wz.1970.

The most notable issue is that the packing grease used on these pistols can dry out after time, leaving a hard, brown residue which looks like rust.  This residue must be cleaned off carefully (silicone spray works well to soften and remove encrusted residue).  This is particularly important on the leather piston and buffer, which can also dry out and shrink, considerably reducing power.  There is a great deal of debate on the best lubricant to use on leather air gun seals, but I found that soaking the piston and buffer from my Wz.1970 overnight in silicone oil improved flexibility and sealing.  However, some people claim that silicone oil can degrade leather seals and suggest that only products specifically intended for leather (such as leather stretcher) should be used.  After extended use the leather piston can become worn, giving a fluffy appearance, though pistols in this condition don’t seem to lose a great deal of power or accuracy.

ws709

Removing the springs and piston is simple. With the pistol uncocked and discharged, the spring retaining cap at the base of the grip is unscrewed until it releases.  There is relatively little tension on the springs, and these will project only around 1″ when the cap is removed so no special tools or precautions are required.  With the cap removed, the springs, piston and sleeve can be extracted from the grip.  Take care to note how the end of the trigger guard engages with the sleeve and piston assembly to ensure correct re-assembly.

Other than a tendency for the leather piston and buffer to dry out and encrustation of old packing grease, I’m not aware of any major problems with these pistols.  They appear to be well made and finished and give the impression that they will last a very long time if properly maintained.

Buying a Wz.1970

There are lots of examples of the Predom Łucznik Wz.1970 around, so finding a good one shouldn’t be too difficult.  Large numbers were produced and I suspect that there are probably still warehouses in Poland where boxes of unused examples are lying in their dried-up packing grease.  Pristine examples do appear for sale fairly regularly.  Prices vary depending on condition and use, but expect to pay around 25% – 50% of the cost of an equivalent Walther LP53.

ws704

Many Wz.1970s come with holsters (mine was supplied with a rather nice leather holster).  I have never seen a boxed Wz.1970 or a manual or any tools for these guns.  All you tend to get is the pistol and in some cases a holster.

Very little goes wrong with these pistols, though you should assume that the leather piston will probably need attention if you buy one which has been stored for any length of time.  I’m not aware of any source of spares for these pistols, so I’d tend to be cautious of buying one with any known faults.  There are so many about that it’s probably better to go for a working example.

Conclusion

Is a Predom Łucznik Wz.1970 a cheap alternative to a Walther LP53?  Not really.  The LP53 is a beautifully made and finished piece of German precision engineering, designed to satisfy the most demanding and discerning target shooters.  The Wz.1970 is a robust and reliable air pistol designed and built to survive extended use by untrained conscripts.  They may look similar, but these are very different air pistols in concept and execution and the Wz.1970 is simply not of the same quality as the Walther.

ws7010

However, the Predom Łucznik Wz.1970 is an interesting and fairly accurate air pistol and it’s cheaper than most target pistols from the 1970s.  Cocking is (literally) a pain and the unbuffered jerk from the piston and springs when firing can be a surprise, but if your air gun collection includes elderly target pistols, you may well enjoy this piece of Polish history.

Related pages:

Classic replica air pistol review: Smith & Wesson 78G/79G

Classic replica air pistol review: Crosman Wild West revolvers

Classic replica air pistol review: : Crosman 38 series

Home

Classic replica air pistol reviews

Links

Making a cocking aid for the Predom Łucznik

Classic replica air pistol review: The Schimel

s7

You could probably make a case that the first modern replica air pistol was the Schimel, a CO2 powered Luger lookalike which first appeared in California in 1948.  Although production lasted only two years, this has proved to be a very popular pistol with replica collectors.  And there are certainly lots of good reasons for wanting to add a Schimel to your collection: This was the first replica air pistol powered by CO2, it resembles the iconic Luger and a good Schimel is an accurate and powerful shooter.  However, there are some equally valid reasons why you might not want one: it’s now almost 60 years since production of the Schimel ended and the materials used in construction are prone to cracking, brittleness and shrinkage so that it can be difficult to find a Schimel in good shooting condition.  However, whether you want one or not, few people would argue against the Schimel being one of the classic replica air pistols.

s1

Stoeger’s advertising for the Schimel GP-22, from the late 1940s

In 1945, two Californian brothers, Orville and Clifford Shimel (and no, that isn’t a typo – an extra “c” was added to create the Schimel brand.  No-one is sure why – perhaps because the added “c” made the title seem a little more Germanic?) became interested in the possibility of producing a replica air pistol which resembled the German Luger.  Both were experienced machinists and Orville was also a talented tool and die maker.  Working out of Clifford’s garage in Sun Land, California, they created a .22″ calibre cast alloy prototype which used a novel form of power source – an 8g CO2 cartridge designed for use with the Sparklet fizzy drink maker.  The prototype produced lots of power, getting close to 600fps with a .22″ pellet or lead ball!  Interest in the Luger pistol was huge in the US following World War Two and the Shimel brothers felt confident that a replica based on the Luger had strong commercial possibilities.  By 1946 they had set up a manufacturing plant in North Hollywood and in early 1948 they begin offering the Schimel GP-22 for sale.

Schimel GP-22s8

The main components of the Schimel GP-22 are made from a cast zinc alloy called Zamak (known as Mazak in the UK) and closely match the overall dimensions and grip angle of the Luger pistol.  Grips are plastic and the 8g CO2 cartridge is stored inside the grip and pierced using the charging handle which articulates from the butt. A 6″ rifled steel inner barrel is concealed inside the alloy casting and the rear part of this barrel also extends to form the loading trough into which a .22″ pellet or lead ball is placed.  The pellet loading probe is operated using a mechanism which looks rather like the toggle mechanism on the Luger.  A simple crossbolt type manual safety is provided above and in front of the trigger and the rear sight is adjustable.  Period advertising claimed that the pistol was finished in “real gun blue“, but it was noticeable that the dark finish chipped and flaked very easily, so I assume it’s more likely to be some form of painted finish.

s6

Preparing the GP-22 to fire is a little more complex than on modern replicas.  The CO2 cap at the base of the grip is unscrewed and removed and then the charging lever is pulled back.  The 8g CO2 cartridge is then placed inside and the cap replaced.  The reset button on the right side of the upper body is then moved forward to seal the secondary compression chamber.  The charging handle is then pushed fully closed, piercing the CO2.  The charging handle must then be opened and closed once more to prepare the pistol to shoot.  The loading probe is then retracted by lifting the toggle mechanism and a .22″ pellet placed in the loading trough.  The probe is then closed by moving the toggle forward until it sits flat, which pushes the pellet into the barrel in front of the CO2 valve.  All of this is best done with the crossbolt safety engaged, and to fire, this must be disengaged.  The charging handle must be opened and closed and the reset button moved forward before each subsequent shot.  One 8g CO2 was claimed to be good for 30 – 35 shots and it was recommended that any remaining CO2 pressure was vented by pulling the trigger with the charging handle open before unscrewing the base cap.

s3

Period advertising for the Schimel GP-22.  Which apparently provided “Excellent burglar protection” and will “frighten off possible prowlers, rodents or other intruders“. Hmmm…

There are some great ideas on the Schimel.  The use of a small self-contained CO2 cartridge was an innovation in 1948 – the contemporary Crosman Model 111 for example, was also CO2 powered but required to be bulk filled from a large 10oz CO2 bottle.  Making the loading probe actuation device look like the toggle from a Luger helped to make this replica look authentic.   The power extracted from the tiny 8g cartridge was also surprisingly good.  However, some things about the GP-22 weren’t so well done.  If you forgot to place the reset button forward when loading CO2 and before each shot, all the CO2 would be vented through the muzzle when you pulled the trigger.  If the base cap was unscrewed while there was remaining CO2 pressure, the cap and CO2 cartridge would be launched across the room at a fair velocity (and remember that in the late 1940s, people weren’t used to CO2 powered replicas).  Zinc alloy casting was a fairly new technology and the alloy components, especially the charging handle and trigger were not particularly strong and were prone to cracking and breakage.  But the worst problem was the seals.  The GP-22 used neoprene seals (unlike the nitrile seals used on modern replicas).  These worked initially, but quickly absorbed CO2 during shooting, leading them to expand in size by anything up to 50% and ruining sealing.  The seals would shrink back to their original size if left for a while, but achieving reliable sealing proved to be a major and continuing problem for Schimel owners.

s9

Most Schimels are marked “MODEL GP-22” on the left side of the main body, with the letters being raised parts of the casting.  However, it’s notable that only the letters “MODEL” and “P-22” are actually cast, the “G” is stamped separately.  Presumably this was done so that a common casting could be used for both the GP-22 and the planned AP-22, with the appropriate additional letter being added by stamping later.  However, a small number of Schimel pistols are marked only as “MODEL P-22” which has led some people to believe that the P-22 is a different model.  It isn’t – these are simply GP-22s where for some reason the additional G has not been stamped on the casting.

Schimel AP-22

The Shimel brothers planned a second variant of the Schimel pistol – the AP-22, though this never went beyond the prototype stage.  The AP-22 was very similar in appearance to the GP-22 (and it used a number of common castings), but it was a pneumatic pistol which used the charging handle as a pump to pressurise an internal air chamber.  Given how fragile the charging handle proved to be on the GP-22, it’s difficult to imagine that this would have proved reliable in extended use as a pump, and perhaps that’s why this version was never offered for sale, despite enthusiastic advertising produced by Schimel Sales.  Occasionally a Schimel will be offered for sale which is claimed to be an AP-22, but these generally turn out to be GP-22s.  Although the AP-22 was extensively advertised in the late 1940s and prototypes were presumably made, it doesn’t appear that any were ever actually sold.

s2

Pre-sales advertising for the AP-22

The end of the Schimel

Sadly for the Shimel brothers, the GP-22 didn’t bring the commercial success they had hoped for.  Owners reported a number of problems.  The valve arrangement was very complex and prone to wear and failure, the neoprene seals tended to leak, the alloy castings were fragile and breakages of the charging handle around the pivot for the link rivet were common.  There were also problems with the cast alloy trigger breaking, especially if the trigger was inadvertently pulled with the safety engaged.  In addition to being brittle, the zinc alloy castings had a tendency to exude a white powder residue, which could cause some components to seize.  The plastic used in the grips tended to shrink and crack when exposed to UV light.  In addition, the loading and charging procedure was complicated compared to contemporary pneumatic pistols and it was just too easy to get it wrong and accidentally vent all the CO2.  As a result, sales were not as strong as hoped and the under-capitalised company ended up spending a great deal of time on costly warranty repairs.  As a further disincentive to prospective buyers, the GP-22 was also fairly expensive – around twice the price of a contemporary pneumatic air pistol.

s14

In some ways, the GP-22 was simply ahead of its time and ahead of contemporary knowledge of plastics, zinc alloy casting and CO2 sealing in the late 1940s.  Sadly, in 1950 Schimel Arms went out of business, though stocks of GP-22s continued to be sold for a number of years.  However, this wasn’t quite the end of the Schimel story.  In 1956 Californian company A.C. Swanson bought equipment and tools from the bankrupt Schimel company and briefly manufactured an improved multi-shot version of the Schimel called the American Luger.  But perhaps that’s a story best kept for another article…

Do you want one?

The first thing to consider is that any Schimel GP-22 will now be over 60 years old.  The problems of brittle and fragile castings and shrinking grips which affected these pistols when new are going to be worse now.  This is a replica that needs to be handled with some care if it’s to survive.

s4

On this Schimel, note “P-22” markings, shrinkage of the grips and mis-matched grip screws

It’s unlikely that you’ll find a GP-22 which still has its original neoprene seals, but even so, it’s probably wise to assume that re-sealing will be required.  In general, this isn’t a major problem – seals for the Schimel are still readily available from specialist suppliers, but changing the two seals on the barrel can be difficult.  The issues with the zinc alloy casings means that it’s possible for corrosion to cause the steel barrel to become completely seized inside the relatively fragile alloy outer casing.  You can’t replace the seals without removing the steel barrel, and it’s horribly easy to break the alloy casting if you exert too much force.  If you have a Schimel with this problem, it may be worth considering professional help.  If you’re considering buying a Schimel, look to see if there is any trace of white powder residue on the castings.  If there is, there’s a good chance that the inner barrel is seized in place, and you should budget for this unless the seller can demonstrate otherwise.  In general, flaws in early die-casting techniques mean that the castings on a Schimel will almost certainly be more brittle than on a more modern replica.  You must handle with care, especially the charging handle and slender trigger.  I believe that it may be possible to find replacement triggers in steel, though I’m not sure where.

s11

Loss of finish, oxidisation and pitting of the alloy castings are obvious on this example

Shrunken and cracked grips are another common issue and there is no simple answer other than replacement.  However, be aware that the grips can shrink so much that it can be very difficult to remove them.

Finish on Schimels also seems variable.  Some seem to have retained their finish well while others are almost completely bare.  Part of the problem seems to be the relatively soft zinc alloy casings.  If these have oxidised badly, there’s a good chance that the black finish will simply have disappeared.

s12

This Schimel has retained its finish well and the grips aren’t too badly shrunk

If this all seems like a lot of messing around, at least you’ll have a powerful and accurate replica when you’re done.  A Schimel in good condition shoots with a meaty bang and will still fling a .22″ pellet at around 450 – 500fps – better than most modern replicas!  Accuracy is very good too and you can expect groups of around ½” – 1″ at 6 yards.  You’ll get around 20 – 25 full power shots per CO2 and fortunately the 8g CO2 cartridges are still widely available as they’re still used in soda makers.

The website The Schimel is a good source of parts and advice for Schimel owners (you’ll find a link at the end of this article).  The site is run by David and Jon Shimel, sons of Clifford Shimel.  Replacement seals (in Buna-N and Viton) are available though the site, as are replacement grips, charging levers, triggers, CO2 caps and toggle assemblies.  This site also sells operating guides and a handy guide on how to re-seal a Schimel.

s10

This Schimel is going to require some work…

Finding a Schimel isn’t difficult.  Though it was in production for only a short time, there do seem to be lots of examples around.  But finding a good one can be more difficult.  Like most vintage air pistols, the value of any particular example is almost entirely dependent on condition – you get what you pay for.  An unrestored Schimel with cracked grips, flaking finish and leaky seals frankly isn’t worth much and will require a fair amount spending on it to bring it up to standard.  Highest prices are paid for professionally re-sealed examples which still have their original finish and come in their original box with a manual and paperwork.

s15

So, should you get one of these?  If you have an interest in vintage replica air pistols and as long as you understand and are prepared to deal with the potential problems and treat this replica fairly gently, the answer is probably yes.  This isn’t a modern “fire-and-forget” replica – a Schimel will probably take time, effort and money to restore to working condition, and even then it must be treated with respect to get the best out of it.  However, I know that, if I were offered a decent Schimel at a good price, I’d buy it without hesitation.  If you own a Schimel, you own a bit of replica air pistol history which happens to be a very fine shooter too.  Surely that’s worth a little time and effort?

Related pages

Classic replica air pistol review: Crosman Wild West revolvers

Classic replica air pistol review: Crosman 38 revolvers

Classic replica air pistol review: Smith & Wesson 78G/79G

Home

Classic replica air pistol reviews

Links

The Schimel website

Classic replica air pistol review: The Crosman Model 600 and Model 677 Plink-O-Matic

60017

You may be wondering what a review of the .22” pellet shooting Crosman Model 600 and its little brother, the BB shooting Model 677 Plink-O-Matic, is doing here on the World of Replica Air Pistols?  After all, this site is generally focused on replica air pistols and neither of these Crosman air guns are replicas of a firearm.  However, many people believe that these are simply the finest air pistols ever made.  Some people even believe that, if either were re-introduced now, they would still find a ready market.  These are big claims, so I thought it was probably time to take a look at the Crosman 600/677.  Can they really be as good as all that?

Development

Somewhere around 1955, Crosman set its design engineers a simple but challenging brief: Produce a semi-automatic, auto loading, auto cocking air pistol capable of very rapid fire and which used CO2 as a power source.  The use of CO2 wasn’t an issue – Crosman began producing rifles which used military 4oz CO2 bottles back in the 1940s and in 1950 had introduced the Model 111 and 112 pistols which used 10oz CO2 bottles.  However the breakthrough in using CO2 came when a Crosman employee came up with the idea of a larger version of the 8g Sparklet CO2 cartridge which was used in soft drinks machines.  Crosman produced the 12g Powerlet CO2 cartridge which has become the standard power source for air pistols.  The first Crosman pistol to use the new cartridge was the model 150, introduced in 1954 (and which led to the later Model 250 which then evolved to become the current Model 2240).

6008

Crosman Model 150

Initially, Crosman used 12g CO2 cartidges which were bought-in from outside suppliers.  However, with the increasing use of CO2 in Crosman products, a decision was taken to produce CO2 Powerlets in-house.  Initially these used an odd “bottle cap” end – Crosman Chief Design Engineer Rudy Merz came from a brewing background, and it has been suggested that this was his idea.  However, these early CO2 cartridges proved prone to leaking and were not popular.  The design of the CO2 Powerlets was quickly changed to incorporate a more reliable welded end cap and users came to appreciate the ease and simplicity of using self-contained 12g CO2 cartridges.

6007

Original Crosman “Bottle Cap” Powerlet

So, it was clear that the new multi-shot pistol would use the proprietary Crosman CO2 Powerlet.  What was less clear was how it would actually work.  Several designs were considered (an early patent application was submitted in 1957) but it wasn’t until a great deal of research and design work by Rudy Merz and his team that a working prototype was produced in 1959.  Like the Model 150, the outer body of the Model 600 prototype was made from cast alloy with internal parts made from brass and steel.  The overall design also looked broadly similar to the Model 150, with the CO2 Powerlet, the main firing valve and the hammer assembly housed in a chamber under the barrel.  However, the loading and cocking mechanism was very different on the new prototype.  At the rear of the barrel, a horizontal magazine held up to 10, .22” pellets.  Some of the CO2 from the firing valve was used to operate a swinging pellet carrier which took a single pellet from this magazine to the breech end of the barrel.  In addition to operating the pellet carrier, CO2 from the firing valve was also used to blow back the internal hammer and re-cock the pistol.  It sounds like a complicated and cumbersome mechanism, but it worked very quickly indeed (the 600 could fire all 10 pellets in less than three seconds!) and with extreme reliability.  This was proved when a test rig was built and three of the pre-production Model 600s were subjected to firing 100,000 rounds without any major failure or malfunction.  High-speed photography was also used to analyse the function of the 600 and to ensure that everything worked as it should.

6006

Inside the Crosman Assembly Shop, circa 1955

In 1959, after exhaustive testing and refinement, it was decided that the Model 600 was ready for production.  In 1960 it was launched for sale.

Production

Production of the Model 600 began in 1960 and continued to 1970 when it was dropped from the Crosman range.  Even in 1970, there was nothing intrinsically wrong with the Model 600 – it was still a popular, reliable and powerful air pistol.  However, Crosman was going through a period of change (including being sold to British company Bagnor Punta) in 1970, and was making strenuous efforts to rationalize its range and to improve profitability.  It was the profitability issue that finally killed the Model 600.  It simply cost too much to make compared to other pistols in the Crosman range and it was dropped for this reason.  However, it has also been claimed that full details of the manufacturing process used in production of the 600 were known only to Rudy Merz, and by this time he had also left the company, so perhaps this was also a factor in the decision to discontinue the 600?

6009

The Crosman Shoot-A-Rama, 1960. “Test fire a pellgun here!”  Yes please!

There were three main variations in the Model 600 during its production life.  Changes were mainly focused on CO2 piercing.  On the first models the CO2 piercing pin was incorporated in the end cap, and the CO2 cartridge was inserted with the neck facing outwards (towards the end cap).

60012

First style (1960 – 1964) end cap with piercing pin in cap

From around 1964, CO2 piercing was incorporated into the firing valve, and CO2 was inserted with the neck facing inwards (away from the end cap).  Up to 1966 the end cap was a plain screw-in type with a hole through which the CO2 cartridge could be seen, but from 1966 – 1970 a button type end cap (similar to the end cap used on the Crosman Mark 1) was used.  However, Crosman service stations were instructed to replace earlier CO2 piercing system with the later versions if a Model 600 was returned for repair.  So, many early 600s may have been retrofitted with one of the later CO2 piercing systems.

60015

Second style end cap (1964 – 1966) left, later “Button” style end cap (1966 – 1970) right

There were also minor variations in the trigger and manual safety fitted to the Model 600 during its production run, but other than differences in piercing procedure, all models are functionally identical.  The finish on all models is black painted with brown plastic grips.  Early versions have a glossy black finish, later versions have a slightly less shiny blue/grey finish.  Both types of finish seem to be hard wearing and scratch resistant.   There was some degree of variation in markings during the production run of the 600 and some Model 600s were produced without any Crosman markings.  These include versions produced for Sears Roebuck, J.C. Higgins and Montgomery Ward.  However, these are identical to the Crosman 600 in everything but markings.

60019

You also occasionally see nickel plated 600s.  However, the Model 600 was never produced by Crosman in a nickel finish, and these examples have either been plated by individual owners or by retailers who bought batches of the Model 600 in the 1960s and had them plated to sell as special items.  If it’s done professionally, a nickel plated and polished Model 600 can look very smart indeed.

60011

Model 677 Plink-O-Matic

In 1961, the Model 677 Plink-O-Matic was introduced.  This was essentially a Model 600 re-designed to shoot up to 15 steel BBs.  Functionally, the Model 677 is identical to the Model 600.  Visually, the only difference is that the Plink-O-Matic was fitted with marbled, grey plastic grips rather than the brown grips used on the Model 600.  Production of the Model 677 ended in 1964.

Design

60022

The Model 600 is a hefty, all-metal pistol (only the grips are plastic). The main body is cast alloy and most internal and moving parts are made from brass or steel.

6005

The upper part of the pistol comprises the barrel, the swinging feed arm, the magazine and follower and the adjustable rear sight.  Beneath this is a steel-lined tube containing the CO2 end cap and chamber, the firing valve and the internal hammer and the hammer cocking slide.  The bottom part of the pistol comprises the frame, grips, trigger and, on the left side, the manual safety.

The blowback action of the internal hammer is used to operate the loading arm, moving a pellet from the magazine to the breech of the barrel.  The mechanism used is very simple – the loading arm is mounted on a cam which is made from a piece of twisted, square section steel.  As this cam moves, it causes the loading arm to rotate.  It’s a simple, elegant engineering solution which will last almost indefinitely if everything is kept well lubricated.

Given its complexity and levels of innovation, perhaps the most surprising thing about the design of the Model 600 was that it worked as well as it did.  In marked contrast to, for example, the later Model 451, the 600 proved to be reliable, durable and easy to use from the moment it was launched.  Even now, more fifty years after it was made, a Model 600 can still provide reliable shooting fun if it’s looked after.

Operation

6002

Before CO2 is loaded, you must ensure that no pellets are left in the gun – in addition to pellets visible in the magazine, there may also be a pellet in the loading arm.   When the pistol is cocked, the loading arm can be swung out to check if it contains a pellet.  When the pistol is known to be unloaded, the knurled CO2 end cap can be removed by unscrewing.  As a safety feature, this tube cap cannot be unscrewed if there is residual CO2 pressure in the cartridge.  The only way to vent all CO2 pressure is to fire the pistol until all CO2 is used.  When the CO2 pressure is exhausted, the end cap can be unscrewed and the used CO2 will fall out.  The manual safety should then be moved up to the Safe position, and the cocking slide cocked and then returned to its forward position.  The new CO2 is then inserted (either end first or neck first, depending on the type of piercing assembly provided).  The end cap is then screwed tight and then released by ⅛” to pierce (on early models – the piercing procedure is slightly different on later versions).  The safety is then moved down to the Fire position and the pistol is fired to confirm that the CO2 has pierced and that there is sufficient CO2 pressure to re-cock the hammer correctly.  With a fresh CO2 in place, pellets can then be loaded.

6001

To load pellets, the safety should first be engaged.  The magazine follower is then pushed to the rear and locked.  Then up to ten, .22” pellets are fed into the magazine, facing forward.  The follower is then released, taking care that it is not allowed to spring forward against the rear of the row of pellets – this can distort the pellets and cause jams.

With CO2 and pellets in place, the cocking slide is cocked by moving it to the rear and then returned to its forward position.  The safety is moved down to the Fire position and you’re ready to squeeze the light, consistent and precise trigger as quickly as you can, ten times.

60021

1962 advertising for the 600

And shooting is where the Model 600 excels.  It shoots with a loud bang and there is some felt recoil from the moving internal hammer.  CO2 consumption is reasonable. Depending on the condition of your 600 and temperature you can expect anything from 30 – 40 full power shots from a single CO2. A Model 600 in good condition will shoot at around 300fps and you can expect groups of under 1″ at six yards. The fully adjustable rear sight means that the point of aim and point of impact can be set to coincide at your preferred shooting range.  There really isn’t any more satisfying way of sending large numbers of .22” pellets downrange than a good model 600.

Of course, it isn’t all good news: When the 600 was released, it proved to be very finicky about which pellets fed without jams.  Using pellets of the wrong type and/or shape could (and still can) lead to frequent jams. Generally, owners reported best results with flat, wadcutter type pellets.  Currently, owners report that Crosman High Quality Match pellets, Webley Vermin Pell and RWS Meisterkugeln pellets are all well suited to the 600.  You may have to experiment to find which pellets work for you and this is well worth doing.  Get the pellet selection right and the 600 can perform flawlessly.  Get it wrong and it will jam.  Often.  Well worn Model 600s can also engage an involuntary full auto mode, shooting all ten pellets in a single burp of power.  If this happens to yours, you will probably need professional assistance to put things right.

60016

The Plink-O-Matic, from the Crosman manual

Just about everything written above also applies to the Plink-O-Matic.  As it fires lighter steel BBs, you can probably expect a little more power – probably closer to the 340fps claimed by Crosman for both models and you should get a few extra shots per C02.  However, given that it has a smoothbore barrel, accuracy on the Plink-O-Matic will be slightly less impressive.  Of course the issues with pellet selection and jamming that affect the 600 don’t apply to the 677 – just fill it up with BBs and blast away.

Buying a Model 600/677

If you want a Model 600 for your collection, there is good news and bad news.  The good news is that the 600 proved to be reliable, robust and long lasting, so there are still lots of working examples around.  The bad news is that people have come to recognize that this air pistol is something special and prices reflect this.

Like most older replica air pistols, the price you will pay will be dependent on the condition of the particular 600 you are looking at and on whether it comes with things like its original box and manual.  In Canada and the US (the principal markets where the 600 and 677 were sold), you can probably expect to pay somewhere from $200 – $250 for a working 600 and more if you find one in pristine condition and/or which has its original box or has unusual markings.  Expect to pay a little more for the slightly rarer Model 677.  Outside the US and Canada, you can expect to pay more.  It’s difficult to be precise, but you are unlikely to pay much less than £300 (around €400) in the UK and Europe for a good, working 600 and a little more for a 677.

60018

Find one like this and it won’t be cheap, but it will last just about forever if you take care of it

If you do manage to find a 600 or 677, you will be well served for spares and replacement parts.  So many 600s were produced, and so many are still being used today, that a number of companies provide parts (including replacement grips).  There are so many to choose from that I haven’t included links to suppliers here – just Google “Crosman 600 parts” and you should be able to find what you’re looking for.  Although far fewer 677s were produced, most of the working parts on the Plink-O-Matic are interchangeable with the Model 600, so you should also be able to find spares for your BB shooting version.

Conclusion

For many people, the Crosman 600 represents the golden age of airguns.  It’s easy to see why – this pistol is beautifully designed, well made and if properly maintained it should last virtually indefinitely.  It’s also massive fun to shoot. Are there any bad things about the Crosman 600?  Well, it’s an ugly old thing.  It looks to me like a cross between a Buck Rogers ray gun and an early Webley air pistol.  But then, you aren’t looking at it when you’re shooting.  It’s not particularly lefty friendly either – the standard grips are designed for right hand use only, with a pronounced thumb ridge on the left grip (though Crosman did make left-handed grips) and the manual safety and cocking slide are designed for right-handed use.  It’s choosy about pellets too, but these are pretty small complaints on an otherwise pretty wonderful package.  If you want an air pistol abut which you can confidently say “They don’t make them like this any more”, the 600 may be just the thing for you.

6004

Which rather brings us back to the original question of whether a modern version of the 600 would still sell?  Well, I can guarantee that there would be at least one sale (to me!), and I suspect that lots of other air pistol shooters would also be interested.  However, I have two reservations.  One is price.  One of the reasons the 600 was dropped from the Crosman range was that it was claimed to be uneconomical to produce.  So, a modern version would inevitably be rather expensive, though it’s difficult to see how it could cost much more than people are currently paying for 50 year old examples.  In 1960, Crosman sold the 600 for $19.95, which equates to about $150 today.  However, I doubt it would be possible to produce a new Model 600 for that sort of price.

But I suspect that the biggest potential issue would be quality.  One of the reasons the original succeeded so brilliantly was that production processes were very carefully controlled to ensure reliable operation.  A modern version would have to do this too, and in this world of disposable consumer items, that might be a difficult philosophy for a manufacturer to adopt.  If it was possible to produce a modern version of the 600 that was priced at under $300 and which was able to match the quality of the original, I believe it would find a ready market.

Is the Crosman Model 600 the best air pistol ever made?  I’m not certain that I’d confidently give that title to any individual pistol, but this is certainly up there with the very best.  Original and innovative design combined with high quality production provide a unique, enjoyable and long-lasting shooting experience.  If you have any interest in vintage air pistols, you really do need to try the Model 600.

Related pages

Crosman Model 451

Crosman Wild West revolvers

Crosman 38 revolvers

Home

Classic replica air pistol reviews

Links

Crosman manual and parts diagram for the Model 600

Crosman manual and parts diagram for the Model 677

Another Airgun Blog: Disassembling a Crosman 600, part 1

Another Airgun Blog: Disassembling a Crosman 600, part 2

Another Airgun Blog: Disassembling a Crosman 600, part 3

Another Airgun Blog: Disassembling a Crosman 600, part 4

Classic replica air pistol review: Crosman Model 451

4518

If you asked replica air pistol collectors to name the first CO2 powered, pellet shooting replica airgun styled to look like a semi-auto pistol but using a concealed internal rotary pellet carrier, many might suggest the Umarex CP88 from 1996.  But they’d be wrong.  Some might nominate the Crosman Model 1088 RepeatAir from 1992.  But they’d be wrong too.  To find the very first one, you have to go all the way back to 1969 and the Crosman Model 451 “GI 45” Auto Repeater.  Crosman, riding high on the success of replica air pistols based on the Colt SAA and S&W .38 revolvers, decided to produce a pellet shooting, CO2 powered repeater based on the Colt 1911.  The result was far from elegant and less than reliable and it sold like ice cream in December.  Despite that, the little-known 451 is now one of the most sought-after and collectable of all Crosman’s replica pistols.  But, would you really want to own one of these?

Development

Relatively little seems to be known about the development of the Model 451.  Most of the information in this part of the article comes from the book My Life, Our Lives by Roger Molina, Head of Sales at Crosman in the late 1960s.  If anyone has additional information on the development of the 451, I’d be happy to hear about it.

The idea of a Colt 1911 replica initially came from Ed Denniston, CEO of Crosman in the late 1960s and preliminary design had been completed when Roger Molina and Denniston visited the US Army Infantry Training Center at Fort Benning in Georgia.  The main purpose of the visit was to discuss the possible production by Crosman of a conversion kit for the M16 rifle which would allow it to fire BBs, ideal for training inexperienced troops destined for the conflict in Vietnam.  During the visit discussions also covered an air pistol which could be used for training army personnel who would be using the Colt 1911.  The US Army Training Center had evaluated the multi-shot Crosman 600 as a possible training weapon, but rejected it because it was just too different in use to the 1911.  When the people from Crosman described the 1911 replica they had on the drawing board, the Army trainers seemed interested.  Sensing that they might be able to achieve sales if they could produce a reliable, multi-shot air pistol which resembled the 1911, work on the development of what would become the Model 451 accelerated.

Like the Crosman 38 series of revolvers, the 451 was designed initially as a training tool which would replicate the feel and function of the original firearm as far as possible.  The rear and top of the slide was a moveable part and some of the CO2 from the firing valve was used to push this backwards via a rod actuated by a nylon piston when the pistol was fired.  This replicated the recoil effect of the cartridge firing weapon and cocked the hammer.  As springs moved the slide forward, it also indexed the pellet carrier for the next shot, resulting in a true single-action trigger as on the 1911.  However, early testing showed that the blowback system used more CO2 than was desirable.  Prototype versions produced plenty of power, but gave only ten shots or less per 12g C02 cartridge.  This was thought to be unacceptable both to potential army users and hobbyists.  Power was therefore reduced to improve CO2 consumption, but production versions still only managed between 15 and 20 shots per CO2 with pellets leaving the barrel at around 300fps.

Despite these issues, some people within Crosman were still confident that the 451 would be the best selling air pistol the company had ever produced.  In addition to possible interest from the US Army, it was known that air pistol shooters in the US and elsewhere would be very interested in a reliable multi-shot air pistol which was also a replica of a well-known semi-auto firearm.  Although the Army had not made a decision to use the 451 for training, the decision to commercially launch the 451 was taken in 1967 and work began on producing the tooling required to produce this model in large numbers in the Crosman factory in Fairport, NY.

4513

However, in addition to the relatively poor CO2 consumption, testing of the 451 also revealed recurring problems with pellets jamming in the barrel, particularly after power was further reduced to improve CO2 consumption.  The Crosman Engineering Department claimed that these problems had been addressed, but other people within the company felt that the 451 was not sufficiently developed to be ready for commercial sales.  Sadly, the pessimists proved to be right.  When the 451 was launched, jamming soon proved to be a major headache.  Large numbers of 451s were returned to Crosman Service Stations across the US because of pellets jammed in the barrel.  The problem was so serious, particularly when it involved a double jam of two pellets, that these often had to be returned to the factory for repair or replacement.  In response, Crosman tightened quality control checking on the 451 in late 1969, but this led to a rejection rate of around 50%.

Unsurprisingly, the US Army showed little interest when the 451 proved to be unreliable.  Added to this, poor commercial sales, loss of revenue through returned 451s and the unacceptably high QA rejection rate meant that instead of being a best-seller, the 451 was a commercial disaster in which Crosman failed to re-coup the high costs of design and development.  After just twelve months of production, the 451 was quietly dropped from the Crosman range.  It has been suggested that the large amount of money fruitlessly poured into development and production of the 451 was a factor in the losses which led to the sale of Crosman to British company Bagnor Punta in 1970.

Production

The 451 had a very short production run compared to most Crosman replicas.  The Model 451 “GI 45” Auto Repeater was introduced in 1969 to a fanfare of publicity: “The most asked for pistol by our customers“, “Another Crosman pace-setter“, “Superbly crafted in the tradition of fine gun making“, “As sleek and beautiful as its famous firearm counterpart!“.  However, “sleek” and “beautiful” weren’t the words which most potential buyers used to describe the rather bulbous and ungainly looking 451.  Worse still, although it represented technical innovation, it was unreliable in use.

4519

In addition to jamming, the other main problem was the hammer, which was made from sintered steel and was simply too brittle to withstand the forces acting through it.  Hammers cracked regularly, and if this happened the hammer could not be repaired by welding or brazing because of the material from which it was made.  It has been suggested that if the 451 had been produced with a steel hammer, many failures could have been avoided and it might have proved more popular.  We’ll never know if this might have been true because the 451 retained its fragile sintered steel hammer throughout its production life.  The 451 also suffered from premature wear of the nylon piston which actuated the slide.  If this wore, CO2 leaked and the slide eventually stopped working entirely.  Added to these problems was comparatively high C02 usage (15 -20 shots per CO2 for the 451 compared to 30-35 for the Crosman 600 and anything from 40 – 70 shots per CO2 for the 38 series revolvers).  No wonder that buyers in 1969 were reluctant to buy the 451 – it has been claimed that it would actually have been cheaper to shoot a cartridge firing 1911 in 1970 than to use the CO2 gobbling 451!

By the end of 1970, all sales of the 451 had ended.  Like many aspects of the 451, no-one is completely certain how many were made during its short production life though most estimates agree on somewhere in the region of 10,000.

Design

45111

The Model 451 is a hefty, all-metal replica (only the grips are plastic) which is close in weight to the Colt 1911 which it resembles.  The metal used is mostly cast alloy and sintered steel (though some internal parts such as the rifled barrel are steel) with a painted black finish and brown, wood effect grips.  Pellets are loaded into a six shot rotary carrier which is located horizontally in the top of the slide above the trigger and causes the odd bulge in the profile of the 451.  However, unlike most modern replicas which use a vertically mounted, removable rotary carrier, on the 451 the rotary carrier is fixed in place and has pellet chambers cast into its circumference.  To load the 451, .22″ pellets must be pressed into each of these chambers, skirt first.  To load pellets, the magazine cover button must be pushed forward which moves the slide to the rear and reveals one pellet chamber in a recess on the right side of the pistol.  A pellet is pushed into this chamber and then the pellet carrier is rotated manually using a grooved thumbwheel to expose the next chamber.  You must do this six times to fully load the 451.  Once done, the magazine cover button is moved to the rear which moves the slide forward and the magazine cover button then masks the open pellet chamber.

4511

Magazine cover button forward, slide moved to the rear and pellet chamber exposed for loading

CO2 is retained in the grip and tightened and pierced using the rather unsightly knurled knob in the base of the grip.  Just as on the 38 revolvers, the right hand grip (which must be removed to load CO2) is retained by a spring steel clip, one leg of which attaches to the CO2 cartridge.  So, the right hand grip cannot be attached unless a CO2 cartridge is in place.

4515

The hammer must be manually cocked for the first shot – like the 1911, the 451 does not have a double action trigger.  The 451 fires when the hammer strikes the firing valve.  A charge of gas is then sent up the hollow tube which also forms the spindle on which the rotary pellet carrier rotates.  This gas is directed towards the pellet chamber opposite the barrel, firing the pistol.  The blowback action is snappy, fast and fairly strong and this is (as far as I am aware) the only pellet shooting semi-auto replica which uses blowback action to cock the hammer and index the next pellet for shooting (most current pellet shooting replicas use blowback only to cock the hammer).  This provides a very light, short, single action trigger.

4514

No manual safety is provided.  Instead a hammer safety is used.  To engage this, the hammer is pulled back from rest until the first click is heard (approximately ⅛”), or carefully lowered from the full cock position.  With the hammer in this half-cock position the pistol cannot be fired and is claimed to be drop safe.

Operation

Using the 451 is a mix of good and bad.  CO2 loading is simple and works well.  Turning the CO2 loading knob anticlockwise lowers the whole bottom part of the grip.  With a CO2 cartridge in place, turning the knob tightens and pierces without major loss of gas.  Loading pellets however is a pain.  It’s fiddly to accurately seat a pellet in the single, recessed visible chamber if you have large man fingers and you must do this six times to fully load the pistol.

4512

When it’s finally loaded, shooting the 451 is fun.  The blowback action gives a delightfully light (around 6lbs), short and consistent trigger action.  A well maintained 451 will shoot at around 300fps and you can expect groups of 1″ at six yards.  The fully adjustable rear sight (adjusted using slotted screws on the right side and top of the sight) means that the point of aim and point of impact can be set to coincide at your preferred shooting range.  The 451 fires with a loud bang and blowback is strong and snappy.  Despite Crosman claims that it should be used only with their “Super Pells“, the 451 works well with almost any type of .22” pellet.

CO2 consumption isn’t great.  Depending on temperature you can expect anything from 15 – 20 full power shots from a single CO2 (though some users report that 25 – 30 shots are possible).  That means you may not even get three full loads from a single CO2.  High CO2 consumption also contributes to one of the major problems with the 451 – pellet jamming.  As CO2 pressure falls, it’s possible for a pellet to become jammed in the barrel.  With the light trigger on the 451, you can fire six shots very quickly indeed.  If you fail to notice that a pellet is jammed in the barrel and fire again, you may get the dreaded double jam where two pellets are stuck in the barrel.  This can be difficult to clear and, if one of the pellets sticks between the rotary carrier and the barrel, the entire action can be locked, making it even more difficult to remove the jammed pellets.  Crosman correctly identified jamming as a potential problem on the 451 before launch.  A rod intended to remove jammed pellets was included with the 451 and if you read the Crosman manual for the 451 it’s notable that almost one whole page of the four page manual is devoted to how to clear jammed pellets.  If you are shooting a 451 it’s important to take the time to be sure that a pellet leaves the barrel each time you shoot if you are to avoid a double jam.

4516

Early publicity for the 451.  Which makes you wonder if someone in Crosman had a rather sneaky sense of humour – “fool proof, jam proof shooting fun” was one thing the 451 was almost guaranteed not to provide.

Buying a 451

If you’d like a 451 for your collection, the first problem will be finding one.  Only around 10,000 were made almost fifty years ago, and it’s probably safe to assume that many of these were either returned to Crosman due to immovably jammed pellets or quickly destroyed by enthusiastic but inexperienced users unfamiliar with blowback semi-auto replicas.  Inherent weaknesses such as the fragile hammer and wear to the nylon actuating piston have accounted for many more over the years, so there just aren’t many working examples still around.  This means two things: prices tend to be high due to scarcity and spares are almost impossible to find – the limited numbers still in existence mean that it just isn’t worth any service company setting up tooling to produce parts for the 451.

45110

The finish on this well used 451 is far from perfect.  It’s still worth more than just about any modern replica though.

If you can find a working 451 in good condition, you can expect to pay anything from 400 – 600 dollars in the US and Canada (the main markets where the 451 was sold) and 400 -500 pounds in the UK.   That’s a lot of money for an elderly air pistol with known reliability issues.  So, why would you want one?  Well, it’s still the only pellet shooting blowback semi-auto replica with a true single action trigger for one thing.  It’s also accurate and satisfying to shoot and it’s one of the most collectable Crosman replica air pistols, so you are unlikely to lose money if you keep it working.  But that’s the main problem here.  The fragile sintered steel used for the hammer will probably be even more brittle almost fifty years after it was cast.  If the hammer on your 451 cracks or breaks, there’s not a great deal you can do other than try to find someone willing to make you a new hammer out of steel, not an easy or inexpensive job.

The risk of experiencing a difficult to clear double pellet jam is also just as high now as it was in 1969.  Well used 451s also suffer from a cocking problem where the slide fails to fully cock the hammer (though you can still do this manually).  Finally, the rear sight, which moves as the rear part of the slide retracts, can shear off.  So, do you risk shooting your precious and expensive 451, knowing that it may suffer terminal damage?  But, if you can’t shoot it, why would you want to own one?  After all, part of the fun of owning replica pistols is actually shooting them.  While other vintage Crosman air pistols like the 600 and the 38 revolvers go on providing a reliable and satisfying shooting experience year after year, the same can’t be said for the fragile 451.

4517

Find one as good as this and you’ll be doing well. You’re still likely to need that clearing rod though…

The Crosman 451 was an ambitious attempt to produce a functional replica of a semi-auto pistol.  However, in many ways it was ahead of its time, or at least ahead of materials and engineering  technology available in 1969.  Twenty-five years later, Umarex produced the Walther CP88 and proved that the concept of a revolving pellet carrier, dressed up in alloy castings to look like a semi-auto firearm, could produce a reliable, powerful and accurate air pistol.  The 451 was also one of the first (or perhaps the first?) CO2 powered replica pistol to use blowback to mimic the function of a moving slide.  This was a bold experiment, but one that was poorly developed and executed and it proved to be a commercial disaster for Crosman.

I can understand why you’d want one of these in your collection.  It represents a level of innovation that’s rarely seem in any branch of commercial engineering.  But the 451 failed in 1970 because it was expensive, complex and unreliable and suffered from basic design flaws.  All these things are still true today, compounded by the wear and deterioration which affect any older replica air pistol.  If you’re happy to own an air pistol mainly for display and very occasional use or if you just want to complete your Crosman replica pistol collection, you may be prepared to pay the going rate for a 451.  However, if you want a vintage air pistol which you can also enjoy shooting without worrying that it will self-destruct, you may want to spend your money on something other than Crosman’s quirky Model 451.

Related pages

Classic replica air pistol review: Crosman 38 revolvers

Classic replica air pistol review: Crosman Wild West revolvers

Home

Classic replica air pistol reviews

Links

Crosman manual for the Model 451

Classic replica air pistol review: The Austin Magic Pistol

Astute readers will notice that the Austin Magic Pistol isn’t a classic, or a replica or even an air pistol. But this 1950 kid’s toy is so endearingly insane that it just has to be worth covering here.

I sometimes wonder if our current obsession with safety has gone too far. Do replica manufacturers believe that there are people so stupid that they don’t realize that shooting yourself (or anyone else) with a pellet or steel BB traveling at over 400fps is a really, really bad idea? And if there are such people, will putting big blocks of “safety” text on replicas actually stop them? I don’t think so. Same with kid’s toys – anything smaller than a grapefruit is a “choking hazard” and anything sharper than an elbow is simply unacceptable. But how will our children learn about safety and responsibility if we never allow them to do anything that has the potential to hurt?

amp8

However, when I look back at some of the replica (and toy) guns from the 1950s, I think that maybe we are actually better off today. One such gun which I came across recently was the staggeringly, incandescently stupid Austin Magic Pistol. Now, this isn’t really a replica gun (well, it’s a sort of replica of an imaginary ray-gun I suppose) but it’s just so completely insane that I thought I’d share it with you here.

Back in the 1950s, science and science fiction were big news. People were seriously talking about things like nuclear powered vacuum cleaners and television shows like Captain Video and his Video Rangers, Rocky Jones – Space Ranger and Space Patrol were thrilling small boys around the world. If you didn’t fancy a western styled toy gun then the chances were that what you really wanted was a working ray-gun.

amp1

The King of the Rocket Men had a cool ray-gun in 1949. Even if it did look a bit like a Luger with an ice cream cone stuck on the front.

Of course, toy manufacturers were keen to cash in on this promising interest in science and science fiction. For example, in 1950 US toy manufacturer A.C. Gilbert introduced the Atomic Energy Lab, an “educational toy” which contained, amongst other things, a Geiger counter and several samples of radioactive materials including Uranium bearing ore samples. There is little doubt that little Jimmy (or Jemima) would quickly have learned all about the wonders of atomic energy when they started growing extra limbs after playing with this, but parents become worried when their children began to glow in the dark. What mum and dad really wanted was a “scientific” toy that was a little safer for their children to play with.

amp2

Exciting! Safe! The 1950 Gilbert Atomic Energy Lab, complete with Uranium and Geiger counter. You couldn’t make this stuff up…

Happily, at about the same time the Austin Manufacturing Company of Port Austin, Michigan released the Austin Magic Pistol 38mm Special. This looked a bit like a Buck Rogers ray-gun and provided reassurance for parents as it was described as “harmless” and was claimed to have been “thoroughly tested for safety by the Detroit Testing Laboratory”. Period advertising went on to explain that the Austin Magic Pistol used something called “magic crystals” to shoot ping-pong balls. Well, that sounds pretty safe, doesn’t it? I mean, what could possibly be dangerous about a replica ray gun that uses crystals to shoot ping-pong balls?

amp3

1950 advertising for the “Harmless” Austin Magic Pistol.

There are actually a couple of important clues in this advert which should probably have raised a red flag to any concerned parent. First, the advert happily notes that the Magic Pistol goes off with a bang “as loud as a .45” cal. pistol or 12 Gauge shotgun” which suggests a reaction of some violence. And it claims to fire a ping-pong ball up to 100 feet. Even allowing for manufacturer’s hyperbole, just think for a moment about the kind of muzzle energy needed to shoot something as large and light as a ping-pong ball 100 feet!

amp5

So, just how did the Austin Magic Pistol work? Well, the “magic crystals” were actually Calcium Carbide (CaC2) which, when mixed with water, undergoes a violent chemical reaction to produce extremely flammable acetylene gas. The Calcium Carbide crystals were placed inside a compartment which formed the main body of the pistol and then water was added and an end-cap screwed in place. The CaC2 reacted with the water and the compartment rapidly filled with acetylene. Pulling the trigger produced a spark which explosively ignited this gas, propelling the ping-pong ball out of the muzzle with a deafening report.

amp6

However, there were a couple of tiny safety issues which the advertising doesn’t mention. First, the reaction when water is mixed with CaC2 is violent and can lead to fragments of reacting CaC2 being thrown off. Get some of this in your eye and there is a good chance that you’ll lose it. Second, there was nothing to stop an enterprising child from adding more than the recommended amount of CaC2 and water, producing a bigger and more powerful explosion when the trigger was pulled and providing a very real risk of blowing off the tinplate end-cap and liberally dousing the shooter’s face and head with burning acetylene. Finally, even when using small quantities of magic crystals, each shot involved the ping-pong ball leaving the muzzle at high velocity followed by a tongue of flame of up to eight feet long. Just imagine shooting at your little sister with one of these (because you just would, wouldn’t you? After all, it’s “harmless”). If the ping-pong ball didn’t get her, the flame-thrower certainly would.

Nowadays, none of these features would be considered ideal in a child’s toy but back in the 1950s I guess that parents just shrugged and decided that this was probably safer than letting their kids play with Uranium. It also rather makes you wonder just who the Detroit Testing Laboratory were – they were the people who Austin claimed had “thoroughly tested for safety” the Magic Pistol.

amp7

The Austin Magic Pistol provided hours of harmless fun for children and gave them the opportunity to meet lots of interesting people like fire-fighters, paramedics and plastic surgeons.

Below you can see a YouTube video of someone actually firing an Austin Magic Pistol. You may notice a couple of basic issues. First, the shooter spits into the rear compartment of the pistol to start the reaction that produces acetylene. Without any form of eye protection (don’t try this at home, kids!). And second, he is holding in his hand a not particularly robust tinplate toy that is now sixty-five years old and almost certainly corroded and inside of which a fair sized explosion takes place. You know, maybe we do need that safety text on our replicas after all!

I’m guessing that a fairly small amount of CaC2 was used when filming this video because the flame produced by the Magic Pistol is fairly small, perhaps only eighteen inches long. Contemporary reports suggest that this toy was capable of producing a much, much larger flame on firing. Which makes it even more odd that the instructions for the Magic Pistol suggested that it could be fired without a ping-pong ball in place “into the palm of the hand.” Look at the picture below and imagine a hand held directly in front of the muzzle. Can you see a potential safety issue here? I wonder if the Detroit Testing Laboratory tried that…

amp4

Austin Magic Pistols still occasionally turn up for sale on e-bay and other places, but if you are thinking about adding one of these to your replica collection there are a couple of things you should be aware of. First, this is now classed as a firearm in many parts of the world and owning one may be illegal. Following a number of accidents involving Magic Pistols the state of Virginia in the US for example passed a law in 1950 making illegal any toy gun which “by action of an explosion of a combustible material discharges blank or ball charges.”  The second thing to think about is whether you want to actually shoot something like this. The explosion which propels the ping-pong ball out of the muzzle is extremely violent and there is a chance that the now brittle tinplate which forms the rear part of the magic crystal compartment may blow off, spraying your face with red-hot shrapnel and burning acetylene. If you do decide to shoot one of these, you’ll need to use eye and ear protection and you should hold the Magic Pistol as far away from your face and body as possible before you pull the trigger. I’d suggest at least 100 feet away.

amp9

So, there you go. A (sort of) replica pistol from the days before safety was invented and when real men laughed at the prospect of being enveloped in a cloud of burning gas. Kind of makes you appreciate modern replicas, doesn’t it? I mean, if you are careless with a modern replica pistol, you can certainly injure yourself. But if you had messed around with the Austin Magic Pistol you might not only have incinerated and/or blown yourself and any spectators up, you might also have burned down your house. With a kid’s toy!

Nostalgia gives you a nice, warm feeling inside. The Austin Magic Pistol potentially combines this with an even warmer feeling all over.

Happy shooting. But please, not with one of these…

Related pages:

Home

Classic replica air pistol reviews

Classic replica air pistol review: Smith & Wesson 78G and 79G

7819

Replica air guns actually manufactured by the original maker of a firearm are very rare indeed.  The only other example I can think of is the Baikal MP654K by IMZ, but back in the early seventies, Smith & Wesson got there first.  The 78G and 79G air pistols are replicas of the S&W Model 41 semi-auto target pistol and were produced by Smith & Wesson in their Springfield, Massachusetts and Tampa, Florida plants.  Both the 78G and 79G (the only difference between the two is calibre: the 78G is .22″ and the 79G is .177″) are hefty, well made, powerful, single shot, CO2 powered air guns.

I owned and enjoyed a late model 78G version of this fine replica, so most of the shooting and functional information in this article comes from my experience of that pistol, though I believe that the 79G is very similar to use and shoot.

Real steel background

In the decade following World War Two, the majority of production from Smith & Wesson involved revolvers for law enforcement and civilian use.  However, in the early 1950s a new president joined S&W, the dynamic and forward thinking Carl “Swede” Hellstrom.  Hellstrom wanted to diversify the S&W range to meet the needs of a market that was starting to look towards semi-auto pistols, and under his leadership new developments in the mid-fifties included the Model 39, the first US made semi-auto to chamber the 9x19mm round and the Model 41 target pistol.

7812

Smith & Wesson Model 41

Introduced in 1957, the Smith & Wesson Model 41 was a .22 calibre semi-auto target shooting pistol.  In contrast to many contemporary .22 rimfire pistols, the Model 41 quickly gained a reputation for quality, reliability and extreme accuracy.  Construction was all-steel with attractive walnut grips and a hard-wearing glossy black finish.  The Model 41 was provided with a fully adjustable rear sight, a ten round magazine, a 7⅜” barrel and a light and precise single action trigger.  The Model 41 proved extremely popular and S&W sold very large numbers over the following twenty years, with supply sometimes struggling to keep pace with demand.

In 1963 the glossy black finish on the slide was replaced with a matt, dark grey finish to reduce glare.  In 1978 some additional minor design changes were made to the design of the Model 41, and some people felt that the new version didn’t provide the same high quality of fit and finish seen on early models.  The Model 41 was dropped from the S&W range in 1992, but was reintroduced in 1994 as the Model 41 (New Model) with detail changes and improvements.  The Model 41 has remained in intermittent production since, and was last reintroduced in 2013 (with a price tag of $1,400!).

Despite the introduction of many more modern designs, the S&W Model 41 is still a highly regarded target shooting and competition pistol – as recently as 2010 more than one title at the World Speed Shooting Championships was won by competitors using the Model 41.  Not a bad performance for a design that was more than fifty years old at the time.

The Smith & Wesson 78G and 79G

In 1965, the Wesson family sold Smith & Wesson to British conglomerate Bangor Punta.  By the late 60s, Bangor Punta was pushing S&W to diversify their range, and one of the solutions was to produce an air pistol which could be used to provide an inexpensive practice tool for the Model 41.  The S&W Sporting Goods Division employed an engineer from Crosman who produced a design for a single shot air pistol which was functionally very similar to the Crosman Mark I and Mark II models from the mid 1960s.  A cocking hammer is pushed forward to prepare for shooting and a metal loading probe is used to push a single pellet into the breech.  The pistol uses a standard 12g CO2 cartridge inside the grip (the “G” part of the name stands for “Gas” – all S&W air guns were designated either “G” or “A” for Air on pump-action models).  From 1970 two functionally identical versions were introduced: one in .22″ calibre (the 78G) and one in .177″ calibre (the 79G).  Both versions have adjustable power levels, a manual safety and a fully adjustable rear sight.

7815

The 78/79G pistols are beautifully made and designed to handle and shoot just like the Model 41.  The weight and balance of the replicas is almost identical to the rimfire version and at up to 50ft, the 78G is said to be almost as accurate as the Model 41(the 78G is actually claimed to be more accurate than some .22 rimfire target pistols at ranges under 50ft).  Grips are wood-effect plastic on the 78/79G, but are almost identical in shape and feel to the walnut grips on the original.  Each pistol has a unique serial number stamped on the left side of the frame, above the trigger.

788

The 78G and 79G were initially produced in the S&W plant in Florida before the S&W Sporting Goods Division was moved to Springfield in 1973.  Having pushed S&W towards diversification in the early seventies, Bangor Punta then reversed that decision and decided towards the end of the seventies that the Company should rationalise their range and concentrate on the core firearms business.  The last production of the 78G and 79G was in 1978, though both continued to be sold by S&W until 1980 when the S&W airgun business including the tooling required to manufacture the 78G and 79G was sold to Daisy.  Over 170,000 78Gs and 79Gs were produced by S&W between 1970 and 1978.

Daisy 780, 790 and Model 41

786

Daisy Model 41

From 1980 Daisy continued to produce both versions as the Daisy Powerline 780 and 790 and introduced a nickel-plated version of the 79G as the Powerline Model 41 which also incorporated a revised CO2 loading system.  The 780 and 790 are visually identical to the 78G and 79G other than for markings, and they remain powerful and accurate pistols though many people felt that the Daisy models lacked the high quality of fit and finish which characterised the S&W versions: the metal loading probe, for example, was replaced by a plastic version on the 780 and 790 and the trigger action was said to be less precise.  These models were not strong sellers in the Daisy range and all production ended by 1985. The Daisy variants of the 78G/79G are not as popular with collectors or shooters as the original S&W pistols.

Model changes

The first versions of the 78G and 79G featured an adjustable trigger, where the release point of the sear could be changed by using a small allen screw in front of the trigger.  Early versions also included a two-stage cocking process:  the cocking hammer could be moved partly forward to cock for a low-power shot, or fully forward to cock for a full power shot.

7810

Early black finish 79G (top), later grey finish 78G (bottom)

Finish was originally a sprayed semi-gloss black paint, but was changed on later versions to a dull grey, baked powder-coat finish, which looked somewhat similar to a Parkerised finish.  The earlier black finish seems to be more prone to chipping and wear than the later grey finish, which is very hard-wearing.

From approximately 1973 (when production moved to Springfield) the new finish was used on all 78G and 79G models and the adjustable trigger and two-stage cocking were dropped.

7811

78G markings (top), incorrect 80G markings, below

A very small number of 79Gs were wrongly stamped by S&W.  The model identification is stamped on the left side of the slide, but some 79Gs are marked as “Model 80G .177 calibre” – the 80G was a CO2 powered air rifle also produced by S&W, and it would appear that someone used the wrong stamp on at least one batch of 79Gs.  This has led some people to suppose that there is a third version of the S&W air pistol, but pistols marked in this way are simply misidentified 79Gs.

7820

Function and Shooting

The first thing you notice on picking up one of these replicas is weight.  These are hefty pistols.  They may be made of alloy rather than steel, but they are notably heavier than most modern replicas.  The finish also seems thickly applied and very long lasting, especially the grey finish on later models.  Everything about the 78G and 79G feels like it was made to last.

782

Power adjustment screw

Before you start to shoot with your 78G or 79G, you may want to adjust the power level.  All models of both types have a slotted power adjustment screw under the barrel which is accessed from below the muzzle.  This screw adjusts the tension on the hammer spring: turning it clockwise increases power and anti-clockwise reduces power.  S&W claim that setting this screw in the low power position will result in a 50% saving in CO2, though I can’t say that I noticed that this led to a huge difference in CO2 consumption on mine.

783

To prepare a 78G or 79G for shooting, you must first load the CO2.  The CO2 chamber is inside the grip and accessed by unscrewing the CO2 piercing assembly (the large knob on the bottom of the grip).  There is no way to check whether there is a CO2 cartridge in place, and if you unscrew the piercing assembly with a charged CO2 inside, there will be a loud bang as the assembly flies across the room.  So, it’s always best to cock and fire the pistol in a safe direction to confirm that there is no CO2 pressure before you unscrew the assembly.  If it is pressurised, move the cocking hammer towards the rear to release gas pressure.

Next, you insert the CO2 cartridge.  This goes in upside down compared to most modern replicas (i.e. with the piercing neck facing down).  The piercing assembly is then replaced and screwed finger tight.  Piercing is achieved by tapping sharply on the piercing knob on the base of the piercing assembly.  S&W recommend holding the pistol in one hand and tapping the knob with the heel of your other hand, but I never seemed to be able to get this to work, and I usually found that gently tapping the piercing knob on a worktop or other hard surface was a better way of piercing, which happens without any loss of CO2.

784

Next, you will want to load a pellet.  This is done by pulling back on the charging handle at the top rear of the pistol.  This moves the loading probe back and exposes the loading trough and breech, and a pellet can then be placed in the trough.  The charging handle is then pushed forward until it latches, and the loading probe pushes the pellet into the barrel.  Both versions accept a variety of pellet weights and types without any problems.

781

The cocking hammer in the discharged position.  Moving it forward cocks the gun, moving it backward releases CO2 pressure

Finally, it’s time to cock the gun.  This is done by firmly grasping the lugs of the cocking hammer which project from the frame above and in front of the trigger,  and pushing it forward until it latches.  On early versions there are two positions in which the cocking hammer will latch: the first gives a lower power shot, the second gives full power.  On all later versions, the cocking hammer latches only on the full power position.  The manual safety, a crossbar type behind the trigger can be applied only when the pistol is cocked – pushing the safety to the right makes the pistol safe, pushing it to the left allows it to fire.

785

The grips have a distinct thumb ridge, but these are identical on both sides and are equally comfortable for right and left-handed use.  The sights are a simple notch and post design without white dots or aiming aids, but they are clear and easy to use.  The rear sight is fully adjustable for windage and elevation using slotted screws.  Some people fit some form of optical sight on to the top of the slide, though this involves drilling and tapping holes in the top of the slide.

7814

All 78Gs and 79Gs fire with a loud bang, the cocking hammer is fairly heavy and the spring that propels it when the trigger is pulled is powerful, but this is a hefty pistol and felt recoil is minimal.  The single action trigger pull on my 78G was short, but not especially light or crisp.  I’m told that the earlier versions with adjustable triggers have a much crisper trigger pull, but I haven’t tried one so I can’t comment on this.

7813

78G, six shots free standing, six yards, standard sights

A 78G in good condition will shoot at over 450fps in the high power setting with most pellet types (strangely, S&W claim only 365fps for the 78G on high power, but most owners report considerably higher velocities – mine regularly shot at 450 – 460fps).  Many 79Gs will produce over 500fps.  All versions shoot with awesome accuracy and the 78G is probably the only replica air pistol I have tried which was consistently more accurate and more powerful than my 6″ Umarex S&W 586.  Even at 10m, my 78G was capable of 1″ groupings and I believe that these are also capable of very good accuracy at up to 50ft (though the heavier .22 pellet from the 78G works better at longer ranges).  For most of the shooting I did, the 78G was far more accurate than I was capable of utilising, and I had to work hard on my technique, grip, breathing and stance to get the best out of this replica.

Loading and cocking for each shot is a slightly cumbersome process, and these certainly aren’t action shooting pistols, but they are more powerful and accurate than almost any replica air pistol you can buy today. The only thing that stopped my S&W 78G being my favourite replica in terms of shooting was my Crosman Mark 1. The S&W 78G and 79G are very similar to the Crosman Mark 1 in terms of design and function (unsurprising since the same designer was involved in both projects) but, for me at least, the Mark 1 is just a little better balanced, a bit less cumbersome and has a more comfortable grip angle than my 78G. These are very good replicas. It’s just that, in my opinion, the Crosman Mark 1 is slightly better.

Quality and reliability

The S&W 78G and 79G are made from zinc alloy, though this feels rather heavier than the alloys used on contemporary replicas (these air pistols actually weigh a little more than the Model 41 pistol).  However, the alloy used is also quite brittle, and care is needed to avoid damage during disassembly and use.  There are also issues with the use of dissimilar metals – on my 78G for example, the sleeve round the power adjustment screw was firmly stuck in place.  Several O rings were leaking, and the only way to disassemble the pistol is to remove this sleeve.  I eventually managed this, following several applications of penetrating oil and the use of more force than I would have liked, but it could easily have ended in disaster.  I found similar problems in a number of areas – the use of steel and brass components in an alloy shell can cause parts to become firmly wedged in place over time (the tiny allen screw used for trigger adjustment in early examples is another part which suffers from corrosion) and unless you are  confident in your gunsmithing skills, refurbishment of a 78G or 79G may be something best left to a professional.

The castings on some of the earliest 78G and 79G models also turned out to be porous and these can lose gas fairly quickly through the CO2 channels cast into the frame.  Sadly, there is not a lot you can do if your 78G or 79G is losing gas through the castings.  Later models (with the dull finish and non-adjustable trigger) don’t seem to suffer from this problem.

7816

There are also a couple of quirks in the operation of these replicas.  Once a 78G or 79G is cocked, it cannot be safely de-cocked other than by shooting.  It is also possible to unscrew the piercing assembly while a charged CO2 is in place, launching the assembly across the room with a great deal of force.  It’s best to release gas pressure by moving the cocking hammer fully to the rear and then test fire the pistol in a safe direction to confirm there is no residual pressure before removing the piercing assembly.

There also seems to be some variability in CO2 usage.  I generally used my 78G in the high power setting, and I found that I was getting 25 – 30 shots per CO2 (though I have seen claims of as few as 12 – 15 shots per CO2 for these models).  However, I have also seen claims of 100 and even 200 shots per CO2 from some users.  S&W claim 65 shots per CO2 on high power and 125 shots per CO2 on low power – the lower the power setting the less CO2 you’ll use, and the ability to cock to a half-power setting on early models may also help, but even so there seem to be wide differences between examples in the level of CO2 consumption.  I found that my 78G used a lot of CO2 though I was entirely willing to accept that in return for the high levels of power and accuracy the pistol provided.  On the other hand, other people seem to get much better CO2 consumption while retaining good power and accuracy so there does seem to be some variation.

7817

Another slightly worrying quirk of the 78G and 79G is a tendency to fire if they are dropped while cocked.  A stray .22 pellet traveling at over 450fps is definitely something you want to avoid, so careful handling is in order.  In the US in 1983 a recall was ordered on all S&W 78G and 79G models in addition to the Daisy 780, 790 and Model 41.  Recalled pistols were modified to prevent them from firing if dropped.  Apparently all pistols modified in this way have the letter “D” stamped on the angled part of the base of the grip.  I have handled a number of these pistols, but I have never seen one marked in this way so I wonder how many were actually modified?  Unless your 78G or 79G is marked in this way, be very careful when handling it cocked.

Keeping it working

If you buy any elderly air pistol, it is probably sensible to assume it will need to be resealed.  On the 78G and 79G most of the seals are simple O rings which can be replaced with modern Viton versions which will cure leaks and may even improve power.  Disassembly isn’t technically difficult and no special tools are needed, but some of these pistols are now more than forty years old, and many parts are likely to be firmly lodged in place.  This, combined with fairly brittle alloy casings can cause major problems, so approach with caution.

Conclusion

7818

Lots of 78Gs and 79Gs were produced and large numbers still turn up for sale.  If you do buy one of these, you aren’t buying a replica: this is a Smith & Wesson handgun which happens to use CO2 and pellets rather than cartridges.  For that reason alone, they’re worth considering, but they also happen to be extremely accurate and powerful, so they aren’t disappointing to shoot.  Of course, even the most recent 78G or 79G will be more than thirty-five years old now, so you have to expect some wear and tear and it’s probably sensible to budget for re-sealing to get the best out of one.  But for your money you’ll get one of the most accurate and powerful replicas around and you’ll own a real slice of S&W history.  Which can’t be bad, can it?

Related pages:

Crosman Mark 1 and Mark 2

Home

Classic replica air pistol reviews

Links

Very detailed article on re-sealing a 78G – Part 1

And Part 2

How to add a sight rail (to a Daisy 790) – Part 1

And Part 2

Classic replica air pistol review: Crosman Mark I and Mark II

m11

In the mid-1960s, Crosman reached what in retrospect was some kind of high point in terms of CO2 powered air pistols.  The company were producing a range of innovative, carefully designed and well engineered air pistols which appealed to both collectors and shooters.  By 1965 the Wild West revolvers, the 38 series revolvers and the Model 600 had all proved to be reliable and popular.  However, all these pistols were multi shot plinkers – ideal for sending large numbers of pellets or BBs accurately out to 10m or so, but less accurate beyond that range.  What the company didn’t have was a modern, high quality replica air pistol capable of tight groupings at ranges of 50ft or more.  Which led to the development of the Mark I and the Mark II, CO2 powered replicas of the Ruger Mark 1.

I have to admit right at the start that this isn’t an entirely unbiased review – the Mark I is probably my favourite of all the Crosman “Golden Era” replica air pistols.  Like the Ruger Mark 1 on which it is based, there is something that just feels “right’ about the Mark I (and the Mark II) when you pick one up.  These may not have the technical “Wow!” factor of the Model 600 or the emotive appeal of the SA-6, but if you want a beautifully balanced, well made and supremely accurate replica air pistol, they don’t get much better than this.

Development

In the late 1940s, engineer, inventor and entrepreneur Bill Ruger bought a war souvenir Japanese Nambu pistol from a US Marine who had served in the Pacific theatre.  Using the Nambu as a model, Ruger set out to produce a simple, reliable and inexpensive .22” handgun for target shooting and plinking.  After some experimentation, by 1949 he had produced a prototype which incorporated the cylindrical bolt and overall look of the Nambu.  However, he didn’t have enough money to start production of the new pistol.  Fortunately he made contact with Alex Sturm who had the money to act as financial backer and the vision to realize that Ruger’s new pistol could be something very special.  Sturm, Ruger & Co. was formed in 1949 and went on to become one of the most iconic US firearms manufacturers.  And the .22 pistol based on the Nambu became the company’s first product, initially as the “Standard” though it later became more generally known as the Ruger Mark 1.  The Mark 1, with its simple design proved to be reliable, rugged and inexpensive to produce and went on to become one of the most prolific and well-loved .22 automatic pistols ever made with over two million examples produced.

m16

In the mid 1960s, Crosman were looking to expand their range of successful and reliable CO2 powered replica air pistols.  They already had a range of Wild West revolvers to keep cowboy fans happy and their 38 revolvers were being used as training tools by police and military personnel in addition to selling well to the public.  Their Model 600 and 677 provided reliable semi-auto shooting action to keep plinkers happy.  They also had the Model 157, an accurate, single shot CO2 powered target pistol, but this was purely an air pistol, not a replica of a firearm.  What they didn’t have was a powerful, accurate replica air pistol capable of shooting targets at ranges of up to 50ft.

By that time the Ruger Standard was selling well and had become very highly regarded as a pistol which pointed naturally, had great balance and bore more than a passing resemblance to the iconic Luger.  Although the Crosman Mark I/II are not licensed replicas of the Ruger Mark 1, and as far as I am aware Crosman advertising from the 1960s did not make reference to the Ruger, there is no doubt that the Crosman pistol was at least very strongly influenced by the look and proportions of the Ruger.

m19

Ruger Mark 1 (left), Crosman Mark I (right)

The .22” Crosman Mark I and the .177” Mark II were launched in 1966.  Both sold strongly from the start and their simple design and high manufacturing standards ensured that both were reliable from the outset.  With only minor changes the Mark I remained in production until 1983 and the Mark II until 1986.  When these pistols were introduced, Crosman was still under the control of the Crosman family and the company was producing some of the highest quality and most innovative air pistols ever seen.  By the time they were phased out in the mid 1980s, Crosman was owned by a British conglomerate and their simplified range was focused on easy to produce, lower cost models, many of which used plastic extensively. Large numbers of both models were produced during their long production run.

Design

m117

The Mark I and Mark II are functionally and technically almost identical.  Other than differences in barrels and rifling, the only other difference is that the bolt tip on the Mark II is thinner and is magnetized so that it can also hold a steel BB in position in the breech.  Visually, the two are distinguishable by markings on the outer casing and by the use of black grips on the Mark II and brown, wood effect grips on the Mark I.

The Crosman Mark I and Mark II are virtually all-metal – the outer body is an alloy casting while internal parts are made from steel and brass.  Only the grips are plastic.  Weight is good making this replica feel very solid and the balance point is close to the rear of the trigger guard.

m12

CO2 is stored inside the grip and accessed by removing a piercing cap in the base of the grip.  All models incorporate two-stage cocking with low power and high power settings.  The pistol is cocked by pulling forward on the cocking knobs located either side of the body, above the trigger.  The cocking knob has two stages – moving the knob only to the first (low power) stage gives approximately 100fps less than moving to the second (high power) position.  Using the low power setting is claimed to give improved CO2 usage.

m18

Early models also incorporate a velocity adjustment screw on the front of the main body, below the barrel.  Turning this screw clockwise increases power, turning it counter clockwise reduces power.  Using this adjustment screw reduces/increases power for both cocking positions.  The power adjustment screw was phased out around 1975.

All models incorporate an adjustable trigger.  By turning the 1/16” hex screw located inside the trigger guard and in front of the trigger, trigger pull weight can be adjusted.  The rear sight is fully adjustable on all models.  Elevation adjustment is done by use of the slotted adjustment screw on top of the sight.  Windage adjustment is done using a slightly odd, push me – pull you system which uses two slotted screws, one on either side of the sight.  To adjust, the screw on the side in which you want to move the sight is first loosened, and the screw on the opposite side is tightened.

m110

On all models the bolt is operated by turning the bolt knob counterclockwise one quarter turn and then pulling it to the rear.  When a pellet or BB is loaded, the knob is pushed fully forward and then turned one quarter turn clockwise to lock.

All models are provided with a manual safety on the left side of the frame, behind the trigger.  The manual safety can only be applied when the pistol is cocked.

Production

The Crosman Mark I and Mark II were introduced in 1966.  Production of the Mark I continued until 1983 and the Mark II remained in production until 1986.  However, several changes to the original design were incorporated in both models around 1975.  The most notable change was that the ability to adjust power using the screw under the front of the receiver was dropped.  From mid-1975, the receiver used a new casting which did not include the power adjustment screw (though two-stage cocking was retained).  At around the same time several other changes to the initial design were incorporated including the replacement of the toggle type piercing cap with a push button type.

m13

Early toggle style piercing cap (left) on a Mark I and later push button style (right) on a Mark II

Other changes focused on the bolt and bolt guide at the rear of the receiver: the cast alloy bolt knob was replaced with a machined, knurled version and the machined metal bolt guide was replaced with a plastic version (and the retaining screws for the metal version, visible at the side rear of the receiver on early versions were also dropped).  Other minor changes included modifications to the barrel nut and the muzzle nut.  However, these changes did not happen all at the same time, so for example, you may find a Mark I with the power adjustment screw of the early version but which also has the later plastic bolt guide.  Crosman repair stations also tended to replace the early toggle style piercing cap with the later push button style when Mark I or Mark II pistols were returned for servicing or repair.  So, it’s common for early pistols to have been retrofitted with the later style piercing cap.

m14

Early receiver style with cast bolt knob and bolt guide retaining screws (arrowed, left) and later type with machined bolt knob (right)

The good news is, none of this really matters.  Later models are just as good as early versions in terms of shooting.  The only functional change is the loss of the power adjustment screw, which I confess I never bothered to adjust on my early Mark I.  If you really want to save CO2, you can always just cock the pistol to the first stage.

Operation

Inserting and piercing CO2 is simple on this replica: just unscrew the piercing cap, insert the CO2 cartridge neck down (i.e. with the neck facing towards the piercing cap) and then screw the piercing cap back on.  If you have one of the early style piercing caps, it must be screwed on with the toggle in the “home” position.  To pierce, the toggle is flipped to the opposite position, but do remember to return it to the “home” position before shooting. On push-button style caps, the cap is screwed on and then the button on the cap is pressed.  Crosman recommend pressing the base of the cap against a hard surface.  However, on my Mark I, it needed a fairly sharp tap against a hard surface before the CO2 would pierce.

m114

A pellet or BB is then loaded by twisting the bolt knob 90° anticlockwise to unlock and then pulling backwards.  This exposes the loading trough in front of the breech.  A pellet is placed in the trough and the bolt knob pushed forward.  This pushes the pellet or BB into the breech and the bolt knob is then turned 90° clockwise to lock.  Both the Mark I and Mark II accept a range of pellet types without any problems.

m15

The pistol is cocked by moving the two cocking knobs forward.  Cocking takes very little effort and when the first click is heard, the pistol is cocked to the low power setting.  If you continue to push the cocking knobs forward you’ll hear a second click, indicating the high power setting.  I like the idea of the high and low power settings.  Velocity isn’t particularly important for target shooting and normally I’d be happy to trade some fps for improved CO2 consumption.  However, on my Mark I, the trigger pull was notably less crisp when cocking only to the low power setting, and for this reason I always cocked to the second, high power setting.  The manual safety can only be engaged when the pistol is cocked, and there is no way to safely de-cock other than firing.

If you have a pre-1975 example, power can also be adjusted using the slotted screw on the front of the main casting, below the barrel.  On my Mark I, I left this set at the mid position and never felt any need to adjust it.  I suppose if you are shooting at long range you might want to adjust for maximum power, but otherwise I don’t really see any need for this adjustment.

m113

The trigger pull can also be adjusted by using the hex screw inside the trigger guard, just in front of the trigger, but some caution is required.  It is possible to adjust the trigger so that it releases with a pull of around one pound or even less.  This is really, really light and with the trigger set like this it’s just way too easy to inadvertently fire.  Most owners report that a pull of around 2lbs gives a crisp, useable trigger pull.

The Mark I and Mark II both shoot with a satisfying bang though there is virtually no felt recoil due to the lack of blowback or other moving parts.  The sights (and particularly the undercut front post) provide a clear sight picture and full adjustment of the rear means that you can set things up so that the point of aim and the point of impact coincide at your chosen shooting range.  A good Mark I will generally shoot at around 400fps in the high power setting and the smaller caliber Mark II will shoot a little faster.  You can expect anything from 30 – 60 shots per CO2 depending on your chosen power settings.  The Mark I is just phenomenally accurate, certainly one of the most accurate replica air pistols I have tried (in my experience, only the S&W 78G/79G get close).  At 10m, a decent Mark I is capable of grouping at well under ½” and even at 50 feet can still group at under 1”.  It’s generally agreed that, out to around 50 feet, the Crosman Mark I is actually more accurate than the Ruger Mark 1 which it replicates.  I have less experience with the Mark II, but I believe that it’s only a little less accurate than the Mark I at 10m when using pellets.  It will be less accurate if you use BBs, but really, why would you?  BBs are a little cheaper than pellets but when you have a classic air pistol this accurate, why would you accept lesser accuracy and the risk of eroding the rifling on the barrel just to save a few pennies?

However, accuracy also means that shooting a good Mark I or Mark II can be a daunting and a humbling experience.  These pistols are just so damn accurate that there really isn’t any excuse for not producing tight groups at 50ft and even beyond.  If, like me, you’re used to shooting multi-shot pistols at 10m and under, you may discover that you’re not nearly as good as you thought you were if you use one of these.  And that’s just the standard version – some modified Mark 1s are claimed to be capable of a 1” grouping at 50m.  I don’t know about you, but I can barely see a 1” target at 50m using iron sights, let alone hit one reliably!  So, be prepared to feel a little silly the first time you shoot one of these.  The good news is that, if you’re willing to practice and improve, the Mark I will allow you to discover the satisfaction of precisely placing pellets at ranges well beyond those which most modern replica air pistols can manage.

Buying a Mark I/Mark II

Should you go for a Mark I or a Mark II?  For me, that’s a fairly simple choice.  The barrel on the Mark II is a compromise, allowing both pellets and steel BBs to be fired without damaging the rifling.  The barrel on the Mark I is rifled and designed to take pellets only, and this, added to the better stability of the heavier .22” pellet,  gives the Mark I the edge for accuracy, especially at longer range.  And extreme accuracy is what makes this replica stand out.  Given that, I’d always go for a Mark I if I had the choice.

m111

And the good news is, there is lots of choice.  Large numbers of the Mark I and Mark II were made over their twenty year production run, and because it’s a simple, robust design, lots of them are still around.  The long production run also means that prices tend to be lower than for some other classic Crosman models, for example, the Model 600/677 or the very rare Model 451.  As with all older pistols, it’s difficult to quote a precise price because this is so dependent on condition and whether the sale includes things like the original box, manual, etc.  In general, it should be possible to find a reasonable, working Mark I for around the same or less than you’d pay for (for example) one of the top or the range Umarex pellet shooters.  For something that’s immaculate and in its original box, you can expect to pay more.  The Mark II generally sells for a little less than the Mark I.  If you are looking for an air pistol which will hold its value or appreciate, go for a Mark I in good condition with its original box and paperwork.

m115

This early Mark I has lost most of its original finish.

There are relatively few problems with these replicas.  Seals wear out over time and the lands and grooves on barrels will eventually wear (though both models seem to be capable of thousands of shots without major degradation of the barrel).  Finish is variable.  Some seem to keep their original finish and resist scratching and chipping, others seem to prone to completely shedding their finish, leaving dull, oxidized alloy.  Don’t be too put off if you find one of these with a poor finish – these often sell for much less, but re-coating is an option and the lack of finish doesn’t affect power or accuracy.  Because so many were produced and are still being used, spares and replacement parts (grips and re-seal kits in particular) are widely available for the Mark I and II.

The Mark I was (and is) a popular pistol to modify, and you will often come across examples which have been modified.  Longer barrels (10”, 12” and 14” barrels are fairly common), bulk CO2 adaptors and mounts which allow the use of optical sights are all fairly common.  The performance of some modified Mark I pistols is simply astounding – versions of the Custom LD MKI Long Range Pistol produced by Mac-1 Airguns for example, are said to be capable of over 600fps and 1” groups at 50m!  Decent optical sights certainly help those of us with ageing eyesight to use more of the accuracy of even the standard Mark I, but it is notable that recently, the best prices seem to be paid for original, unmodified examples.  I guess that as the Mark I becomes rightly regarded as one of the classic pistols from a classic period for Crosman, collectors are becoming more interested in owning original and unmodified examples.

m112

Mark I fitted with wood grips, a mono-mount and a red-dot sight

Conclusion

These pistols exude quality in almost every way.  From the undercut Patridge front sight to the accurately adjustable rear sight, everything feels well-thought out and nicely put together.  Better still, these are natural pointers which have great primary balance and fit the average hand better than most pistols.  Mimicking something as popular and well-regarded as the Ruger Mark 1 was a very sensible design choice by Crosman, and the Mark I and II inherit many of the fine handling qualities of that pistol.

m116

Are there any down sides to these replicas?  Well, both have grips that include a thumb rest and are intended for use in the right hand only (though left-hand or ambidextrous grips are easy to find) and the safety is designed for use with the right hand only.  And of course they’re single shot only, which can come as a shock if you’re used to blasting away with modern multi-shot replicas.  Other than that, there isn’t a lot wrong with either.  Both the Mark I and the Mark II are simple, robust, well engineered and will last a very long time indeed if they’re looked after.  And there are very, very few replica air pistols which will provide the accuracy and power of a good Mark I.

Related pages

Crosman 38 revolvers

Crosman Wild West revolvers

KJ Works Ruger MK 1

Home

Classic replica air pistol reviews

Links

Crosman support page with links to download the Mark 1 manual and parts diagram

https://support.crosman.com/hc/en-us/articles/203361344-MARK-1-Owner-s-Manual-EVP-1966-1983-

And the same for the Mark 2

https://support.crosman.com/hc/en-us/articles/203544200-MARK-II-Owner-s-Manual-EVP-1966-1986-

Classic replica air pistol review: Healthways Plainsman/Plainsmaster

p8

This time we’re looking at the Healthways Plainsman, a CO2 powered multi-shot replica of the classic Colt Woodsman. It’s an ugly little devil, looking like some kind of Frankenstein marriage between a Colt Woodsman and a Japanese Nambu, but it’s robust and reasonably powerful and accurate. Just make sure you know what you’re buying or you may find yourself with a replica that it’s almost impossible to find ammunition for. Incidentally, don’t confuse this with the much rarer and more valuable Challenger Plainsman, a pump action pneumatic air pistol manufactured by Challenger Arms Corporation in the 50s and 60s.

The Healthways Plainsman was designed and first produced in the sixties and it lies somewhere between the quality and technical sophistication of, for example, the Crosman 600 and the cheap and cheerful end of the market represented by the Marksman 1010.  Like the Colt Woodsman that it (sort of) resembles, it’s also a decent shooter as well as being reasonably well made, robust and reliable and decent examples can be had for relatively little money. All good reasons for considering the Plainsman if you’re thinking about expanding your collection of vintage replicas though you do need to know which version to buy if you are to avoid problems sourcing ammunition.

Development

By the mid-1960s, the use of CO2 in air pistols was well established with, amongst other things, a range of Crosman CO2 powered replicas. CO2 cartridges, mainly still the 8g type produced for soda makers, were readily available, relatively inexpensive and offered a reasonable number of shots per CO2. Noting that lots of shooters seemed keen to buy these pistols, US sporting and fitness goods manufacturer Healthways (“America’s most unusual line of sporting goods products”) decided that a CO2 powered replica air pistol would fit nicely within its existing range which included outdoor and sports equipment such as diving gear.

For the design of what would become the Plainsman, Healthways employed engineer and gunsmith Kenneth R. Pitcher and in the course of the late 1960s several patents were registered for new air pistol designs. Finally, in 1969 Healthways launched the Plainsman, modestly claiming that it represented “The most sensational invention in the history of the air gun world” and that it was “acclaimed by gun experts as a new era in gas powered guns”. The slightly less exciting truth was that the Plainsman was a relatively simple and robust design which was sold fairly cheaply (early models retailed at around $12, around half the price of a Crosman revolver replica) and proved to be reliable and trouble free.

p3

Most sensational pistol ever made!” Hmm… Healthways hyperbole from the early 1970s.

Other than an early modification to the piercing cap which allowed the use of larger 12g CO2 cartridges, the Plainsman stayed relatively unchanged during its production life. It sold well and during the 1970s a licensed version was sold by the Uma Hunting and Sporting Goods Company in Germany (which would later became Umarex) and marketed in Europe as the Perfekta Plainsman. However, despite the commercial success of the Plainsman, by the 1970s Healthways was not doing well. The company had actually filed for bankruptcy in 1963 and only continued to trade as it was bought over by a number of large corporate owners. Production of the various Plainsman models continued until 1980 when Healthways finally ceased trading. However, the Plainsman story didn’t quite end there because in 1983 Marksman bought the rights to manufacture the Plainsman and from 1984 – 1987 the Model 9401 was manufactured and sold as the Marksman Plainsman Model 1049.

Design

The Plainsman is constructed mainly of zinc alloy with steel internal parts and plastic grips. On most models of the Plainsman, grips are black but towards the end of production some were produced with plastic grips in a very convincing walnut grain. Barrels are steel and either smoothbore or rifled according to model. BBs are poured in to a reservoir at the upper rear of the pistol which is covered by a sliding gate which incorporates the rear sight and are then gravity fed to a magnetic elevator arm which conveys them to the breech. The trigger is double action only and the long pull feeds the next BB into place in addition to cocking and releasing the internal hammer. A sliding manual safety is provided on the left side of the grip and a three-position power adjusting screw is located in the base of the grip.


p5

Early Plainsman with lever type piercing cap

The Plainsman is powered by a CO2 cartridge inserted in the grip and pierced using a cap in the base of the grip. The first models used a lever-type piercing cap which incorporated the main seal but during the 1970s this was replaced by a more conventional screw type cap which pressed the CO2 cartridge up against the internal neoprene seal and piercing pin. On models with the lever type cap the CO2 cartridge is inserted neck down (the whole internal chamber inside the grip is pressurized) but on later models with screw type caps the cartridge is inserted neck up. The earliest models of the Plainsman could only be used with 8g CO2 cartridges but the later piercing cap was designed to accommodate the larger 12g cartridges. Later models were provided with the 12g piercing cap plus an alloy spacer which allowed use of the smaller 8g cartridge.

p4

Intermediate model with early screw type piercing cap

The first models with screw type piercing caps had a shallow cap with a slot so that a coin or screwdriver could be used for tightening. Later, this was changed to a deeper cap with knurling which could more easily be tightened by hand. Construction of the Plainsman was very sturdy and the zinc-alloy frame in particular seemed more robust than on many other contemporary replicas. The Plainsman proved to be very reliable and Healthways were so confident in it that they offered a comprehensive repair and replacement service for defective pistols.

Models

There are a number of variations on the basic Plainsman theme. All are mechanically similar but if you’re looking to add a Plainsman to your collection, you need to know which is which because some are designed to shoot hard to find .22” nickel coated lead balls.

Healthways Plainsman Model 9400

The Model 9400 has a rifled barrel and was designed to shoot Healthways proprietary nickel coated steel BBs, though it can also be used with modern 4.5mm zinc coated steel BBs. The reservoir holds up to 100 BBs.

Healthways Plainsman Model 9401

The most common model of the Plainsman, this is identical to the Model 9400 except that it has a smoothbore barrel and is designed to shoot plain 4.5mm steel BBs. Sometimes identified and marked as the “Plainsman .175” or the “Model ML 175”. The BB reservoir holds up to 100 BBs.

Healthways Plainsman Model 9404 Shorty

p1

Model 9404 Shorty

The Shorty is similar to the 9400 except that it has a shorter 3.9” rifled barrel and was designed to shoot Healthways .22” nickel coated steel BBs. These were never especially easy to find even during the seventies, which may explain why the Shorty wasn’t as popular as models which fired .177” BBs. The BB reservoir on the Shorty holds around forty BBs. It’s also notable that, unlike the .177” versions of the Plainsman which have fixed rear sights, the Shorty has a rear sight that is adjustable for elevation only.

Healthways Plainsman Model MA 22

p8

MA 22

The MA 22 is very similar to the Shorty except that it has a longer (6.25”) rifled barrel. Like the Shorty, it was designed to shoot Healthways .22” nickel coated lead balls and it has a rear sight that is adjustable for elevation. Finding ammunition for the MA 22 is even more difficult than for the Shorty as it uses different rifling which means that, if you can’t find nickel or zinc coated .22” BBs, you can only shoot steel ball bearings with an external diameter of not more than 0.215”. The BB reservoir on the MA 22 holds around forty BBs.

Healthways Plainsmaster Model 9405

p6

Plainsmaster

The Plainsmaster 9405 is a Plainsman with an extended 9.4” rifled barrel, a plastic grip and fore-end in imitation walnut grain and a removable foregrip. Other than these changes the 9405 is mechanically identical to the Model 9400 and was designed to shoot Healthways .177” nickel coated steel BBs though it will also shoot modern zinc coated steel BBs. The BB reservoir holds up to 100 BBs.

Healthways Plainsmaster Model 9406

The 9406 is identical to the 9405 other than having a smoothbore barrel suitable for shooting 4.5mm steel BBs. The BB reservoir holds up to 100 BBs.

Marksman Plainsman Model 1049

p7

Marksman Plainsman

From 1984 – 1987 the Marksman company produced the Plainsman Model 1049, which is identical to the Healthways Plainsman Model 9401 other than for Marksman markings on the frame and walnut grain plastic grips. Because it shares a smoothbore barrel with the 9401, this model can shoot standard 4.5mm steel BBs.

Perfekta Plainsman

The Perfekta Plainsman is identical to the Model 9401 other than that it has “Perfekta” and “Kal 4.45mm” markings on the frame.

Design


p15

The frames of the Plainsman and Plainsmaster are constructed from robust zinc alloy with steel internal parts including barrels. Grips are plastic. On early Plainsman models grips are black though on some later models of the Plainsman and on the Plainsmaster and Shorty these are simulated walnut.

p11

Internal design is fairly complex. Pulling the trigger causes a large link to move to the rear, pushing the hammer back until it reaches the limit of its travel when it is released and strikes the firing valve. The link which cocks the hammer also operates a magnetic BB elevator which takes a single BB from the reservoir and places it in the breech. Because of this the trigger pull is long though not particularly heavy at around 5lbs, and the release point is a little vague.

All models are provided with a power adjustment screw in the rear base of the grip which adjusts pre-tension on the hammer spring. This screw has three pre-set positions – low, medium and high. BBs are stored in a chamber at the upper rear of the pistol. This is accessed by sliding a section at the rear which includes the rear sight upwards to open the reservoir. All models have a sliding, two-position manual safety on the left front of the grip.

Operation

Preparing any Plainsman or Plainsmaster for shooting is simple. Insert a CO2 cartridge (neck down on early models with lever type piercing caps, neck up on later models with screw type caps) and pierce. Open the BB loading cover at the rear of the upper body by sliding it up, pour in BBs and slide the door down to close. Move the manual sliding safety down to the “Fire” or “Off” position and you’re good to go.

p9

Healthways claimed that sub one inch groupings were possible at 25 feet with the Plainsman. This may be technically feasible, but it is rather difficult to achieve in practice. The issue is the long, double action trigger pull. Although pull weight is very consistent, the long pull introduces vertical spread in any grouping and at 25 feet, a two inch vertical spread is much more likely. The Plainsman does shoot with a satisfying bang though of course there is virtually no felt recoil.

p12

BB loading cover

Using the power adjustment screw allows the usage of CO2 to be controlled. At the lowest power setting (i.e. with the screw all the way in), a Plainsman in good condition will shoot .177” BBs at around 250 – 270fps. Medium power will give around 350 – 380 fps and on high power you can expect 420 – 440 fps. Healthways claimed that on the low power setting, all 100 BBs in the reservoir could be fired with a single CO2 cartridge. You won’t be surprised to hear that as power is increased, the number of shots per CO2 will decrease. I don’t have figures, but I’d expect the longer barreled Plainsmaster to fire at slightly higher power and the .22” Shorty and MA 22 will shoot at around 300 and 350fps respectively on the high power setting. Obviously, these figures are for guidance only and the actual performance of any Plainsman will vary dependant on temperature and condition.

Shooting CO2 powered replicas doesn’t get much simpler than this. Just load CO2, pour BBs into the reservoir and keep pulling the trigger until you run out of one or the other. These replicas may not be the most powerful or accurate you’ll ever shoot, but they have no major vices or problems and in general they’re robust and reliable.

Buying a Plainsman/Plainsmaster

Large numbers of the Plainsman and Plainsmaster were produced and it isn’t difficult to find used examples for sale. As with all older pistols, price will vary dependent on condition and whether a box and manual are provided but these are generally fairly inexpensive to buy, especially compared to some Crosman vintage pistols. I hesitate to quote prices given that these are subject to variation depending on where you live, but generally I’d expect that you can find a good, working Plainsman for around the equivalent of $100 and a pristine, boxed example probably won’t cost much more than $150. However, you can expect to pay more for the rarer Shorty and MA 22 models.

All models are generally very robust and reliable, with the obvious caveat that you may be buying a replica that’s anything up to forty-five years old so it may be sensible to budget for a re-seal at the very least to get the best out of your Plainsman. All models of the Plainsman seem to retain their finish well and thirty and even forty year old versions can still look very good indeed. Current manufacturers please take note – I don’t know what kind of coating Healthways used for the finish on the Plainsman, but could we have something as durable as this on modern now? Please!

p10

If you can find an early, boxed Plainsman in this sort of condition you should be very happy indeed.

One of the major issues if you’re thinking about one of these will be ammunition. If you’re going to buy a Shorty or an MA 22, you’ll need some form of coated .22” BB to get best results. You can use steel ball bearings in either (though these need to be of smaller diameter in the MA 22), but you may damage the rifled barrels and you certainly won’t achieve optimum accuracy. Lead balls in .22” are commonly available, but these won’t feed properly due to the magnetic parts in the feed system. Finding ammunition for the Shorty or the MA 22 isn’t impossible, but it is much more difficult than picking up standard 4.5mm steel BBs or .22” pellets. You may want to do some research on this if you’re considering buying a Shorty or MA 22.

p13

Late production Plainsman with deep piercing cap and walnut grain plastic grips

The Model 9400 and Plainsmaster 9405 both have rifled barrels and were designed for use with Healthways own nickel-coated steel BBs which are no longer available. However, zinc or copper coated steel BBs are still widely available and can be used on both models.

For modern shooters, the Plainsman 9401 and the Plainsmaster 9406 are probably the simplest in shooting terms as both will happily use standard 4.5mm steel BBs. Fortunately the 9401 is probably the commonest Plainsman of all, so there are still plenty of these around. The Marksman Plainsman Model 1049 and the Perfekta Plainsman are both based on the 9401 and can also be used with steel BBs.

Conclusion

Despite Healthways extravagant marketing claims, the Plainsman and Plainsmaster are nothing special in terms of design, power or accuracy. However, all Plainsman models are reliable, robust and fun plinkers which seem to go on shooting without major issues for a very long time indeed.

p4

As ever, it depends what you are looking for. If you want technical innovation and high quality, go for a Crossman 600. If you want extreme accuracy, go for a Crosman Mark I or a Smith and Wesson 78G/79G. If you want to spend less money for a simpler but still enjoyable and reliable vintage plinker, the Plainsman may be the very thing you want.

Links

Excellent article on dismantling the Plainsman   http://anotherairgunblog.blogspot.com/2011/11/healthways-plainsman-bb-pistol.html

Related Pages:

Classic replica air pistol review:  Crosman Wild West revolvers

Classic replica air pistol review:  Crosman 38 revolvers

Classic replica air pistol review:  The Marksman Repeater

Home

Classic replica air pistol reviews