If you have read my review of the Gletcher PM1951, you’ll know that, while it wasn’t a bad shooter, it hits around 2” below the point of aim. I hate replicas that shoot low. I don’t know why: I can just about tolerate something that shoots high, but not low. On a replica such as this which has fixed front and rear sights, I can’t simply adjust the sights to take care of the problem. If this was a 6mm replica, I’d switch to using a lighter BB and/or adjust the hop-up. But on a 4.5mm replica, I don’t have either option. So, is there anything you can do about it if your 4.5mm replica shoots low?
Happily, the answer is yes. Sort of. Let me explain. If the point of impact is below the point of aim, you have two options: you can raise the point of impact by raising the barrel or you can lower the point of aim by modifying the sights. On the Gletcher PM1951, the barrel is rigidly fixed to the frame, just as it is on the Makarov pistol this replica is based on. That means that there isn’t a quick or simple way to change the angle of the barrel.
On replicas like this where the front sight is an integral part of the slide, the only option is to file it down.
On this replica, the only option is to modify the sights. If I want to lower the point of aim, I need to either lower the front sight or raise the rear sight. There doesn’t appear to be a simple way of raising the rear sight, so the only thing left is to lower the front sight by filing it down.
Before you start anything like this, make sure that you first do plenty of reference shooting. You want to establish a known baseline before you start making any alterations. When you’re doing this, use the same steel BBs all the time to ensure consistency. I have shot a few hundred rounds through the PM and I am confident that the centre of typical groups is around 2” below the point of aim. You can see a typical target below.
10 shots, Umarex Steel BBs, 6m, semi-rested. Point of aim is the centre of the black circle. The group is very respectable but its centre is approximately 2” below the point of aim. And yes, I know the target’s upside down.
So, we need to lower the front sight to raise the point of impact. On a replica where the sight is a non-removable part of the slide, the only option is to file the sight down. There are two things to consider here: the first is that a small change in the height of the front sight makes a large difference to the point of aim and the zinc alloy from which replicas are made is relatively soft so, don’t try to take too much off in one go. File off small amounts each time and then shoot to check how things are progressing. The second thing is that, given the generally thin and fragile finishes applied to our replicas, it’s horribly easy to inadvertently put a large scrape or scratch on the finish of the top of the slide when you’re filing the sight. Guess how I know that? That’s right, because I tried filing down the front sight of my Cybergun P226 X5 without using a mask and I put a scratch right along the top of the slide. So, you need to make a simple mask that will allow you to file the sight without risking damaging the slide.
On the PM, I removed the slide and then used a piece of card to make a mask which I taped in place round the slide. This left only the sight projecting and stopped me from scraping the top of the slide. Then, it was just a case of filing a little at a time and testing by shooting.
Having said that you should take off a little at a time, I had to file the PM sight down more than I expected to get the point of aim and the point of impact to coincide. However, when I was done, I had a PM that shoots where it’s aimed.
After filing, 10 shots, Umarex steel BBs, 6m, semi-rested. Aim point was again the centre of the black circle. The group isn’t as tight this time, probably because I shot fairly quickly, but at least it’s vertically centred on the black circle and six out of the ten shots are inside the inner circle. And the target’s still upside down…
So, that wasn’t too difficult. In less than an hour I went from a replica that was hitting two inches below the point of aim at 6m to one that shoots pretty well where it’s aimed. The front sight has ended up smaller than I would have liked, but I’m willing to put up with that in return for a better shooting experience.
A quick dab with a black permanent marker pen and it’s good to go. Another job can be ticked off the list and I can start to really enjoy shooting this replica.
The next step in the upgrade of my Tokyo Marui Hi-Capa is to fit the upgraded loading nozzle. The loading nozzle is the part that pushes the BB into the barrel when the slide returns to battery and the front part of the loading nozzle fits tightly inside the barrel. The better the seal between the front of the loading nozzle and barrel, the less gas you will lose here and the higher and more consistent the fps should be.
To fit a new loading nozzle, you must first remove the blowback unit which is located in the rear part of the slide. On the TM Hi-Cappa, it’s held in place by a 2.5mm hex screw at the rear of the slide. To remove the unit, first remove this screw…
Then, remove the blowback unit by sliding it down and out of the slide. When it’s out, you’ll see that there is a long trough in the top of the unit, inside which fits the loading nozzle return spring and the retaining tab for the loading nozzle (arrowed below).
To remove the old loading nozzle, just slide it forward and angle it so that the retaining tab clears the slot. Then, fit the new one in the same way. Put the return spring back in the slot and re-fit the blowback unit in the slide. It’s best to do this with the slide right-way-up – if you try to do it with the slide upside down, the nozzle return spring may fall out and prevent the unit from seating properly. Once you’re happy that it’s properly seating in the slide, re-fit the hex screw and you’re done.
Finally, it’s time for the new hop-up rubber and tightbore barrel. Take the inner and outer barrel out of the slide and take the inner barrel and hop-up unit out of the outer barrel by sliding it to the rear. Split the hop-up casing by removing the two small cross-head screws (arrowed below).
Take out the metal hop-up adjustment arm then lift out the existing barrel and hop-up rubber. You’ll see that the hop-up rubber has a large, rectangular tab on it which fits into a slot on the right-hand hop-up casing. Fit the new hop-up rubber to the new barrel. The open part of the barrel must face towards the top of the pistol while the rectangular tab on the hop-up rubber faces to the right. Basically, just make sure that you replicate what you find with the existing set-up.
New barrel and hop-up rubber (top) and original barrel and hop-up (bottom).
Press the tab on the hop-up rubber into the slot on the right-hand hop-up casing, then re-fit the hop-up adjustment arm, making sure that the small tab on the end of the arm fits inside the slot in the adjustment wheel (arrowed below).
Now re-fit the left half of the hop-up casing and you’re done. Reassemble everything and you’re good to go. Now, that wasn’t so difficult, was it?
Now for the good bit – time to try shooting the upgraded Hi-Capa. I’m using Green Gas for these tests – with the upgraded recoil spring, this replica now won’t function with HFC-134a. I want to use the upgraded recoil spring because this returns the slide to battery faster, providing snappier blowback and a harder kick. However, be aware that this can also cause accelerated wear on plastic slides. But just like all these upgrades – you can always change it back if you’re not happy with it.
The first thing I did was to run ten shots over my chronograph using 0.2g BBs. Even before I noticed the numbers, I was aware that this replica is now louder and the kick is much stronger than it was. It’s now right up there with the hardest kicking blowback replicas I have tried. The numbers were pretty good too. If you have read the review for my standard Hi-Cappa, you may recall that it chronoed at an average of just under 230fps. It was a few degrees cooler than when I first ran this over the chrony, but this time the average was 304fps, with a high of 307 and a low of 295. That’s a pretty impressive improvement of over 30% in the speed at which BBs are leaving the barrel. It seems to work as it should too, with BBs feeding and shooting reliably. Time to try some target practice.
Initially, results were a little disappointing, but I think that’s almost certainly due to the new hop-up rubber taking time to break-in. By the time I had shot around 100 BBs, groups were getting smaller and I was able to use 0.25g BBs and to get them to shoot to the point of aim. Overall, I’d say that accuracy and consistency have improved marginally over the original, but then it was pretty good in the first place and it’s possible that the hop-up will improve further and that accuracy and consistency will continue to improve. BBs certainly hit the target with noticeably more power now, the kick is much stronger and I’m able to use 0.25g BBs, which is what I had hoped for.
10 shots, 6m, 0.25g BBs. The point of aim was the top of the black inner circle. The black circle is 30mm diameter.
Are there any drawbacks? Well, using this setup and Green Gas, I’m getting around 35 shots before I run out of gas compared to 70+ shots in standard form and using HFC-134a. So, I’m certainly using more gas, but I’m not unhappy about trading off a reduction in gas efficiency against improved kick and more power. There are people who say that using Green Gas in TM replicas will damage the slide, but I haven’t seen any signs of damage yet and I know people who have used Green Gas in TM replicas for years without problems. Part of the issue, I suspect, is temperature. Gas powered replicas are very dependent on temperature – the hotter it gets, the higher the pressure of the gas. I think that in warmer weather (say, anything over 25°C), I’d be tempted to revert to HFC-134a and the original recoil spring on this replica, just in case.
Overall, I’m very happy with these upgrades. They aren’t expensive, they’re fairly simple to fit and they do make a noticeable difference to shooting my TM Hi-Capa. I’d recommend these upgrades and the expert advice from Elite Shooting Centre to anyone thinking of upgrading their TM replica.
If you have read my review of the TM Hi-Capa 4.3 Custom, you’ll know that I was very happy with it. It’s beautifully made and it shoots very nicely indeed. However, I did wonder whether it might be possible to upgrade it for a couple of reasons:
One, I’d like it to shoot with a little more power, which would allow me to use heavier BBs, and,
Two, I’d like to be able to use Green Gas rather than HFC-134a. This would help with the first point, and would also mean that I’d need to have only one type of gas for my replicas.
My plan was to fit uprated parts and then to test for both power and accuracy with Green Gas.
I was fortunate during my research for the review on the Hi-Capa to come across Elite Shooting Centre in Bury in England. This small company is run by Mike Cripps, a man who knows a great deal about competition shooting and TM Hi-Capas. Mike was a member of the UK Squad at the World Shoot X in Bisley in 1993 and he won the very last UKPSA Competition using firearms to be held in the UK. When firearm law in the UK changed in 1997, Mike switched to shooting with airsoft pistols and in particular with TM Hi-Capas. He won the UK Open Championship in 2003, 2004, 2006, 2008 and 2009.
In 2004 Mike started Elite Shooting Centre (you’ll find a link to his website at the end of this article). Initially, this included a retail store as well as shooting ranges. However, in time the focus of the business changed to supplying parts for and building custom airsoft pistols for IPSC and pistol shooting. Mike only builds and provides parts for TM Hi-Capa pistols. Obviously, Mike is very knowledgeable about these pistols, and so I asked him for guidance when I was thinking about upgrading.
His advice was fairly straightforward – keep it simple and upgrade only using parts which are a straight replacement for stock. His recommendation was that I fit a tightbore barrel and upgraded hop-up rubber, an uprated loading nozzle and 120% hammer and recoil springs. Mike was kind enough to provide the parts needed to upgrade my replica, so, let’s see just how easy it is…
The parts
Mike provided several replacement parts for my TM Hi-Capa. These are:
Elite tightbore 6.02mm barrel
UAC replacement hop-up rubber
Gunsmith Bros. uprated loading nozzle
AIP Enhanced 120% hammer and recoil springs
Fitting all of these should simply be a case of swapping the uprated parts for the standard parts. None of it sounds too challenging, so let’s see how it goes.
First, the replacement springs. The parts Mike provided come from Hong-Kong based AIP (Army International Products). The upgraded recoil spring should provide improved recoil effect from the blowback, though you should only fit an upgraded recoil spring if you are planning to use Green Gas – HFC-134a just doesn’t provide enough power to deal with an upgraded recoil spring. The hammer spring will lead to a harder hammer strike, which will cause more gas to be released with each shot, hopefully providing improved fps. The downside is that this will also use more gas, but as the TM Hi-Capa is pretty frugal with gas, I’m prepared to accept that trade-off.
Replacement AIP 120% recoil spring (top) and TM original (bottom)
Fitting the upgraded recoil spring was no problem – I just removed the guide rod, bush and spring from the slide, replaced the old spring with the spiffy new one and put everything back together.
The hammer spring was little more tricky. The mainspring housing on any 1911 style pistol is in the base of the rear of the grip and it’s essentially a self-contained module which has to be removed to access the hammer spring. One useful tip is that it’s best to lock the grip safety in the engaged position before you remove the mainspring housing. The grip safety uses a leaf spring with fingers which can be bent or damaged when you re-fit the mainspring housing, but if you use tape or an elastic band to hold the grip safety in before you remove the mainspring housing, this won’t be a problem.
Pin which retains the mainspring housing (arrowed). Masking tape is used to hold the grip safety down.
To remove the mainspring housing, all you have to do is drift out the pin in the bottom rear of the grip. The pin has a pronounced dimple on one side and that’s the side on which you should place your drift.
Pin partway out.
With the pin removed, tension on the hammer spring will cause the housing to move around 1/8” down. Just slide it out the rest of the way down and out of the grip.
If you then look into the top of the housing, you’ll see the dished top of the hammer spring pin and, coming from the left side of the housing, a small plastic pin which stops the hammer spring and pin from twanging out. All you do is push the small plastic pin to one side and the hammer pin and spring will come out.
OK, I know it’s a little difficult to see in this picture, but if you look into the top of the mainspring housing, you’ll see the dished top of the hammer spring pin and the small plastic pin which pushes in from the side and holds this in place (arrowed)
This is one part of the job where you’ll need to be careful if you don’t want small parts springing off into the middle distance. When you push the small pin to the side, tension on the hammer spring will cause the spring pin and spring to twang out of the housing. Guess how I know that? And, if you’re working close to an open window where the light is good, you may be especially unlucky and the spring pin will bounce out of the window, on to the balcony and then down into the street one storey below. And you’ll then spend fifteen minutes looking like a complete dork as you wander up and down, scouring the street outside looking for the missing pin. Guess how I know that? And against the odds, yes I did find it. It’s lucky I live on a very quiet street! To avoid similar problems, all you have to do is make sure that your thumb or something else is over part of the opening at the top of the mainspring housing before you slide the small plastic pin to the side – this will stop the hammer spring and pin popping out.
New AIP 120% hammer spring (left) and original TM hammer spring (right)
Anyway, once the old spring is out, you just replace it with the new one and reassemble everything. Just out of interest, I put everything back together at this point and tried the slide and hammer. And yes, the hammer feels harder to cock and the slide is harder to rack. Nothing dramatic, but you can certainly feel the difference. Which is encouraging…
In Part 2, I’ll fit the tightbore barrel and hop-up rubber and replace the loading nozzle. And I’ll finally get round to doing some chrony testing and shooting with my upgraded Hi-Capa to see if these changes provide a notable improvement.
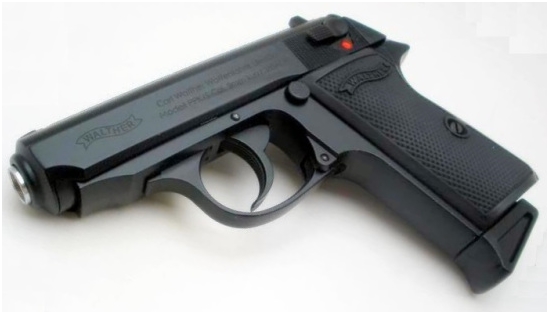
The Makarov is a classic pistol which has been represented by a number of replicas. However, none of them have been entirely satisfactory for a number of reasons. So, when I saw that Gletcher have produced a new, CO2 powered, 4.5mm Makarov replica, I was excited. Is this the Mak replica we have been waiting for? Let’s take a look…
The Makarov
I have already covered the history of the Makarov PM (Пистолет Макарова or Pistolet Makarova) in my review of the Baikal MP-654K (you can find a link at the end of this article) so I won’t repeat that here. Instead, I offer an interesting fact. Can you guess what is the only handgun to have been regularly taken into space? That’s right, that would be the Makarov.
You see, on board every Soyuz spacecraft was a Granat-6 survival kit. Along with the usual stuff like a first aid kit, there was also other survival gear in case the capsule came down in an uninhabited area. This included a compass, machete, fishing gear and a Makarov pistol and ammunition.
A Soyuz survival kit complete with Makarov pistol.
This is, as far as I’m aware, the fourth CO2 powered Makarov replica in 4.5mm, though all the previous versions had issues. The first was the Baikal MP-654K which was introduced in 1998. Not so much a replica as a CO2 version of the original firearm, this is produced in the same factory as the firearm version. It’s a heavy weight replica, but it lacks blowback and all versions are designed to shoot steel BBs through a rifled barrel, which means that all are woefully inaccurate.
In 2009 Umarex launched their new Legends range with a Makarov replica. This was a CO2 powered, 4.5mm pistol and it’s a pretty decent shooter. Unfortunately, it lacks blowback and parts like the slide release are moulded in place. In 2014 another Makarov replica joined the Umarex Legends range, the PM Ultra. This version had blowback, but it also had an unsightly CO2 loading tab which projected below the grip and it used a moving barrel system to fire which meant that it lacked a true single-action trigger.
The Gletcher PM 1951
Gletcher is a brand owned by US company SMG (Sports Manufacturing Group, Inc.). Under the Gletcher brand, SMG sell a number of 4.5mm replicas of historic handguns. Generally these are rebranded versions based on Taiwanese 6mm replicas.
The Gletcher PM 1951 appears to be a 4.5mm version of the Taiwanese KWC Makarov PM airsoft replica. It’s pretty much all metal with only the grips and some internal parts being made of plastic. This is a blowback replica and the slide operates through a full range of movement and locks back on empty. There is a slide mounted manual safety and a slide release, both on the left side, and a magazine release in the heel of the grip.
Up to 16 BBs can be loaded into a full-size, drop-out magazine which also holds the CO2 cartridge. Unlike the original (which is both double and single action) this replica is single action only. The inner barrel is brass and has a fixed hop-up rubber.
Packaging and presentation (2/5)
This replica comes in a simple card box with a single magazine and a hex key for tightening and piercing the CO2. No manual is provided but inside the lid of the box there is an exploded view of this replica.
The box states “18 Month Warranty” but there are no clues as to what this means or how one would go about making a warranty claim.
Visual accuracy 6/10
At first glance, the Gletcher PM looks fairly much like a Makarov. However, when you look a little more closely, there are several discrepancies. First and most obvious is that the grip is too long on this replica. On the original, the overall height from the top of the slide to the base of the grip is 125mm. On this replica it’s 140mm. I assume the extra length is to accommodate the CO2 cartridge, but, just like the Umarex Walther PPK/S, this looks a little odd because of the extended grip.
Makarov PM (left) and Gletcher PM 1951 (right)
Next there’s the trigger guard – this is much too thick and I don’t know why. Just as on the original, the trigger guard on this replica is hinged at the rear and must be swung down to allow the slide to be removed. Some people have suggested that the trigger guard on this replica is thick because a hinged zinc alloy trigger guard of the correct dimensions would be too fragile. However, both the earlier Umarex versions have hinged zinc alloy trigger guards of the right size, and I’m not aware of problems with these breaking. Whatever the reason for it, the trigger guard on this replica does look odd and not at all like the original.
Then there’s the hammer. In the fully forward position, it looks sort of OK, but when it’s cocked, you can see that it’s a very strange and unrealistic shape.
You’ll note that I haven’t mentioned the magazine base extension which projects below and in front of the grip base. This makes the already long grip look even longer and I assume that this is also done to accommodate the CO2 cartridge, but it does look a little strange – most Makarovs have a magazine base that’s flush with the base of the grip. However, some versions, especially export versions for the US market, do have this type of magazine extension, so I’m not going to mark it down just for that.
This replica also lacks any sort of accurate markings. The only markings here are PM 1951 on the left side and some Gletcher markings on the right. All markings are laser-etched in fairly obtrusive white text.
Functional accuracy 13/15
Functionally, this is pretty good. It has blowback over a full range of movement, a full-size magazine and the magazine and slide release are located and work just as they would on the original. One small discrepancy is that this replica is single action only whereas the original shoots in both double and single action. This replica can be field stripped in the same way as the original. There is a sleeve which fits over the outer barrel. Initially, I thought this was plastic, but I believe it’s actually some form of light alloy.
This replica weighs almost precisely the same as the (unloaded) original, which is always nice to see.
Shooting 30/40
Loading the magazine with BBs on this replica is a little fiddly if you have large man-fingers like me. You have to hold the follower down with a thumbnail and the drop BBs in one at a time into the wider opening at the bottom front of the magazine. CO2 loads cleanly and without leaks using the hex key provided. When you re-insert that magazine, you have to use a fair amount of force – the spring on the catch is very strong. When I first started shooting this replica, the magazine dropped out of the grip a couple of times because I hadn’t pushed it in firmly enough. Getting it back out again is also a bit of a chore – the deeper and extended magazine base makes using the release in the heel of the grip a little awkward and this is definitely a two-handed job.
With the magazine inserted, you must rack the slide for the first shot. This also cocks the hammer. If the manual safety is engaged, you can’t rack the slide. There is no decocker – the only way to safely de-cock is to remove the magazine and pull the trigger. With the slide racked and the first BB in the breech, you’re ready to shoot. The sights are simple – just a notch and post arrangement with no white dots, but they’re clear and easy to read.
The trigger is reasonably light and short and true single action – all pulling the trigger does is to release the sear and allow the hammer to drop. The Gletcher PM is moderately loud and the blowback action provides fairly strong recoil effect. Balance is good, but I didn’t especially care for the grip. The rear of the grip has a pronounced corner or edge at each side. This isn’t particularly uncomfortable, but it is noticeable and I’m sure that other Makarov replicas I have owned weren’t like this.
I ran a number of shots from the Gletcher PM over my chronograph and, in fairly warm temperatures, I saw readings of between 265 – 280 fps. Perfectly reasonable, but well down on the 328 fps claimed by Gletcher. I found that I was able to get 50 – 60 full power shots before power started to drop off. Faster shooting uses CO2 more quickly. Like some other KWC replicas I have owned, cooldown is an issue if you’re shooting quickly. You can actually feel the cold permeating the grip if you shoot several times in quick succession.
In terms of accuracy, this is adequate. Groups are around 1.5 – 2” at 6m, but it does do one thing that I particularly hate – it shoots low. At 6m, it hits around 2” below the point of aim. Now, there are a number of things that you can do about that (and I may look at this in another article) but looking at other reviews of this replica, it does seem that out of the box, it’s likely to shoot low. I find that very frustrating. Obviously, I prefer a replica that shoots to the point of aim, but I can just about tolerate one that shoots high. What I definitely don’t like is a replica that shoots low. There is a hop-up rubber here, but it is non-adjustable. This replica’s airsoft roots can be seen in that there is a slot for a hop-up adjustment wheel in the outer barrel, but the wheel itself is not provided.
There is one other slightly odd thing about this replica. The slide locks back, but generally not when you fire the last shot. It locks back when you fire the shot after the last BB is fired. So, if you have 10 BBs loaded, you shoot all ten, but it isn’t until you pull the trigger for the eleventh time when the pistol is empty that the slide locks back. This happens nine times out of ten. It’s not a major issue, but it is odd and in the course of shooting around 500 rounds, this has been completely consistent.
Below you can see a short video showing a shooting test for the PM 1951. You’ll note that in this video, the first shot was so low that it completely missed the target – I don’t know why and this isn’t usual with this replica. You’ll also note that the slide locks back after the last shot is fired, which is also unusual.
Overall, the Gletcher PM is a perfectly pleasant shooter, but not an outstanding one.
Quality and reliability 13/15
Overall, quality and finish look reasonable. The semi-matt finish seems to be fairly hard wearing and is showing no signs of wear though, like every Mak replica I have seen, there is a scratch on the slide where the bearing for the manual safety moves. It was notable that, out of the box, my Gletcher PM was completely devoid of lubrication.
Other than the issue with the slide usually failing to lock back until the shot after the last BB, I haven’t seen any faults with my PM and it shoots reliably and without misfeeds or misfires.
Overall impression 11/15
I like compact replicas and I like classic handguns, so I should really love this replica. The fact that I don’t is down to a combination of several minor factors which separately don’t amount to much, but which combine to be a little frustrating. I don’t care for the extended grip or the corners on the rear of the grip. I don’t like look of the oversized trigger guard or the oddly shaped hammer. And I do hate the fact that it lacks a double action trigger and that it shoots low.
None of these are show-stopping issues and they are partly offset by decent finish, good weight and the fact that it’s a reliable shooter. But overall, if I’m looking in the gun cupboard for something to provide half an hour of shooting satisfaction, this usually isn’t the one I’ll be reaching for.
Conclusion
It looks as though we’ll have to wait a little longer for the definitive 4.5mm Makarov replica. This is close to being a good visual and functional replica, but it’s not quite there. However, it is relatively cheap and it seems to be reliable and fairly frugal with CO2 usage.
If you want something that looks and handles like a Makarov, you’ll probably still be wanting a Baikal MP-654K. If you want something that looks like a Makarov, has blowback and shoots well, I’m afraid you’ll most likely be looking at the 6mm WE version.
There are a range of different weights of 6mm BB available which means it’s possible to experiment to find the one that suits a particular replica perfectly. There is also a notable difference in the quality of different brands of 6mm BBs. But, all 4.5mm steel are the same? Aren’t they? There’s only one way to find out for sure…
For those of us who shoot with 4.5mm steel BBs, we don’t have the option of trying different weights of BB to see which is best as all steel BBs are claimed to be identical. Likewise in terms of quality – there aren’t supposed to be notable differences between brands. But, is that really true? To find out, I thought I’d head-to-head test three different brands of 4.5mm BB to see if there are detectable differences in power and consistency of shooting. So, let’s try to answer the question: Are all steel BBs the same?
The Test
All steel BBs have a nominal diameter of 4.5mm and a weight of.35g. These are sometimes also referred to as .177” caliber. This is technically incorrect though these 4.5mm steel BBs can be shot through a rifled, .177” barrel.
Up for this test I have three different brands of 4.5mm steel BB, These are:
Umarex steel BBs, which are identified as 5mm, (.177)
ASG Blaster steel BBs which are identified as 5mm/.177”, 0.35g
Heckler & Koch black coated steel BBs which are identified as 5mm (.177)
Heckler & Koch Steel BBs
With their distinctive semi-matt black finish the H&K BBs certainly look different, but when you look closely, even the Blaster and Umarex BBs aren’t quite the same. The Umarex BBs are slightly darker in colour and look a little more shiny than the ASG BBs.
ASG Blaster steel BBs
This is interesting because I had wondered whether the ASG and Umarex BBs were simply re-branded versions of the same thing, but they certainly do look different.
Umarex steel BBs
The first thing I did was to weigh these BBs and this confirms that the ASG and Umarex BBs are precisely 0.35g while the H&K BBs are marginally lighter at 0.34g.
Power test
For this part of the test I shot ten of each type of BB over my chronograph and produced an average figure from the results. To try to produce consistent results, these tests were done using the same replica, at the same time and in the same location and with fresh CO2. In each case, I waited five seconds between shots to avoid issues with cooldown. And the scores on the doors were (all power measurements are in fps):
ASG Blaster steel BBs
271
262
263
269
265
264
254
262
265
262
Giving an average speed for the ASG Blaster BBs of 264.7 fps
Umarex steel BBs
266
263
271
270
270
271
276
268
271
277
Giving an average speed for the Umarex BBs of 270.3 fps
Heckler & Koch steel BBs
266
274
272
280
269
277
277
277
276
269
Giving an average speed for the H&K BBs of 273.7 fps
Now, you’d have to do a great deal more testing to be certain, but it does seem that there is a small but measurable difference in the average speed at which each type of BB is fired. The H&K BBs fire with a little more speed than the Umarex and ASG BBs, but then they are fractionally lighter, so perhaps that’s why? However, that doesn’t explain the differences between the Umarex and ASG BBs. They’re both the same weight, though the Umarex BBs do seem more shiny – perhaps they have a smoother surface finish and that gives a small boost in fps? While testing this particular replica it did seem that generally the ASG BBs gave speeds in the lower 260s, Umarex BBs gave speeds in the upper 260s/lower 270s and the H&K BBs gave speeds in the lower 270s. Is that significant if you’re target shooting? Not really, but it will be interesting to see how this translates into the next part of the test, accuracy and consistency.
Shooting
For the shooting part of the test, I shot several ten shot strings at targets at 6m range with the replica in a rested position. As before, I changed to a fresh CO2 before changing ammo type and I should note that the replica I used for the test has a tendency to shoot low and the aim point for all the targets shown below was the centre point of the black circle. Obviously there’s always going to be a degree of the human element in a test like this, but here’s what I found.
H&K BBs
10 shots, rested, 6m, H&K Steel BBs
The H&K BBs typically produced groups of around 1.25 – 1.5” horizontal spread and 2 – 2.25 vertical spread. Groups were centered around 1.25” below the point of aim.
ASG Blaster BBs
10 shots, rested, 6m, ASG Blaster BBs
The ASG Blaster BBs typically produced groups of 1.5 – 1.75” horizontal spread and 2.25 – 2.5” vertical spread. Groups were centered around 1.75” below the point of aim.
Umarex Steel BBs
10 shots, rested, 6m, Umarex steel BBs
The Umarex steel BBs typically produced groups of 1.25” horizontal spread and 1.5” vertical spread. Groups were typically centered 1.75” below the point of aim.
During the test, it was notable that the Umarex steel BBs consistently produced the smallest groups. The difference between these and the other BBs wasn’t huge, but it was measurable and consistent. The H&K and Blaster BBs produced similar sized groups, but the groups produced by the H&K BBs were centered around 0.5” higher than the groups produced by the other two types.
So, overall and based on this testing, I’d have to say that if you want the consistently smallest sized groups, I’d recommend the Umarex steel BBs. However, if you have a 4.5mm replica which shoots low, you may want to try the H&K BBs as these do seem to produce groups that centre a little higher than the other two,
Conclusion
The differences I found during this part of the test are fairly minimal, and certainly nothing like the differences that can be seen between different types of 6mm BBs (for example, some Chinese-made 6mm BBs are essentially unusable). However, there do seem to be differences here. The H&K BBs appear to produce a group with its centre around ½” higher than the others at a range of 6m, which could be useful if you have a replica that shoots low with other types of BB. The Umarex BBs did seem to produce groups that were consistently smaller than those produced by the other two types.
So, there you are. Are all steel BBs the same? Not quite, it seems, though there are no huge differences. However, these are significant enough that, next time I’m buying steel BBs, I’ll probably go for Umarex steel BBs if they’re available and H & K BBs if I’m using a replica that shoots low.
Like everything else that I publish here on the World of Replica Air Pistols, I have tried to be objective and unbiased here. However, for the sake of consistency I used a single replica during testing and it’s worth pointing out that it’s entirely possible that, if you use a different replica, you may get different results.
In replica terms, hype is a double-edged weapon. It can mean that you assume something is going to be good before you ever pick it up but it can also mean that you have expectations so high that the reality is bound to be disappointing. For these reasons, it’s not easy to approach a review of a Tokyo Marui replica pistol completely objectively. After all, TM have a reputation for producing some of the finest airsoft replicas. But hey, this is the World of Replica Air Pistols and the word “objective” is right up there on the site banner, so, let’s put those preconceptions aside and take a look at the TM Hi-Capa Custom. Is it really as good as they say? Is it worth the money? Will I run out of superlatives before I finish the review? Sit down, strap-in, grab a mug/glass of your favourite beverage and let’s take a detailed look at this iconic replica.
The first question to address is: what is this a replica of? The Tokyo Marui Hi-Capa Custom Dual Stainless doesn’t claim to be a direct replica of any specific firearm, but it is obviously very similar in appearance and function to the Hi-Cap 1911s produced by companies such as Springfield Armory and STI, so that’s what I’ll be discussing here.
1911 Hi-Cap
The 1911 by John Moses Browning has been a popular handgun since it was first introduced in the early 1900s. However, one of the limitations of this design is that its slim grip accommodates a magazine which holds just seven .45 ACP rounds. By the 1970s and 80s, many shooters were switching to 9mm semi-automatics which had much larger capacity magazines. In response, companies like Springfield Armory and STI in the US and others elsewhere began producing 1911 pistols with wider, double stack magazines which could hold up to 14 rounds. These designs, which quickly became known as “1911 Hi-Caps”, often also added other features which addressed shortcomings of the original 1911 design such as ambidextrous manual safeties, accessory rails and extended grip-safety beavertails to avoid hammer bite. The result was pistols which lost the wonderfully slim grip and clean look of the original, but became in many ways much more practical handguns.
The STI Edge, a custom 1911 Hi-Cap
Illinois based Springfield Armory Inc. started trading in 1975 after purchasing the rights to use the famous Springfield Armory name (the original Springfield Armory in the city of Springfield, Massachusetts closed down in 1968). Springfield Armory is now one of the biggest firearm manufacturers in the US producing the XD range of semi-automatic pistols as well as several 1911 designs and automatic rifles.
The Springfield Custom shop produce a range of very high quality handguns which are used both by competition shooters and carried by law enforcement agencies. For example, in 1996 the FBI Hostage Rescue Team set out on a very exacting series of tests in order to select a new handgun. The winner was the Springfield Professional 1911 A1 produced by the Custom Shop. Springfield Armory produce several variations on the Hi-Cap 1911 theme.
A 1911 Hi-Cap by the Springfield Armory Custom Shop
Although you won’t find any Springfield Armory markings on the TM Hi-Capa Custom, things like the angled front and rear slide serrations and the use of black and polished stainless on the slide make it look very like a custom version of the basic 1911 design produced by Springfield Armory. It’s also possible to buy a replacement metal slide for this replica from airsoft customizing manufacturer Intrudershop which includes full Springfield Armory markings.
TM Hi-Capa Custom fitted with an Intrudershop Springfield Armory metal slide
The Tokyo Marui Hi-Capa Custom Dual Stainless
The TM Hi-Capa Custom is a replica of a railed 1911 4.3 Hi-Cap. It is constructed of a mix of high-grade plastic and metal. The slide, outer barrel and grips are plastic while just about everything else (including the frame, guide rod, trigger, hammer, sights, safety and grip safety) is metal. The inner barrel is brass with hop-up which is adjusted via a small wheel under the barrel. A full size, metal, drop-out magazine holds up to 28 BBs and there is an ambidextrous manual safety which can only be engaged when the hammer is fully cocked. The hammer can also be manually de-cocked to a half-cock position in which the pistol cannot be fired. This replica is an improved version of the original Tokyo Marui Hi-Capa design which is claimed to be more accurate and to incorporate “Hi-Kick” blowback for increased recoil effect. TM also produce a similar 5.1 Hi-Capa version, but not in this distinctive Dual Stainless finish.
Packaging and presentation (2.5/5)
The TM Hi-Capa Custom comes in a polystyrene base with cut-outs for the pistol, magazine and accessories and a colourful, printed card lid. This replica is supplied with a single gas magazine, a small bag of TM BBs and a plastic clearing rod. It also comes with what may well be a comprehensive user manual, but as it’s entirely in Japanese, I can’t be certain about that.
The information on and inside the box is slightly confusing. For example, it gives the caliber of this replica as .45ACP and the magazine capacity as 13 + 1, both of which are true of the original firearm, but not this replica (which, of course has a caliber of 6mm and a magazine capacity of 28 + 1). At first I assumed that this information simply referred to the original weapon, but the box gives the weight of the pistol as 865g, which is close to the replica but much too light for the original.
Visual accuracy 8/10
Although this isn’t a replica of a specific firearm, it’s a good general visual replica of a custom 1911 Hi-Cap with a 4.3” slide and barrel. The markings on the slide (“OPS Tactical .45”, etc.) don’t have any particular meaning or refer to any firearm as far as I know.
Functional accuracy 14/15
Functionally, this is very good replica. It has blowback over a full range of movement, a full-size magazine and all the controls are located and work just as they would on the original. Even small details like the fact that the front and rear sights are separate metal parts which are fitted on to the slide replicates what you’d find on the original. This replica can be field stripped in the same way as the original.
Shooting 36/40
The first thing you need to do is to load the magazine with gas but, unlike most of the other airsoft replicas reviewed on this site, the TM Hi-Capa Custom is designed to use HFC-134a gas rather than the more usual HFC-22 (Green Gas). Many Japanese designed and manufactured replicas, such as those produced by Western Arms and KSC as well as TM, are specifically designed to work best with HFC-134a. This gas is a refrigerant (chemical composition 1,1,1,2 tetrafluoroethane) and is quite different from Green Gas which is simply propane. The main reason that Japanese replicas are designed to use HFC-134a is that there are very strict power limits on replicas in Japan and the use of this gas ensures that replicas won’t exceed these limits. You can use Green Gas in any gas powered replica, and it will give more fps and a stronger blowback compared to HFC-134a, but many Japanese replicas use plastic slides and restricted flow gas valves and these can be damaged by using higher pressure Green Gas. That said, I know that some people have used Green Gas in Tokyo Marui replicas for years without any adverse effects – you’ll find a link at the end of this article to a review of a TM 1911 that has been run on Green Gas for over six years without any problems!
For some reason, I found it more difficult to load the HFC gas into this replica without leaking that I do when filling Green Gas magazines. It wasn’t a major issue, but there was always some leakage when I filled this magazine. Once it’s filled with gas, you can add up to 28 BBs. The follower doesn’t lock down so you have to hold it down while you add the BBs to the wider part of the opening on the front of the mag. The mag inserts and locks positively. Rack the slide to queue up the first BB in the breech and you’re ready to go. Incidentally, the slide racks with a very satisfactory sound – it may be made of plastic, but at least it doesn’t sound like it! The ambidextrous manual safety can only be engaged with the hammer fully cocked and it moves precisely and smoothly. The pistol will not fire unless the grip safety is depressed, and this is also smooth and light in operation.
The sight picture is simple and very clear. There’s only one white dot, on the front blade, but it’s easy to acquire a good sight picture. The single-action only trigger is short, precise and very light indeed – so light that I had a couple of unintentional discharges before I got a feel for it. This isn’t particularly loud and the recoil effect provided by the Hi-Kick blowback simply isn’t as strong as it is on some replicas with heavier, metal slides, but the blowback action is very snappy. I know that some people don’t like the feel of the blowback action on plastic slide equipped TM replicas but, while I agree that it isn’t as powerful as some other replicas, it seemed to me to provide an entirely satisfactory shooting experience. This has good weight though, like many airsoft replicas, around 30% of the total weight is in the magazine, which does give it a slightly butt-heavy feel.
The fat, double stack magazine certainly holds plenty of gas – I was able to get more than 70 full power shots from a single fill of gas. Which also suggests that the gas efficiency of HFC-134a is as good as claimed. It also seemed to me that cooldown was far less noticeable using this gas than either Green Gas or CO2, though that’s a subjective thing which I can’t confirm by measurement.
Hop-up adjustment wheel (arrowed)
The hop-up is adjusted via a small, toothed plastic wheel under the barrel – you have to remove the slide to access it. Just like everything else about this replica, hop-up adjustment is precise and accurate. Using .2g BBs at 6m, the full range of hop-up adjustment moves the point of impact vertically by just over two inches. Even a small movement of the adjustment wheel gives a corresponding change in the vertical centre of the point of impact. Add to this the fact that the front sight is drifted into the slide and can be moved from side to side, and it should be possible to get the point of aim and the point of impact to coincide precisely. Out of the box, with the hop-up set to the minimum, mine shot precisely to the point of aim with .2g BBs.
In terms of power, my TM Hi-Capa Custom certainly isn’t going to break any records. I ran ten shots using .2g BBs over my UFC Pro chronograph on a fairly warm (20°C) day and I got the following results:
231fps
231fps
229 fps
229fps
228 fps
228 fps
228 fps
227 fps
227 fps
226 fps
Now, these readings are certainly very low for a replica rated at 280fps and I can’t explain that. However, what is noticeable is that they are amazingly consistent. The maximum difference between the highest and lowest readings is under 2.5%. If you want consistency in shooting from your replica, what you need is consistent power, and the TM HI-Capa Custom certainly has that. Am I concerned about the lack of power? Not really. I use my replicas for target shooting and plinking only. For that, I need enough power for the BB to travel on a fairly flat trajectory and to have enough energy to pierce the target cleanly when it gets there. Any additional power is actually wasted. So for me, it’s largely irrelevant whether a BB is traveling at 200, 300, 400 or 500fps as long as it works for shooting, which this replica does. However, I know that other people (especially those who shoot at longer range) disagree and want as much power as possible from their replicas. All I can say is that, for me, the standard TM Hi-Capa Custom is adequately powerful.
A full magazine of 28 .2g BBs, shot freestanding at 6m range and fired fairly rapidly. Black, centre circle is 1½” in diameter.
Below, you can see a short video showing the TM Hi-Capa Shooting.
The can shooting part of the video is fun, but it’s also a good test of any replica. I’m afraid there are more replicas than you might expect that can’t reliably hit a can at 6 metres, let alone do it rapidly, six times in succession. This tests accuracy, how easy the sights are to use and whether cooldown is an issue.
Overall, the TM Hi-Capa Custom is very, very satisfying to shoot. It has, in my opinion, enough recoil effect to be satisfying, it feels good in the hand and it’s as accurate and consistent as any BB shooting replica can be. It also seems to work flawlessly (I haven’t had a single misfeed or failure to fire) and it’s frugal with gas. I’m not sure what more you can ask from any replica?
Quality and reliability 15/15
The TM Hi-Capa Custom feels very well made and constructed. The slide fits tightly on the frame and moves with a precise action. The fit of the inner barrel inside the outer barrel and the fit of the outer barrel in the slide are both very good indeed with very little play and no gaps. The grip safety and manual safety work smoothly, precisely and with very little effort. The shiny finish on part of the slide does manage to look a lot like polished stainless steel and there are no visible moulding seams anywhere on this replica (except for a barely noticeable seam on top of the outer barrel). Even the magazine is beautifully made and finished. It was also notable that my TM Hi-Capa Custom arrived well lubricated out-of-the-box, something that isn’t true of most of the replicas I test.
Hammer in the half-cock position
Overall, I haven’t had any issues with the quality or reliability of this replica at all and it seems to confirm that TM replicas are manufactured and assembled with a care that puts some other replica manufacturers to shame. Most people also say that long term reliability with TM replicas is also good. The only thing I did notice is that the slide on the TM Hi-Capa Custom is made entirely of plastic, unlike some TM replicas where metal is used to reinforce the plastic slide. This is one of the reasons that, so far at least, I have chosen to run this only on HFC-134a, as recommended by TM.
Overall impression 14/15
This replica feels good from the moment you pick it up. It has convincing weight and feels solid, balanced and very well finished. Everything about it works precisely, smoothly and without undue effort. And it shoots like a dream – it’s accurate and amazingly consistent and extremely frugal with HFC-134a gas.
OK, perhaps it isn’t especially powerful or as loud as some replicas and the recoil effect provided by the blowback isn’t as strong as some, but overall, I don’t think you’ll particularly notice any of those things while you’re enjoying shooting one of these.
Conclusion
The TM Hi-Capa Custom makes me smile every time I pick it up. That’s all I can ask from a replica. Yes, there’s a price differential between this and some other replicas. But, believe me, there’s an even greater enjoyment differential. And if you don’t care for the standard version, the upgrade options for TM replicas seem endless. Would you like a metal slide and outer barrel with Springfield markings? No problem. Or a tightbore barrel? Or upgraded valves, springs or sights? Or custom grips in a range of eye-searing colours? Or internal and external changes that will allow you to safely use Green Gas? All of these and more are available, which means it’s possible to customize your TM Hi-Capa and make it into something completely unique (you’ll find links to a couple of places which sell custom TM parts at the end of this review). Just be careful – customizing TM Hi-Capas can be addictive, and some people have ended up spending a great deal of money on upgrade parts…
Before doing this review, I wasn’t sure that I’d care for TM replicas. The main issue for me has always been the use of plastic in their construction – I generally prefer metal replicas. However, although the slide is plastic here, just about everything else is metal which gives this replica a convincing heft and feel. Overall, I can’t recommend this highly enough. I can’t say if the Hi-Capa Custom is typical of all TM pistols, but this one is just as outstanding as the hype led me to expect. And that doesn’t happen often!
I’ll soon be publishing my first ever review of a Tokyo Marui airsoft replica on this site. Many people believe that these are some of the best airsoft replicas ever made. That’s a big claim and I hope to find out if it’s true. What is certainly true is the TM pistols are generally amongst the most expensive airsoft replicas. Are they worth it and are they really better than other airsoft replicas? I hope to address those questions in the review, but in the meantime I want to provide a short background to Tokyo Marui and to examine why this Company is still regarded as one of the leaders in airsoft innovation.
Tokyo Marui was founded in Tokyo, Japan in 1965 by two brothers named Iwasawa (the two overlapping circles on the TM logo are said to represent the two brothers) and the Company quickly became very successful as a manufacturer and distributor of children’s toys. Their very first product was the Astro Boy Glider, a plastic flying toy. There are few details of precisely what this was, but it sold over two million examples so it must have been pretty good. Not as good as the following product though – the Zero Fighter Glider sold more than three million examples! These early commercial successes were enough to set the company on a secure financial basis and by 1969 the Company had its own moulding works to produce the plastic components for their toys. In its early toys, as in almost everything it went on to make, Tokyo Marui attempted to balance innovation and novel features with providing products that were manufactured to a high standard and which were reliable in use.
In the late 1960s and early 1970s, Tokyo Marui made a lot of toys which tied-in with Japanese television shows. This is a TM model of the fictional MAT Arrow 1 attack aircraft which was flown by the Monster Attack Team in the 1970s show “The Return of Ultraman.” It looks pretty cool, but be aware that early TM plastic toys are now very popular with collectors and rare models sell for anything up to $3,000 each!
In 1979 they introduced their first model gun, a cap firing, full size blowback replica of the Auto-Mag. In 1985 they produced their first airsoft pistol, a spring powered 6mm replica of the P-08 Luger and just one year later the Company produced the very first blowback airsoft pistol, a replica of the Smith & Wesson M59. This combined their expertise in producing blowback, cap firing replicas with the emerging market for airsoft replicas. The TM M59 used a spring to move the slide backwards and gas pressure to move the slide forwards – the opposite of the system seen on most blowback replicas today, but it was a massive success in the Japanese market and the addition of blowback helped to sell the concept of airsoft to both collectors and shooters.
The TM S&W M59 wasn’t just the first TM blowback airsoft pistol, it was (as far as I know) the first ever replica pistol to feature blowback.
In 1991 TM used their expertise in manufacturing very small electric motors for RC cars and boats to produce the first AEG – a replica of the French FAMAS assault rifle. This was also a huge commercial success and TM soon had a range of AEG replicas. The commercial success of TM blowback and AEG replicas prompted many other companies based in China and Taiwan to copy these designs and the term “TM Clone” or “TM Compatible” became common in the airsoft world to describe these copies. However, despite the widespread availability of cheaper copies of their replicas, Tokyo Marui airsoft weapons remained very popular. To understand why that was, it’s probably worth looking at what makes them more expensive in the first place.
The 1991 TM FAMAS 556F1 AEG. Which was (again, as far as I know), the very first airsoft AEG
First of all, Tokyo Marui remain innovators in airsoft design (for example, in 2015 they released the first ever AEG shotgun – the AA-12 AES). You will see many replicas from Taiwna and China which are obvious copies of TM pistols, but I’m not aware of any TM replica which is a copy of a Taiwanese or Chinese product. This means that TM have to spend time and money on R&D for each new design, and the only way to get this back is to charge a little more for each replica. Those who copy TM designs don’t have to spend so much on R&D and so can charge less.
Second, TM replicas are designed and manufactured in Japan. The costs of labour and materials are much, much higher in Japan than they are in China, the Phillipines or even in Taiwan. This means that it costs more to make a replica in Japan than it does elsewhere, but the presence of highly trained and motivated staff and the use of high quality materials means that the quality of replicas manufactured in Japan is also generally higher.
Finally, TM still have their own plastic moulding works. This means that the parts for TM replicas are made in-house and are subject to careful quality checking and reliability testing. Many other airsoft producers sub-contract the creation of plastic mouldings. This method can be cheaper, but it makes it less easy to ensure consistent high quality.
TM still make toys. This is their Pro-Z Modular train set, introduced in 2008, in which all the buildings and trains are illuminated with tiny LED lights. I don’t know about you, but there’s just something about train sets that brings out the little boy in me – I’d love to own one of these!
It also seems to me that the difference in price between TM replicas and those manufactured in Taiwan and hina has decreased in recent years. Where I live, the cost of the TM Dual Stainless I’m about to review is just under €170. In comparison, the fairly similar Taiwanese WE 5.1 Hi Capa T-Rex actually sells for a few euros more while the KJ Works KP-06 Hi-Capa (which lacks the stainless finish) is around €120. The Chinese airsoft company Well offer several blowback Hi-Capas which sell for around €70 – €90. The TM version (which is most likely the original on which the other copies are based) does sell for more, but perhaps not as much more as you might think.
So, there you are. TM make airsoft replicas that are said to be better than the copies made in Taiwan and China. Is that really true? Does all that innovation, research and design actually deliver a better shooting experience? Are TM replicas worth the extra money? Hopefully I’ll answer these and other questions in the forthcoming World of Replica Air Pistols review of the Tokyo Marui Hi-Capa Custom.
You could probably make a good case that the Glock pistol represents one of the defining handgun designs of the late 20th Century. Which makes it all the more surprising that there are no officially licensed Glock replicas in any calibre. Until now! Today (Friday 22nd September), Umarex announced that they have concluded a formal licensing deal with Glock which will allow them to produce Glock replicas in both 4.5mm and 6mm.
There is no information yet on precisely which Glock models will be replicated by Umarex, though the photograph accompanying the Press Release (above) shows what’s described as the Umarex Glock 17, so that’s presumably one of the first replicas planned. The Press Release also notes that worldwide distribution is expected to begin in November 2017, so there shouldn’t be too long to wait until we find out just what’s covered.
You can read the full text of the Press Release and watch a short teaser video on the Umarex website.
Having recently re-discovered my passion for the classic Italian “giallo” films of the 60s, 70s and 80s, I often notice the protagonists, especially the intrepid police detectives, are armed with a small, but very handy, semi-automatic pistol. Naturally, I assumed this to be a Beretta and set-out to discover what model it was likely to be and if any replicas were available.
Inspector Tellini (Giancarlo Giannini) comes face to face with the murderer in “Black Belly of the Tarantula” who has a penchant for pins (thereby saving his wife and solving the crimes…) What a guy!
This proved to be more of a challenge than I thought as IMDB does not have many of these more obscure movies listed and in the one that is given, “Tenebrae”, the gun, although clearly belonging to the Beretta Series 80 family of pistols, does the lady in question little good as she is sitting next to a window instead of looking out of it… queue the ketchup!
However, following a little research I soon discovered that in most cases the pistols shown would be either Model 1934s, Series 70s or Series 80 “Cheetahs”. All feature the attractive, smooth curves and characteristic cut-out slide of the Beretta pistol; the question was: were any replicas available? Having been quite pleasantly surprised with both the WE Tokarev and Browning, I thought I would go to their website first and was delighted to see their latest addition was a “Cheetah” Mini-92 which looks an awful lot like a Model 84FS (replicas of which I now realise are also made by Umarex in 4.5mm and Gun Heaven in both 4.5 and 6mm).
A quick word with K.Don, the owner of my local shop, soon confirmed their availability in Thailand and so it was off to Suphanburi to have a closer inspection. I should like to add that since I already owned a KJ Works M9A1, I had been toying with the idea for a while of getting the more “rounded” and, in my opinion, more attractive Model 92. However, justification for another pistol so very similar to that of the M9 was a little difficult to find (even for me!), but a smaller model built along the same lines — well, that was a different story!
Comparison between the much larger, but visually and operationally similar, Beretta 92 (in this case an M9A1 made by KJ Works, also of Taiwan)
Real Steel Background
The Beretta “Series 80” family of pistols was introduced in 1976 and were chambered for .32 ACP (models 81 and 82), .380 ACP (models 84, 85 and 86) and .22 rimfire (models 87 and 89). Differences between pistols in the series, which have latterly been given the collective name of “Cheetah”, include variations in safety and trigger operation, magazine capacity (the Model 84 features a double-stack, 13 round magazine), trigger guard appearance, visibility of the slide-stop “cut-out” and even a forward tilting barrel on the Model 86 (an interesting concept and one which I would like to pursue having recently handled, but not shot, a real “tilting-barrel” Beretta at the Nakhon Sawan Shooting Club).
The WE Cheetah “Mini-92” (Model 84FS)
Packaging and Presentation 3 / 5
The pistol is presented in standard-issue We-Tech “egg-shell” type packaging inside a robust cardboard box. Although being “one-size fits all”, the gun and magazine are unable to come into contact with each other and the box is more than adequate for safe transit (and IMHO is much better than polystyrene). A small Allen (hex) key is provided should you need to remove the piston/ blowback assembly. The manual is useful and details the various parts to the gun, how to fill with gas, load 6mm balls and how to operate the pistol (although it does not describe how to field-strip). These processes are given in Chinese, English, Spanish, German and Italian (although the exploded diagram and parts listing is only in Chinese). Two colours are available; I chose silver/ nickel over black.
Visual Accuracy 8.5 / 10
Whilst still in the shop, I “turned-detective” in order to determine which version of the Series 80 “Cheetahs” this gun by Wei-Tech most closely resembled, if any at all. The first thing I noticed was the trigger guard which is quite prominent and has a serrated front edge.
Then came the lack of a cut-out for the slide stop. Earlier versions of the “Cheetah” had a visible cut-out on the left-hand side, but this is now hidden from view on the more modern guns. Needless to say, it did not take long to deduce that this “Mini-92” bore more than a passing resemblance to a Beretta Model 84FS.
By comparing the photographs given below, it is clear to see that, markings aside, the 6mm replica is to all intents and purposes identical to that of a real 84FS (photo courtesy of “impactguns.com”). The only differences I can see are that the sights are black and the small screw under the rear sight is simply an indentation.
The markings are another matter, but at least some have been included, are relevant to the pistol and are stamped/ engraved along the frame reading “CAT.5802-MOD.8 F-CAL.9 Short”. The grips are black plastic, although I have seen wooden Beretta grips fitted to a Mini-92 which enhance the overall look of the pistol.
The same attention to detail goes for the right-hand side except where the fake extractor is black as against to silver (but full marks for fitting one as an extra item in the first place). Interestingly, the Italian proof marks “BD” (indicating it was “proved” in 1994) are shown on the trigger guard whereas they would normally be found on the frame above the trigger on a real Beretta.
The markings on the outer barrel read “CAL.9 Short” with “360 Auto” underneath… I would have thought “380” would have been more appropriate, although it is very small lettering and barely noticeable. The magazine is appropriately marked “CAL. 9 SHORT”. Again, all these markings are etched or stamped very well (they are not painted) and IMHO go towards the overall visual appeal of this gun.
Functional Accuracy 13 / 15
Functional accuracy is excellent with, as far as I am aware, everything working as it should. The recoil spring is perfectly balanced for this kind of gun and feels very realistic when chambering a round (it also sounds the part, too). The serrations on the rear of the slide have a “sharp” feel to them and allow for a very positive grip between finger and thumb. The gun works in both double and single action. To operate in double action, a ball must first be loaded by pulling back on the slide. The safety switch is then moved up in order to decock the hammer thereby making it “safe”. Pushing down on the safety will then allow the gun to be fired. The trigger pull is extremely smooth in both double and single action. The hammer may also be released manually.
Ready for shooting in “double-action” with the safety applied and the hammer at the half-cock position. The sights are an interesting variation to the more commonly found “three-dot” pattern.
Being a WE gun, one expects the internal mechanism to closely resemble its real counterpart, and it doesn’t fail to deliver. Field stripping is carried-out in a straight-forward fashion by removing the magazine, checking the breech is empty (not really necessary on 6mm “airsoft” as the propellant is housed in the magazine, but good practice none the less), pushing the small button on the left-hand side of the frame and rotating the lever on the opposite side down through 90°. The slide may then be moved forward, the guide rod and recoil spring removed followed by the outer barrel and hop-up assembly which slides slightly forward to clear the loading nozzle and down (the barrel and hop-up are pinned together as one unit). The outer barrel is threaded for a silencer.
Shooting 30 / 40
Green Gas/ propane is loaded in the base of the magazine and I have not experienced any leaks so far. The follower is rather short, but may still be caught and held down by a thumb nail whilst 6mm balls are loaded from the top. The pistol sits nicely in the hand, is well balanced and very enjoyable to shoot. The recoil is crisp and relatively strong for a gas-blowback pistol, producing muzzle velocities in the region of 295 +/- 5 fps using 0.20g ammunition (which I have found to suit it best). The slide locks back when the last shot is fired and may be released by depressing the slide stop or by pulling back and releasing the slide.
IMHO, it would be great if WE were to introduce slightly more powerful versions of their guns, perhaps approaching two joules of muzzle energy, for those wishing to use them for target shooting/ plinking as against to skirmishing.
The following targets were shot using a two-handed stance from 18 feet (5.5m). Both were shot as two sets of five shots at each silhouette. I think it is fair to say that a 1 ½ inch grouping is quite easily achievable, albeit having to aim about 1 ½ inches above POI. The magazine will hold fifteen 6mm “double-stacked” balls with about four full mags (cheers Marc!) from a single charge of gas. It seems to suffer little from the “cooldown” effect.
The hop-up is not very effective, with BBs starting to fall at longer ranges of greater than 15m (although lateral accuracy is still good). In fact, adjusting the hop-up wheel on mine seemed to make very little difference at all.
Quality and Reliability 13 / 15
I have had this pistol for a little over a month and, apart from the hop-up, have not experienced any problems so far. It is made of metal alloy and feels solid and well assembled. Even with the slide removed, there are no extraneous movements to any of the parts; with the slide fitted it feels just right. I was slightly concerned with what appeared to be a very small abrasion to a piece of metal in the hammer assembly (see photo).
However, this was also present on another Mini-92 in the shop and has not deteriorated in any way, even when viewed through a magnifying glass. I would suggest this is part of the original manufacture/ design. The silver/ nickel finish seems to be good and on a par with that of their Tokarev TT-33.
Overall Impression 13 / 15
My overall impression of the WE Mini-92 is an extremely good one. It both feels and operates in a very realistic fashion and, markings aside, should be considered to be a fine replica of a Beretta Model 84FS. One would hope that a licensed version may be introduced at some point in the future. My only other real comment would be to reiterate that slightly more powerful versions be made available, perhaps using an easily identifiable dual-magazine system, for those of us who simply wish to participate in a little informal target shooting at home.
Complete with black gloves and sunglasses (stilettos, Fedoras and of course an alibi come extra!)
“Classic” is an overused and seldom defined term. What exactly is a “classic” handgun? Ask ten people and you’ll get ten different answers. However, there are a small number of handguns which I’m confident would appear on most people’s list, including the one I want to talk about in this article: The Walther PPK. Although it was introduced more than eighty-five years ago, the PPK is still available, virtually unchanged from its original form. That in itself is testament to good basic design, but the PPK is also perfectly sized, a decent shooter and of course it has an association with a certain British secret agent…
Development
The pocket pistol (what we’d now call a compact or sub-compact design) wasn’t a new idea in the 1920s. A number of manufacturers including Colt, Mauser and Steyr all offered small, easily concealed semi-auto pistols. However, most were of a hammerless design and all were intended to be carried with a round in the chamber. Manual safeties were provided, often of the cross-bolt type, but accidental discharges due to light, single action triggers were frighteningly common. Revolvers, which required a long, double action trigger pull were generally safer, but less popular for concealed carry due to their greater bulk. What the market wanted was a compact semi-auto pistol which incorporated a revolver style double-action trigger.
Fritz Walther, the eldest son of founder Carl had persuaded his father to enter the pistol market in 1908. Recognising the need for a safer pocket pistol, in 1924 Fritz registered a German patent for a “self-loading pistol with magazine and revolver self-cocking lock and double action trigger”. Development continued until 1929 when the Walther PP (Polizei-Pistole) was released. The PP was a mid-sized, blowback operated design with an external hammer and a trigger which operated in both double and single action. Additional safety elements included a manual safety which also locked the trigger and hammer, a de-cocker and a loaded chamber indicator. Another notable feature was the takedown system – rather than using a separate lever or catch, the trigger guard of the PP was hinged at the rear. Rotating the trigger guard down and letting it rest against the frame allowed the slide to be removed. Reliability, safety and a reasonable price ensured that the PP immediately became popular both as a police handgun in Germany and as a civilian weapon in that country and elsewhere.
The Walther PP
However, though it was smaller than a full-size military pistol, the PP was still relatively large and was mainly used as a sidearm by uniformed police. Walther almost immediately began work on a more compact version suitable for use by undercover and plain-clothes officers. In 1931, the Walther PPK was released. Visually and mechanically similar to the PP, the PPK featured a shorter barrel and grip and a smaller capacity magazine, making it the perfect concealed carry weapon. Incidentally, the “K” in PPK stands for Kriminalmodell (Detective model) and not Kurtz (Short) as is sometimes claimed.
Early Walther PPK produced in Zella-Mehlis
Use
The PPK was an instant success, being quickly adopted by police and civilian users in Germany and elsewhere. Both the PP and PPK also became very popular as German officer’s sidearms. In this period, German army and navy officers were given an allowance to select and purchase their own pistols, and very large numbers chose the small and light Walther pistols and not, as Hollywood would have us believe, the larger and heavier Luger.
Why was the PPK so popular? The de-cocker and double action trigger certainly made it less prone to accidental discharge than some other pocket pistols of the period and it was a reliable and effective shooter. It was also relatively cheap, being one of the first commercially produced handguns to use pressed steel parts. But most of all it was the perfect size. Very small handguns are difficult to grip and fire accurately. The PPK was just big enough to provide a good and comfortable grip while being small and light enough for concealed carry. Even more than the PP, the PPK was an instant commercial success.
Post-war Walther PPK from Ulm, with “pinky rest” magazine extension
Initially, the PPK was manufactured at the Walther plant at Zella-Mehlis in Thuringia, Germany. Following World War Two the plant was relocated to Ulm in Baden-Württemberg, though for a number of years firearm manufacture was forbidden by the Allied powers. As a result, in 1952 Walther licensed production of PPK series pistols to Manufacure de Machines du Haut-Rhine, a French engineering company better known as Manurhin. Manurhin produced the PPK from 1952 until 1986, though their licensed versions continued to feature Walther markings. Production of the PPK at the new Walther plant in Ulm finally resumed in 1955, though early models utilised many parts manufactured by Manurhin. It wasn’t until 1986 that full manufacturing and production of the PPK was undertaken in Ulm and this continued until 1999. The only significant new version produced during the post-war period was the PPK/L, featuring a lightweight dural frame.
Manurhin Walther PPK
In 1978, Walther also granted a manufacturing license to US Company Ranger Manufacturing to produce both the PPK and the new PPK/S. These versions were distributed in the US by Interarms. The PPK/S was produced in response to the US Gun Control Act of 1968 which set minimum sizes and weights for imported handguns. The PPK was simply too small to comply with these new requirements, and the slightly larger PPK/S was produced by combining the slide and barrel of the PPK with the frame and grip of the original PP. From 2002, Smith & Wesson began production of a licensed version of the PPK/S in the US. S&W are currently the only producers of the PPK and this pistol remains part of their range.
Interarms stainless steel Walther PPK/S
The PPK was produced in several calibres. The majority were 7.65mm, though a 6.35mm version was produced in relatively small numbers. The PPK was also available chambered for the .22LR round, principally to provide a police practice and training weapon which used much less expensive .22 rimfire ammunition. The PPK was also chambered for the 9mm short (9x17mm, also known as the .380 ACP) cartridge, but this was considered the limit for the strength of the slide and no versions were produced using the more powerful 9mm Parabellum (9x19mm) cartridge.
Visual style
I don’t normally consider the appearance of a pistol separately. After all, a handgun is a functional piece of equipment which is principally designed to operate efficiently rather than to look good. However, there is something about the appearance of the PPK that I can’t entirely explain but which makes this pistol look as fresh now as it did in 1931. As is the way of things, I started to wonder why that might be…
The design of any item is inevitably influenced by events in the wider world. The Walther PP and PPK were designed at a time of political change and social turmoil in Germany. However, this period was also notable for the influence of the German Bauhaus art movement. Started in 1919 by German architect Walter Gropius, Bauhaus took the concepts and philosophy of high art and translated them into the industrial production of everyday objects. Rejecting the ornate and ostentatious Art Nouveau which had gone before, Bauhaus stressed simplicity, functionality, unity and ease of use and manufacture. A Bauhaus artist had to be not just creative in an abstract sense, but also capable of translating this into functional and useful manufactured objects. Though it’s notable that many of the things created by Bauhaus artists also have a timeless and elegant aesthetic that makes them as visually appealing as they are functional.
“It is harder to design a first rate chair than to paint a second rate painting – and much more useful.”
Walter Gropius, the Bahaus Manifesto
Take a look at this “cesca” chair above, designed by Hungarian architect Marcel Breuer, a leading member of the Bauhaus movement. It looked completely radical in the 1930s but, the chances are that if you visit any modern office or public space, you’ll see something very similar to this 1928 creation. Why has this design lasted so long? I suspect the answer is because it’s comfortable, practicable and simple to manufacture and yet it somehow manages to still appear contemporary more than eighty years after it first appeared.
Tokarev TT-33 (top), Walther PPK (centre), Enfield Number 2 (bottom)
I haven’t found any evidence that the engineers at Walther who created the PPK were directly influenced by Gropius or the philosophy of Bauhaus. But by the late 1920 the ideas inherent in the movement, that industrial production could and should generate objects which had artistic value, were prevalent in Germany and elsewhere. Take a look again at the PPK and consider the Bauhaus ideals of simplicity, unity and ease of use and manufacture within a visually pleasing whole. Is the PPK a Bauhaus pistol? I certainly think so. Also, try comparing the PPK to a couple of roughly contemporary handguns – the British Enfield Number 2 revolver and the Russian Tokarev TT-33 for example. Both were perfectly adequate handguns, but unlike the PPK both now look very dated and neither could be mistaken for a modern design. Somehow the PPK looks as good now as it did in 1931, which suggests a design which, in some indefinable way is “right“. Whether or not its designers were consciously influenced by Bauhaus, I believe that the PPK embodies the ethos of the movement perfectly.
James Bond and the PPK
However, one of the reasons the PPK is so well known has nothing to do with its abilities, design or appearance. The James Bond novels of Ian Fleming were hugely popular in the 1950s and 1960s. Strangely however, for the first five novels Fleming provided his hero with a Beretta 418 in .25 calibre. Which is an ineffectual and rather rubbish gun for such a tough hero.
Beretta 418. James Bond gun? Really?
In 1957 while he was writing the sixth novel, Fleming received a letter from Bond fan and firearms expert Geoffrey Boothroyd who pointed out that the Beretta was “a lady’s gun – and not a very nice lady at that!” Boothroyd suggested that it would be much more appropriate to provide Bond with a Walther PPK in 7.65mm calibre. Fleming agreed and Boothroyd went on to provide advice about firearms for the following Bond novels. In recognition, a new character was introduced in Dr No; – Major Boothroyd, the MI6 armourer known as “Q” who is described as “the greatest small-arms expert in the world”.
When Albert “Cubby” Broccoli came to make the first movie based on a Bond novel in 1962, the screenplay was based on Dr No, and so the movie Bond (then played by Sean Connery) exchanged his Beretta for a PPK from the very start. The PPK continued to be 007’s screen sidearm for sixteen more films and 35 years, until in Tomorrow Never Dies in 1997 it was swapped for a Walther P99. However, with the advent of Skyfall in 2012, the third film starring Daniel Craig as Bond, the character once again reverted to using a PPK, albeit modified with a palmprint recognition system. The Bond connection gives the PPK additional cachet, and ensures that it is recognised by people who otherwise know very little about firearms.
Walther PPK Replicas
Given the enduring appeal of the original plus the James Bond connection, there have been surprisingly few decent replica air pistols based on the PPK. Ignoring spring powered replicas, I’m aware of just two: The Umarex PPK/S in 4.5mm and the Umarex/Maruzen PPK in 6mm.
The Umarex Walther PPK/S – this is the new version with a concealed CO2 screw
The Umarex CO2 powered 4.5mm version was introduced back in 1999 and was the first Umarex blowback pistol. In some ways it’s a great replica – all metal, heavy with great fit and finish and strong and snappy blowback. Unfortunately in other ways it’s not so good. I don’t care for the moulded-in-place slide-mounted safety, or the actual safety which is a moving lever at the front of the right grip (though it’s similar to the safety fitted to some prototype PPKs). It’s also fairly inaccurate compared to more modern BB shooters. However, the main issues for me are the large and visible CO2 tightening tab at the base of the grip and the shape of the grip itself, which has been stretched to accommodate the CO2 cartridge. The tab can be replaced with something less obtrusive, but there’s nothing you can do about the lengthened grip which, to me at least, completely loses the pleasingly squat profile of the original. However, this is overall a decent PPK/S replica and it does have the virtue of being readily available and relatively cheap. It’s notable that in 2016 Umarex introduced a new version of their PPK/S which has a concealed CO2 tightening screw (though it appears to be otherwise identical to the previous version). That’s certainly much better visually, but I haven’t yet managed to shoot one of the new Umarex PPK/S models, so I can’t tell you if it’s a better shooter.
The Maruzen Walther PPK
The 6mm Walther PPK from Japanese manufacturer Maruzen is a much better visual and functional replica (it’s also licensed by Umarex, but for the sake of clarity I’ll refer to it as the Maruzen PPK here). It’s a gas powered blowback replica and the slide mounted safety, magazine release and takedown all work as they do on the original. It incorporates Walther markings and this version accurately replicates the short, squat grip of the original. Even the magazine incorporates a pinky rest, just like the original. The metal finish version looks particularly good and in 2011 a 125th Anniversary edition (celebrating 125 years of Walther) was released. However, this is an all plastic replica which is very light (around 375g) and it shoots only in the 220-240fps range, so it isn’t particularly powerful. It can also be very difficult to find new, and production seems to be sporadic.
Shooters Design (a company specialising in aftermarket parts for airsoft guns) produce a full metal kit for the Maruzen PPK, which replaces the plastic slide and frame with metal versions, though a heavyweight slide return spring is also required. I’m not sure if this kit is still in production and it is certainly hard to find. The Maruzen PPK has good functionality and looks good, but is too light to be an entirely convincing replica and it isn’t a particularly great shooter out of the box. Upgrading by using the Shooters Design kit is said to improve look, feel and function, but this is also a pretty expensive option. You can expect to pay around £125 ($200) for the basic pistol and over £200 ($325) for the upgrade kit, if you can find one. I have been looking for a Maruzen PPK and an upgrade kit for some time, and if anyone has either one they’d be willing to donate or sell for review, I’d be very happy to hear about it!
Conclusion
Whether you regard it as a piece of Bauhaus art, an industrial artifact from a significant historical era, a James Bond movie prop or simply a compact and pointable handgun, the Walther PPK doesn’t disappoint. It’s small, light, looks great, fits most hands and shoots better than its small size and relatively antiquated design would suggest. It’s no accident that in 2003, when Walther engineers set out to create a new compact pistol (the PPS), they used the weight and dimensions of the PPK as a guide to what looked and felt right. If ever a handgun deserved the “classic” label, it’s the Walther PPK.
It’s disappointing that the PPK is currently under-represented in the replica world. The Umarex and Maruzen versions both have good points, but neither is entirely satisfactory. We’re still waiting for a weighty PPK replica which is also a decent shooter and mirrors the functionality and distinctive look of the original.


 In replica terms, hype is a double-edged weapon. It can mean that you assume something is going to be good before you ever pick it up but it can also mean that you have expectations so high that the reality is bound to be disappointing. For these reasons, it’s not easy to approach a review of a Tokyo Marui replica pistol completely objectively. After all, TM have a reputation for producing some of the finest airsoft replicas. But hey, this is the World of Replica Air Pistols and the word “objective” is right up there on the site banner, so, let’s put those preconceptions aside and take a look at the TM Hi-Capa Custom. Is it really as good as they say? Is it worth the money? Will I run out of superlatives before I finish the review? Sit down, strap-in, grab a mug/glass of your favourite beverage and let’s take a detailed look at this iconic replica.
 A 1911 Hi-Cap by the Springfield Armory Custom Shop